Showing posts with label cookies. Show all posts

Friday, September 28, 2012

London, a second (third?) home


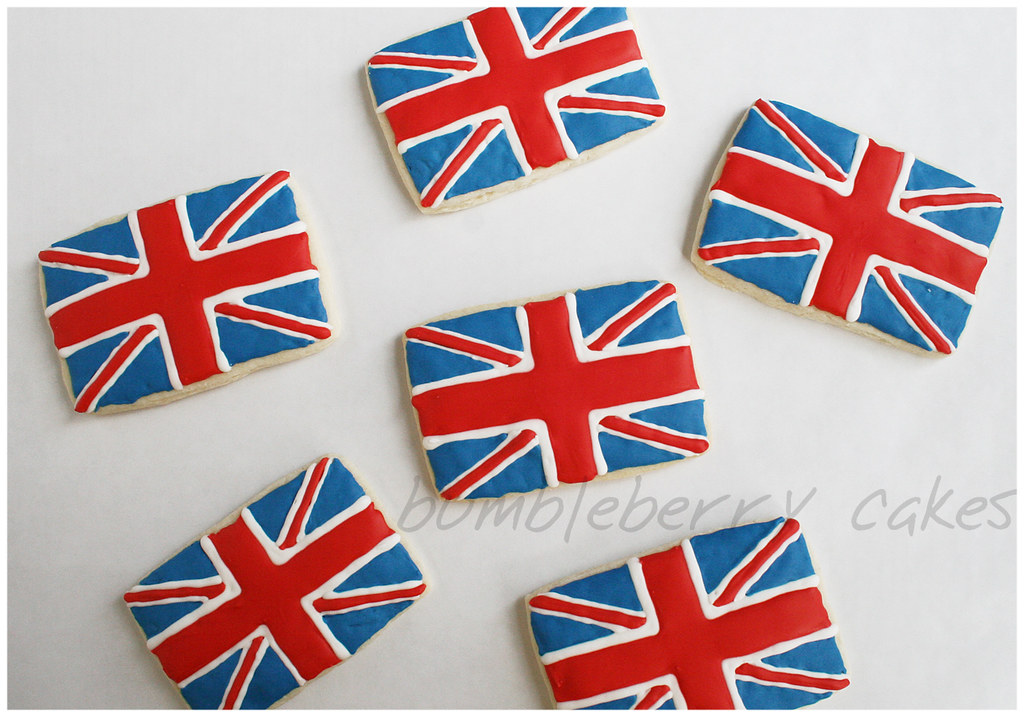
I know I've mentioned on this blog before but I used to live in London about 10 years ago and loved it dearly.  Well, I'm finally getting back this week and I made some cookies a few weeks ago in anticipation.  When I think of England, I think the Union Jack, PG Tips and football!

Even though I lived there for years, I'm ashamed to admit I didn't do all the touristy stuff I should've.  Never went to Buckingham Palace or Westminster Abbey.  It almost seemed unnecessary.  I had to go to work and go to school and junk; I didn't have time to stand around with tourists! But I should have made time because now I'm one of those tourists.  Sort of.


It's a weird mix of seeing new stuff (The London Eye was just opened and SO touristy when I was there) and old favorites (omg omg Harrod's I love so muhuhuhuch). AND my 15 year old nephew is going to experience a new country for the first time. I'm so excited for him!


About the cookies, I tried a new technique of completely painting with coloring diluted with vodka (because it dries quick).  On the red roses, I used a color pen for the detail and softened it with a brush. It's a technique I'd like to play with a little more with better brushes but I liked it! Like little canvases!


So this Sunday, I'll be in London having Sunday roast then watching Downton Abbey.  UGH.  SO English!!  I'll check back in a couple weeks when I return!  Cheers!

Sunday, September 16, 2012

Football is finally here!


My family is Texan and, as such, we are football people.  I went to UT who (sorry my dear Aggie friend, Kelly) have the greatest football team in the state (country WORLD; what? we Longhorns are a proud legion).


I grew up watching the Houston Oilers and was quite heartbroken when they were dissolved in 1998.  Then in 2001 we finally got football back in Houston and all was good in H-Town. (hey, check it out Aggies: even the Longhorn is the symbol of all Texans. IN YO FACE.)


So we do fantasy football in my family and another league with friends.  Being as excited as I was for the season, I made these for our drafts and was pretty pleased with how they came out.  The Texan was, obviously, the hardest and the only one I did by a template. I used a #1 tip and went verrrrrry slow. lol.  If I was to do it again, I'd attach the fragile piece to a solid backing before putting it on the cookie; it was VERY thin, didn't sit flat on the uneven cookie base, and broke easily.


The other teams were my friends' favorites which were fun to give out to them. I'd have to say, as much as I love the Texans symbol on everything, I think the footballs were my favorite.  Footballs don't even look like that anymore but they're just so precious!

The Texans are looking good this year but I'm a superstitious gal so I won't say anything more. Except ANDRE JOHNSON IS MY PRECIOUS DARLING.

Monday, May 14, 2012

Cookies for Mom


My mom specifically told me not to buy her anything for Mother's Day. I mostly acquiesced; I'd already bought her a card. But I know she likes the cookies I bring over for Sunday brunches so I made a batch just for her.


I also usually get her flowers so I decided on cookie roses instead of real ones.  These'll last longer (in the freezer)!


Happy (Belated) Mother's Day, to all moms!

Sunday, May 13, 2012

LOKI'D

There's a moment when you're decorating that you survey your work and just throw up your hands and call it a loss.  I pretty much did that with these cookies but I have a pretty legit source for my frustration. The god of mischief has struck, determined that I not render him in cookie form. I guess he's not keen on being devoured by mortals.


First, I found these adorable action figures and immediately decided I wanted to make them into cookies.  I quickly realized they'd be the most difficult design I'd ever attempted and grew wary... Almost dreading the decorating, to be honest.  But I'd committed myself (and already made the cookies) so I couldn't back out.  So I went into it with trepidation.

But to back up really quick, as I'm mixing the dough, adding the flour to make it come together, my poor Kitchenaid starts straining with some severity. I turn it off, only to see the pin holding the head to the base almost completely worked out. I try to maneuver it back in place - hell, I took a hammer to it (not Mjolnir, unfortunately) - and still nothing.  And suddenly I realized what happened.


UGH. FINE. See if I make your cookies again, prankster!! (JK; I love you!)

So he broke my mixer.  I borrow my mom's to make the icing and decide to try a new recipe that looks super simple from the popular blogger's video. I make the colors and sit down to decorate and it is absolutely WAY too thick. I don't understand; it looked fine in the bowls! I give up and wait a day, go back and thin all the colors and start over.  Slightly better but now it's almost too thin! UGH, THIS ICING IS TOO FICKLE. And then I realized...

By the end of this whole ordeal, I'd mostly given up. They didn't come out as I'd wished but I've learned some things: that freakin icing is not for me.  And if designs look difficult from the word go, they're going to be freakin hard.


My one amusement from this batch was this.  The multiples of Loki!  It makes me laugh.  So many Lokis!  Which one is real?  I'll never not fall for that, right, Thor?


See the icing consistency from the first try (on the lightning) and the second day, after thinned on Mjolnir? 

Mjolnir turned out to be my favorite.  I used an edible marker/pen to detail it so it's the only one with any definition.  I attempted to detail Thor and Loki's helmets as well and they came out junk so I nixed that quick.


Sunday, April 22, 2012

April 22 - Earth Day


Happy Earth Day!  Not only do I super love Earth Day because of the awesome sentiment and the beautiful greenery that goes with it, it's also my birthday! In my quest to find ideas for designs, I came across some lovely cookies from a young lady who had a giveaway and declared Earth Day was someday in March and I went 'Nuh uh never!!'  It's always April 22nd!


Sunday, April 15, 2012

April Showers!


So the cookie obsession continues and each time I'm trying new techniques (sugar coating, wet-on-wet flowers) and learning through trial and error.  I tried a new recipe (not these pictured) and they held their shape wonderfully but didn't taste great. They were kind of your typical bleh sugar cookie. I really like Sweet Sugar Belle's recipe however, as you can see (especially on the umbrella), they spread a bit.  Even in her notes, she acknowledges this issue and suggests adding a little more flour. I'll try that next time because I thought chilling the dough might help but it had no effect at all! Next time: more flour.

Sunday, April 8, 2012

Cookies, Part Deux


Happy Easter!

In case you missed my Game of Thrones cookies post, I am kind of crazy into the cooks these days. Like, researching best techniques, buying all the tools, finding designs, etc.  This week was crazy baking-wise but I knew after the relative failure of the GoT cookies, I wanted to try, try again.  Easter was the perfect excuse!

I had better success on these but still not perfect. At this point, it's just about practicing. New techniques, seeing what works and what doesn't. My biggest issue was definitely the consistency: I was gun shy this time after the GoT royal icing was way too thin so for these I went a smidge too thick. I mean, they leveled off eventually (most of them) but I've watched dozens of tutorials and some decorators just squeeze it out of the bottle and it makes a lovely roundness and sets perfect and fast. That was the thing; I had to work it into place too much.  So.  Consistency still needs work!

(Bunnies love clover!)

Also, I used the same cookie recipe from Sweet Sugar Belle and they taste great but mine spread a little bit too much. Might be an oven that runs too hot.  Will experiment and report back!

As for the royal icing, I tried a new recipe from Lizy B Bakes and found it dried and worked wonderfully. I may just make this my go-to recipe!

Lizy B makes kind of amazing things so I was inspired by her design work, Sugar Belle's and many others.  I can wholeheartedly admit my own designs were the ones I liked least. HOWEVER, I will get better as I practice more and get more ideas from the brilliant bakers who blog and share their gorgeous work! (Thank you, thank you for sharing!)


A small note about the watermarks/blog name on the pics: I've never marked my pictures in the past because I thought no one would really take anything of mine. There's two reasons I'm doing it now. #1. It's kind of heartbreaking to see a picture you worked on setting up and making junk for being reused without credit. Like, my stomach falls out when I see one of my pics just randomly somewhere. So avoiding that feeling is a good thing.

And #2. I've noticed a few other blogs doing the same and realized, as I saved the picture to study later, it was a GREAT way to remember whose it was! I was cruising blogs, right-clicking away and when I went to study the pictures, there's the name of the creator right there! Now I can credit them easy! It takes the hassle off me to remember who made what and making my life easier is always a bonus! So that's that!

And everyone in my family got personalized egg cookies so, since my dad is in Houston, here you go, Dad! Love ya!


(The little chicky was my favorite!)

Tuesday, March 20, 2012

Game of Thrones: Winter is Coming!


Like most chefs I know, my cooking adventures too originate from seeing something and thinking, 'I wonder if I could do that...' I've seen hundreds of beautiful, intricate and amazing sugar cookies and I never thought twice about trying them. And one day it was just like, 'Hey... SUGAR cookies...'

Also, I'm crazy into Game of Thrones right now and I really wanted to geek out about it. Hence, decorated cookies. (The best part? At random intervals, such as coloring the red icing, I'd just suddenly think, "A Lannister always pays his debts." WEE!)

Saturday, January 22, 2011

Chewy Sugar Cookies

One can never have too many sugar cookie recipes. I've discovered this on my neverending journey to find the absolute best. Because I stumbled on a problem: there is no BEST. Sometimes you want chewy sugar cookies and sometimes you want sturdy but tasty ones for decorating and sometimes you want crispy, etc. Old Reliable (Cook's Illustrated) has taken care of one of these categories: the Chewy Sugar Cookie.

There's a few different techniques you can use to make each batch of these different and just a little alteration will affect them dramatically. Just a little more bake time and a perfectly crisp outer ring with chewy center turns into a full-on crunch show. So tread carefully with the first batch and see what works for you.

You can also press the ball of dough with the bottom of a glass to get the aforementioned perfect crisp/chew OR you can leave the dough in balls which results in a chewier, more raw taste (but it's cooked; trust). You can see the difference in appearance as well.

Personally, I like the flatter cookies because they came out with that chewy, soft center every time. I had family over for the holidays as I made these and they were served warm, fresh from the oven. An instant hit! (They keep really well too.)


CHEWY SUGAR COOKIES
Source: Cook's Illustrated


Note: The final dough will be slightly softer than most cookie dough. For the best results, handle the dough as briefly and gently as possible when shaping the cookies. Overworking the dough will result in flatter cookies.

2 1/4 cups (11 1/4 ounces) unbleached all-purpose flour
1/2 teaspoon baking soda
1 teaspoon baking powder
1/2 teaspoon table salt
1 1/2 cups (10 1/2 ounces) sugar, plus 1/3 cup for rolling
2 ounces cream cheese, cut into 8 pieces
6 tablespoons (3/4 stick) unsalted butter, melted and still warm
1/3 cup vegetable oil
1 large egg
1 tablespoon milk
2 teaspoons vanilla extract


1. Adjust oven rack to middle position and heat oven to 350 degrees. Line 2 large rimmed baking sheets with parchment paper. Whisk flour, baking soda, baking powder, and salt together in medium bowl. Set aside.

2. Place 1 1/2 cups sugar and cream cheese in large bowl. Place remaining 1/3 cup sugar in shallow baking dish or pie plate and set aside. Pour warm butter over sugar and cream cheese and whisk to combine (some small lumps of cream cheese will remain but will smooth out later). Whisk in oil until incorporated. Add egg, milk and vanilla; continue to whisk until smooth. Add flour mixture and mix with rubber spatula until soft homogeneous dough forms.

3. Divide dough into 24 equal pieces, about 2 tablespoons each (or use #40 portion scoop). Using hands, roll dough into balls. Working in batches, roll balls in reserved sugar to coat and evenly space on prepared baking sheet, 12 dough balls per sheet. Using bottom of drinking glass, flatten dough balls until 2 inches in diameter (or a little less than 1/2 inch tall).

4. Bake, 1 tray at a time, until edges are set and just beginning to brown, 11 to 13 minutes, rotating tray after 7 minutes. Cool cookies on baking sheets 5 minutes. Using wide metal spatula, transfer cookies to wire rack and cool to room temperature.

Monday, December 20, 2010

Oranges for Christmas


Every Christmas, since I've been living on my own, I've picked a very rigid color theme to decorate my tree and home. At first, my family snickered at me because I couldn't have anything but the Designated Color/Theme wrapping paper under my tree. And I don't know WHY I started doing this. Probably because I'm a control freak. But start I did. The first year was relatively easy: silver and gold. The second year, I had this magnificent idea: turquoise and lime green! My mom balked at me and my enthusiasm deflated and I settled on red, white and silver. I will never go against my instinct again; I regretted it the whole time and the next season, all the stores had those turquoise and green decorations! But the draw to it had passed. If only I'd followed my gut! ARGH.

The year after, 2007, was my Houston Oiler's colors, red and light blue. It was lovely! Then 2008 was inspired by the Pottery Barn garden theme so it was all naturals and greens and golds! I think that one was my favorite because there were birds and butterflies and adorableness. Of course, with all that natural greenery, I went the opposite in 2009 and was all winter: blues and silvers and whites and snow. And that was okay but nothing that I was crazy about.


This year, like every year I'm crazy about a theme, I see one thing and cling to it and make my entire theme around it. This year, it was a wreath from Williams-Sonoma: simple evergreen with dried oranges and pinecones. Orange and chocolate. It hooked me immediately. And the thing is, I don't even really like oranges in general. But they're such a wonderful Christmas tradition that I never even knew about. My theme evolved to winter fruits, oranges and cranberries, so there's splashes of red color mixed in!

First, I made dried orange slices for Christmas ornaments and, dude! They came out WAY better than I could've hoped for! So vibrant and natural and purdy! And EASY. I also made a clove orange pomander (as seen above) that came out lovely! Probably my favorite thing this season so far!


DRIED ORANGE SLICES

1. Preheat oven to 250. Slice oranges 1/4" thick. Dip in mixture of half fresh lemon juice, half water. Place on wire rack set above rimmed cookie sheet. (Or you can place slices directly on your oven rack as some instructions say, but I was afraid of juices dripping in my oven.)

2. Let dry out at 250 for 1 hour, turning slices over every 30 minutes for even drying. Lower oven temperature to 225 and dry for another 2 hours, again, turning every 30 minutes.

3. Take out of oven and let cool to room temperature. I did not even store the dried slices in an air-tight container because I was afraid moisture would build up in it; I WANT them dry and preserved! So I hung them right away and it's been two weeks! So far, so good!


Then I started looking for orange or orange/chocolate recipes. I found a few and, long story short (too late), none have blown my skirt up. I made Cranberry Orange Muffins from Williams-Sonoma that were thoroughly disappointing with fresh cranberries. They were unbearably tart and the recipe called for too many! Then there was an orange-flavored chocolate ganache tart. Mreh. Too simplistic and nothing amazing. I'm waiting for that awesome dessert to wow me and this year, I'm just not feeling it.


I did, however, catch these cookies on Paula Deen's cookie exchange episode. They've been quite finicky for me so I say, watch carefully: since they're chocolate, there's no way of judging their doneness by how dark they are! So the first batch, I followed the Food Network recipe of 10 minutes bake time and they came out as goopy messes. The second batch I went about 13-15 minutes and they were sturdy and had a nice soft chewiness in the center. Perfect! The THIRD batch, I let go for about 15-17 minutes and wow they came out completely crunchy and hard. ARGH. Curse you, brown colored cookies!

So know your oven and make a few batches to find out how you want your cookies. I think it also made a difference in the shape: the first batch, I rolled into balls as I saw the woman do on the show. The second, which came out perfect, I left as round discs and just pat the rough edges down before sugar dusting. That gave them the nice edges and chewy center!

Overall, these are a very chocolatey and delish cookie! They're keepers!


TOP SECRET CHOCOLATE COOKIES
Source: Christy Hyer

2 1/2 sticks unsalted butter, at room temperature
2 cups sugar
2 large eggs
1 tablespoon vanilla extract
3/4 cup Dutch process cocoa powder
2 cups all-purpose flour
1 teaspoon baking soda
1/2 teaspoon salt
White Sanding sugar, for garnish

1. In a large bowl, add the butter and sugar and cream together with mixer. Add the eggs and vanilla extract to the creamed mixture and mix until combined. In a medium bowl, mix the cocoa powder, flour, baking soda, and salt. Slowly add the dry ingredients and continue mixing until incorporated.

2. Roll the dough into 2 logs that are about 2-inches high and 1-foot long. Wrap them in waxed paper and place in the refrigerator for 2 hours.

3. Preheat oven to 350 degrees F

Once thoroughly chilled, slice the cookies into 1/2-inch thick rounds and cover with sanding sugar. Place on a parchment paper lined cookie sheet and bake for 10 minutes.

Remove to a wire rack to cool.


And there's more orange and chocolateness to come! HAPPY HOLIDAYS, EVERYONE!!

Saturday, July 10, 2010

Happy Birthday, AMERICA.


YES, I am a week late for the 4th of July festivities. But, no, these cookies were not late. I made these two weeks ago in anticipation of a week-long vacation from which I just returned. So I have a good excuse and it's better late than never!

Quick story on how these patriotic treats came to be. See, I'm a big football/soccer fan and have been since I got into it a few years back in London. It was great rooting for the Three Lions (England's national team) but once I got back to the States, it had to be Team USA all the way! (Especially since we were such underdogs and needed support.) So this World Cup, I went all out and, what do you know: America flags, shirts, beads, etc all pop up in stores, right in time for our big games (and July 4th, but whatever).


My 5 year old niece saw me with all this America bling. A few days went by and we were visiting at my mom's house where she proceeded to bring me a set of patriotic cookie cutters that she bought at the store. I said, "What's this?" and she replied, "They're for YOU ... to make cookies. For ME." Oooohhkay! So I kinda had to at that point. I mean, it was sort of an order.

But truth be told, I love doing this stuff. It's not that much work and the final product coming out cute is worth every minute!

I tried a new sugar cookie recipe because I'm always on the prowl for the perfect sugar cookie. These came out nice and soft, held their shape perfectly and were hard to mess up (even after re-rolling). They never browned but did get crisp (though light) if I rolled thin enough. Keep them at a respectable thickness and they'll be nice and soft!

Also, the icing is from those tubes of Wilton "frosting" you buy in the stores. I struggled with the thought of royal icing and in the end, just made do with what I had. Turns out, that sweet frosting is really good on cookies. Think of those Lofthouse soft sugar cookies you get in the store. Mmm. But I piped on the lines and just spread the rest with a knife! It's all about adapting with what you have!


SUGAR COOKIES
Source: Williams-Sonoma

16 Tbs. (2 sticks) unsalted butter, at room temperature

3/4 cup sugar
3 egg yolks
1 piece vanilla bean, about 2 inches long, or 1 1/2 tsp. vanilla extract
2 1/2 cups all-purpose flour
1 tsp. baking powder
1/2 tsp. salt

In the bowl of an electric mixer fitted with the flat beater, beat together the butter and sugar on medium speed until light and fluffy, about 4 minutes. Add the egg yolks one at a time, beating well after each addition. Cut the vanilla bean in half lengthwise and, using a small, sharp knife, scrape the seeds into the butter mixture. If using vanilla extract, add it now. Mix well.

In a sifter, combine the flour, baking powder and salt. Sift the flour mixture directly onto the butter mixture. Reduce the speed to low and beat until well mixed.

Turn the dough out onto a work surface and divide into 4 equal portions. Shape each portion into a ball, then flatten the balls into disks. Wrap in plastic wrap and refrigerate overnight. (The dough can be prepared up to 3 days ahead.) Let it soften slightly at room temperature before continuing.

Position a rack in the upper third of an oven and preheat to 350°F. Prepare 2 large baking sheets with parchment paper.

On a lightly floured work surface, roll out a dough disk 1/4 inch thick. Using cookie cutters, cut out desired shapes. Transfer the cutouts to the prepared baking sheets. Gather up and reroll the scraps and cut out more cookies. Repeat with the remaining dough disks

Bake until the cookies are golden on the edges, about 8 minutes. Transfer the cookies to wire racks and let cool completely. Decorate the cookies as desired with colored sugars and decorating pens. Store in an airtight container at room temperature for up to 1 week.

Makes 24 to 30 cookies, depending on cutter size.

And, P.S. I AM heartbroken by our results at the World Cup. But it doesn't lessen my love for our national team and players. They're still awesome and I love them!

Tuesday, March 2, 2010

Soft Sugar Cooks


OKAY, well, there's my green; my March obligation is fulfilled! I KID. I'm planning more, trust.

I like to bake junk to thank people for being awesome to me. Or just to give because I like them. Or if it's a day ending in Y. I like giving bakery to people, okay? So a friend loaned me a TV series on DVD some time LAST YEAR. It got shuffled around in my house and shelved and I never got around to it. I pine for my loaned out DVDs sometimes so I had to make her a thank you for putting up with my forgetfulness. You can't really go wrong with straight-forward sugar cookies.


I planned to make a recipe another friend gave me. Naturally, I misplaced it (hey, like the DVD!), so I started rifling around in my saved recipes. This one caught my eye, even though it's from All Recipes, because it proclaims it's a "State Fair Blue Ribbon winner". WELL. I'm intrigued.


I love soft cookies in general so I was on board for this. They never browned up so I worried a little as I watched them in the oven but the called for 12+ minutes past with nary an edge browning. Turns out, they were perfect: lightly crispy on the outside and soft/chewy near the middle. I passed them out and everyone loved them! I later warmed them up a little in the microwave at half power for 30 seconds and woo wee. WARM COOKIES ARE TEH BEST. With a glass of milk, these are kind of perfect!


SOFT SUGAR COOKIES IV
Submitted by Laura Stearns, All Recipes.com


2/3 cup shortening
2/3 cup butter
1 1/2 cups white sugar
2 eggs
2 teaspoons vanilla extract
3 1/2 cups all-purpose flour
2 teaspoons baking powder
1 teaspoon salt
1/3 cup granulated sugar for decoration


Preheat oven to 350 degrees F (175 degrees C).

In a medium bowl, cream together the butter, shortening and sugar. Stir in the eggs and vanilla. Combine the flour, baking powder and salt, stir into the creamed mixture until dough comes together. Roll dough into walnut sized balls and roll the balls in sugar. Place them on an unprepared cookie sheet about 2 inches apart. Flatten lightly with bottom of glass.

Bake cookies 10 to 12 minutes in the preheated oven, until bottom is light brown. Remove from baking sheets to cool on wire racks.

Sunday, April 26, 2009

The lemon madeleines of doom


You know, the idea to make lemon madeleines started innocently enough. I just wanted something easy to get me back into baking after a winter-induced hiatus. And then the debacle with the oven breaking happened but I was determined to still make them once it came back. I mean, I still had the lemons and those things go bad if you don't use them.

And the thing about madeleines which makes them great and terrible at the same time is, they don't last more than a day. I'd argue a few hours, to be honest. Because they're best when they're warm out of the oven and after a few hours, they're dry and a little stale. The second day, they're useless. I probably won't make them again unless I have someone over to enjoy them as well.

But they're quite lovely anyway. :)


LEMON MADELEINES
Source: Martha Stewart

Makes 2 dozen

3/4 cup unsalted butter (1 1/2 sticks), melted, plus more for pans
1 1/2 cups cake flour, sifted (not self-rising)
1/2 teaspoon baking powder
1/4 teaspoon coarse salt
3 large eggs
2 large egg yolks
3/4 cup granulated sugar
1 teaspoon pure vanilla extract
2 tablespoons finely grated lemon zest
2 tablespoons fresh lemon juice (2 to 3 lemons total)
Confectioners' sugar, for dusting (optional)


Preheat oven to 350 degrees. Butter (or Pam spray) two madeleine pans; set aside.

Sift flour, baking powder, and salt into a bowl; set aside.

Put eggs, egg yolks, granulated sugar, vanilla, and lemon zest and juice in the bowl of an electric mixer fitted with the paddle attachment. Mix on medium-high speed until pale and thickened, about 5 minutes. Mix in butter. Using a spatula, fold flour mixture into egg mixture. Let rest 30 minutes.

Pour batter into buttered pans, filling the molds 3/4 full. Bake cookies, rotating pans halfway through, until edges are crisp and golden, 7 to 8 minutes. Let cookies cool slightly in pans on wire racks. Invert, and unmold. Dust with confectioners' sugar, if desired. Cookies can be stored between layers of parchment in airtight containers at room temperature up to one day.

Wednesday, December 31, 2008

Holiday Cookies


A few weeks ago, I made about 12 dozen cookies to give away to family and friends for the holidays. I made sugar (a bust), peanut butter blossoms, magic cookie bars, chocolate chip cookies and biscochitos. I sent packages of a variety of these goodies to friends and that was the most fun. My friends were pleasantly surprised to receive a box of cookies out of no where which makes me all kinds of giddy!


Peanut butter blossoms are a tradition every Christmas and I used this same awesome recipe for the chocolate chip cookies. This is the first year I made the biscochitos, though, which are a Mexican (or Spanish, if you want to go that far back) cookie that we always get at the Mexican bakeries in Houston. I had a few recipes but the first I tried called for lard. Now, I've never SEEN lard, I've never SMELLED lard and I've certainly never COOKED with lard before. It was definitely different. I actually kind of thought it smelled like turkey. Weird, I know. But I made the cookies which vaguely smelled (like turkey, to me) and I just couldn't give them away. I made another batch with Crisco and they were SO MUCH better. My mom said, after comparing the two, that the lard cookie tasted richer. I agree but mostly because the Crisco cookie might've been lighter because it didn't have that heavy turkey taste. (I kid! But seriously; that mess is OFF.)

So I sent out the Crisco biscochitos to my friends in the shapes of Christmasy stars! Because my first attempt at sugar cookies was a bust, I had a second go at them. (See further down.)

It's funny but I made all those cookies and because I planned to give so many away, I really only ate one or two from each batch. I had to save the rest for others! So I made another pan of Magic Cookie Bars that stayed home for family. They're kind of my favorite bar-thing on the planet so. I gots to have some for meeeee.


BISCOCHITOS

1 cup vegetable shortening
2/3 cup sugar
1 egg
2 to 4 Tablespoons red wine, brandy or sherry
1 to 1 1/2 teaspoons crushed/ground anise seed
3 cups flour
2 teaspoons baking powder, optional
1/2 teaspoon salt, optional

Cinnamon Sugar:
1/4 cup sugar
1 tablespoon ground cinnamon


Preheat oven to 350°.

Beat lard with an electric mixer until light and fluffy. Slowly beat in the sugar, then the egg. Beat in 2 Tablespoons of the wine and the anise seed. Toss the flour together with the baking powder and salt, if using. Gently stir in, adding more wine as needed to form a soft dough. Let stand for 10 minutes or cover with plastic wrap and refrigerate for 15 minutes.

On a lightly floured surface, roll out 1/4-inch thick and cut into shapes as desired. Dip the top side of each cookie in the cinnamon-sugar and place on ungreased cookie sheets, about 1 inch apart.

Bake for 10 to 15 minutes, depending upon size, just until the edges turn a pale blond. Let cool a few minutes then remove to a wire rack to cool. Store in a cookie jar or airtight container.


THEN I committed myself to making sugar cookies and it came down to Christmas Eve but I did them. Next year I'll prepare better and do them right but these came out cute. :)


Tuesday, October 7, 2008

Flaky Cookies and Tea

Sometimes the easiest dishes taste the best. There's something pure and perfect about simple flavors. My mother made these cookies MAYBE twice, about ten years ago, and I still remembered them. There's almost nothing to them but they're flaky, sometimes chewy (with cooked jelly) and they're altogether lovely.


And I've got a serious soft spot for strawberry sweets and tea. Of course, you can use whatever jelly or jam you like best! Go crazy!

A word of advice: these won't rise at all. I recommend making them the thickness you'd like in a buttery cookie (1/2-inch is ideal to me) and make deep wells for the jelly. It likes to escape its cookie when it can!

And one more warning? They're super addictive. Good luck having just one...


CREAM CHEESE / JELLY COOKIES

3 ounces cream cheese (may use 1/3 less fat)
1 stick (4 oz) unsalted butter, softened (*if using salted, omit salt)
1 cup all-purpose flour
1 pinch salt
jam, jelly, or preserves, your favorite


Cream the cream cheese and butter together. Blend in flour and salt.

Roll out on a floured surface and cut into lines dividing lines 2 x 1 inch long. Press a trowel in center with end of spoon or finger/thumb. Place a dab of preserves or jam in the center of each cookie.

Bake on an ungreased cookie sheet at 375 degrees for about 10 to 15 minutes.