Wednesday, December 26, 2007

More Peppermint??

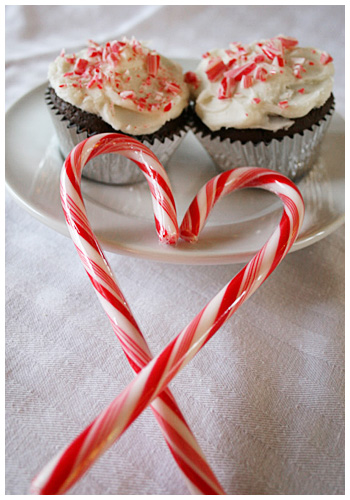
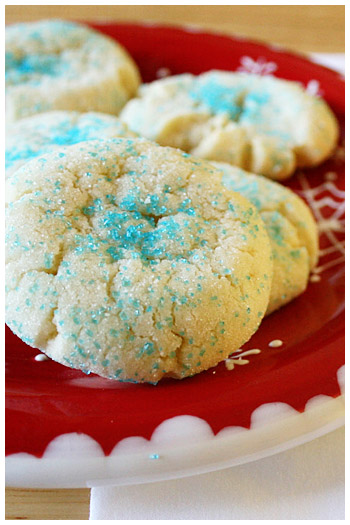
You guys know me; I'm always going to try to find a way to work cupcakes into any season. Christmas was no exception. I found only a few peppermint cake recipes, however, and feared it was because it just plain didn't taste good. Twas not the case!

I tried two different things: one batch with bits of the Peppermint Bark I made earlier sprinkled on the top of the cakes and another without. One thing I've learned is that white chocolate does NOT bake well. It gets all gunky and brown and it's not real chocolate so I don't know what's going on with it. They tasted fine; there was a crunchy-but-not texture to the top. But I'm a traditionalist and I ended up enjoying the plain cake-with-peppermint-icing ones better. It was important to leave the cake unflavored as I used peppermint oil again and it was very crisp and sharp. The icing is flavored and the cake wonderfully takes the edge off so the whole thing goes together well.

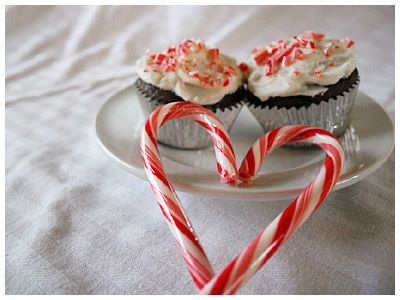
Also to note? The peppermint pieces sprinkled on top go all melty and watery the next day so frost and sprinkle at the last minute if possible (OR frost and sprinkle and then freeze). In case you're wondering, I just threw some candy canes in a double bagged baggie and went to smashing with the edge of a can.

CHOCOLATE CUPCAKES
(Adapted from Barefoot Contessa at Home)
  • 12 tablespoons (1 1/2 sticks) unsalted butter, at room temperature
  • 2/3 cup granulated sugar
  • 2/3 cup light brown sugar, packed
  • 2 extra-large eggs, at room temperature
  • 2 teaspoons pure vanilla extract
  • 1 cup buttermilk, shaken, at room temperature
  • 1/2 cup sour cream, at room temperature
  • 2 tablespoons brewed coffee
  • 1 3/4 cups all-purpose flour
  • 1 cup good cocoa powder
  • 1 1/2 teaspoons baking soda
  • 1/2 teaspoon kosher salt

Preheat the oven to 350 degrees F. Line cupcake pans with paper liners.

In the bowl of an electric mixer fitted with a paddle attachment, cream the butter and 2 sugars on high speed until light and fluffy, approximately 5 minutes. Lower the speed to medium, add the eggs 1 at a time, then add the vanilla and mix well. In a separate bowl, whisk together the buttermilk, sour cream, and coffee. In another bowl, sift together the flour, cocoa, baking soda, and salt. On low speed, add the buttermilk mixture and the flour mixture alternately in thirds to the mixer bowl, beginning with the buttermilk mixture and ending with the flour mixture. Mix only until blended. Fold the batter with a rubber spatula to be sure it’s completely blended.

Divide the batter among the cupcake pans (1 rounded standard ice cream scoop per cup is the right amount). Bake in the middle of the oven for 20 to 25 minutes, until a toothpick comes out clean. Cool for 10 minutes, remove from the pans, and allow to cool completely before frosting.


PEPPERMINT ICING
Adapted from Ooh You Tasty Little Things

  • 1 cup (2 sticks) butter, softened
  • 6 to 8 cups confectioners' sugar
  • 1/4 cup heavy cream
  • 1/2 teaspoon peppermint oil (less if desired; use to taste)

Mix butter in a large mixing bowl with 4 cups of sugar. Add cream and peppermint oil. On medium speed of electric mixer, beat until smooth and creamy, about 3 to 5 minutes. Gradually add the remaining sugar, 1 cup at a time, beating well after each addition (about 2 minutes), until the icing is thick enough to be of good spreading consistency. You may not need to add all of the sugar. Chill for about 15 minutes in the refrigerator before using, and only use to ice cold cupcakes.


Monday, December 24, 2007

Cookies Part Deux


When I saw this blog post on Ooh You Tasty Little Things, I was instantly bowled over and inspired. I wanted to make them OMGRIGHTNOW because they're so adorable!

I ended up finding a recipe on AllRecipes.com that was rated highest for sugar cookies. Now, here's the thing with All Recipes (or any recipe site that has feedback and comments): there's ALWAYS suggestions on bettering the recipe. Some people are convincing. I rarely use the original recipe as is; there is always someone yelling about there being too much flour, not enough flavor, etc. So, as usual, I went with some suggestions and they didn't come out as I expect they would have had I used the original recipe. I'm going to include the modifications I used but link you to the original. If you do make it, I'd suggest the more sugar (2 3/4 cups should do), the lemon zest (so yummy), and extra 1 tsp vanilla. Keep the flour. These didn't have enough and the added sugar made them spread out, not hold any shape (thus the circles after my stars came out all bloated) and they never cooked fully before browning.

I remember the author of the blog musing how she loved decorating cookies, bless her. As I got to my second snowflake, I thought, 'I really don't love this. I'm a cake kind of girl...' It was so much work. But the end pretty is worth it, I suppose. :)


THE BEST ROLLED SUGAR COOKIES

Source: AllRecipes.com, Submitted by: Jill Saunders


1 1/2 cups butter, softened
3 cups white sugar
4 eggs
2 teaspoon vanilla extract
1 teaspoon lemon zest

4 3/4 cups all-purpose flour
2 teaspoons baking powder
1 teaspoon salt

In a large bowl, cream together butter and sugar until smooth. Beat in eggs and vanilla. Stir in the flour, baking powder, and salt. Cover, and chill dough for at least one hour (or overnight).

Preheat oven to 400 degrees F (200 degrees C). Roll out dough on floured surface 1/4 to 1/2 inch thick. Cut into shapes with any cookie cutter. Place cookies 1 inch apart on ungreased cookie sheets.

Bake 8-10 minutes in preheated oven. Cool completely.


ROYAL ICING
Source: Joy of Baking.com

2 large egg whites
2 teaspoons fresh lemon juice
1/2 teaspoon vanilla extract
3 cups powdered sugar, sifted
In the bowl of your electric mixer (or with a hand mixer), beat the egg whites with the lemon juice. Add the sifted powdered sugar and vanilla and beat on low speed until combined and smooth. The icing needs to be used immediately or transferred to an airtight container as royal icing hardens when exposed to air. Cover with plastic wrap when not in use.
Red and blue Christmas 2007 FTW!

Peppermint Mania

Ever since Williams-Sonoma came out with their Peppermint Bark, we've gotten it one way or another at Christmas time. This year, I waffled on ordering it online ($30 for chocolate?? But I'm poor!) I procrastinated and then it wasn't an option. So I attempted to make it myself. I should have known from the word go that this wasn't the same.

First, the chocolate layer has a cream in it which is automatically going to keep it from forming solid. It's more of a very thick ganache. It's not easy to cut but it's bark and it's supposed to be roughly broken up so that's okay.

Second, I realized as I reached into my cabinet for the peppermint flavoring - oh God, it's not extract. I had peppermint OIL. Did a little research online quickly and found a guessimate that to substitute oil for extract, you should use around 1/4 of what is called for. I was very conservative with the flavoring (you can always add more but once it's in there and too much, it's ruined). If you're using oil as well, it will make a strange looking consistency (you know, oily) but it tastes fine. Just taste as you go along. Peppermint oil has a stronger, cooler, more crisp taste to it so use carefully.

Once it was finished, I took a step back to evaluate and I was kind of disappointed. I let everyone try it and they liked it a lot and it tastes fine but it's just not Williams-Sonoma's peppermint bark. Still, it was well liked so I'm chalking it up to a moderate success for that alone. :)


LAYERED PEPPERMINT CRUNCH BARK
Source: Bon Appétit

  • 17 ounces good-quality white chocolate (such as Lindt or Baker's), finely chopped
  • 30 red-and-white-striped hard peppermint candies, coarsely crushed (about 6 ounces)
  • 7 ounces bittersweet (not unsweetened) or semisweet chocolate, chopped
  • 6 tablespoons whipping cream
  • 1/8 teaspoon peppermint oil (add more to taste)


Turn large baking sheet bottom side up. Cover securely with foil. Mark 12 x 9-inch rectangle on foil. Stir white chocolate in metal bowl set over saucepan of barely simmering water (do not allow bottom of bowl to touch water) until chocolate is melted and smooth and candy thermometer registers 110°F. (chocolate will feel warm to touch). Remove from over water. Pour 2/3 cup melted white chocolate onto rectangle on foil. Using icing spatula, spread chocolate to fill rectangle. Sprinkle with 1/4 cup crushed peppermints. Chill until set, about 15 minutes.

Stir bittersweet chocolate, cream and peppermint extract in heavy medium saucepan over medium-low heat until just melted and smooth. Cool to barely lukewarm, about 5 minutes. Pour bittersweet chocolate mixture in long lines over white chocolate rectangle. Using icing spatula, spread bittersweet chocolate in even layer. Refrigerate until very cold and firm, about 25 minutes.

Rewarm remaining white chocolate in bowl set over barely simmering water to 110°F. Working quickly, pour white chocolate over firm bittersweet chocolate layer; spread to cover. Immediately sprinkle with remaining crushed peppermints. Chill just until firm, about 20 minutes.

Lift foil with bark onto work surface; trim edges. Cut bark crosswise into 2-inch-wide strips. Using metal spatula, slide bark off foil and onto work surface. Cut each strip crosswise into 3 sections and each section diagonally into 2 triangles. (Can be made 2 weeks ahead. Chill in airtight container.) Let stand 15 minutes at room temperature before serving.

Wednesday, December 19, 2007

CookiesCookiesCookies

Being a stickler for tradition, I can only make the classic Peanut Butter Blossoms at Christmas although there's nothing really inherently Christmasy about them. It's chocolate and peanut butter, you know? Alas, it's a Christmas Cookie in our family so when the month of December rolls around, it's one of the first things I look forward to. The light peanut butter cookie, the melty chocolate Kiss... Heaven.

I got kind of ambitious with the many things on my list of Christmas Foods this year so I started early. The first week I made four batches of cookies alone. (This week I'm on the more intense cakes and candies but I'll get to that later.) I made two batches of the blossoms then wanted something that would travel well and wasn't chocolate. I settled on Coconut Macaroons which turned out really good but, as my mom says, what with Eagle Brand isn't good?

Last, I knew I was going to make cut-out sugar cookies later but still craved a sugary cookie without all the work. I found a Soft Sugar Cookie on All Recipes that took a few tries with the shaping but finally came out quite nice. Simple but with a good taste. My Christmas color theme this year is red and light blue (like the former Houston Oilers! Holla!) so I rolled one set of the sugar cookies in blue and sprinkled a little more in the center just for pop.


PEANUT BUTTER BLOSSOMS

Cream together:

1/2 cup shortening
1/2 cup peanut butter
1/2 cup sugar
1/2 cup packed brown sugar (light)

Mix in:

1 egg slightly beaten
1 tsp vanilla
1 level tsp baking soda
1/2 tsp salt

Stir in:

1 1/4 cups of flour (watch for consistency; should look shiny but hold together. Add less if needed)

Roll into balls, coat w/sugar, bake 375 degrees for 10 min. Remove from oven, press chocolate kisses into each center spreading ball so edges crack. Bake additional 1-2 minutes until chocolate melts.


COCONUT MACAROONS
Source: Ina Garten

14 ounces sweetened shredded coconut
14 ounces sweetened condensed milk
1 teaspoon pure vanilla extract
2 extra-large egg whites, at room temperature
1/4 teaspoon kosher salt

Preheat the oven to 325 degrees F.

Combine the coconut, condensed milk, and vanilla in a large bowl. Whip the egg whites and salt on high speed in the bowl of an electric mixer fitted with the whisk attachment until they make medium-firm peaks. Carefully fold the egg whites into the coconut mixture.

Drop the batter onto sheet pans lined with parchment paper using either a 1 3/4-inch diameter ice cream scoop, or two teaspoons. Bake for 25 to 30 minutes, until golden brown. Cool and serve.


SOFT SUGAR COOKIES IV
From AllRecipes.com, Submitted by Laura Stearns


2/3 cup shortening
2/3 cup butter
1 1/2 cups white sugar
2 eggs
2 teaspoons vanilla extract
3 1/2 cups all-purpose flour
2 teaspoons baking powder
1 teaspoon salt
1/3 cup granulated sugar for decoration

Preheat oven to 350 degrees F (175 degrees C).

In a medium bowl, cream together the butter, shortening and sugar. Stir in the eggs and vanilla. Combine the flour, baking powder and salt, stir into the creamed mixture until dough comes together. Roll dough into walnut sized balls and roll the balls in sugar. Place them on an unprepared cookie sheet about 2 inches apart. Press gently with bottom of a glass to make into evenly thick discs.

Bake cookies 10 to 12 minutes in the preheated oven, until bottom is light brown. Remove from baking sheets to cool on wire racks.