Showing posts with label Ina Garten. Show all posts

Sunday, September 5, 2010

Green Eating (Mostly)

I'd like to explain that I've had a slight culinary 180 in the last few months but I'm not sure I can explain it fully myself. I had a crisis of conscience and, simply put, I won't be cooking meat anymore. Or eating it.

Now, this has actually produced a surge in my cooking since I won't run by a McDonald's for dinner anymore. My new eating habits require planning and forethought, which is one of my favorite things about cooking! The finding new recipes and making plans!

I have baked but only a little - the bran muffins I made last year, some with banana and walnut and some with pumpkin (instead of applesauce). They've been my go-to breakfast for the past couple weeks.

Mostly, though, I've been cooking. I made a spinach and mushroom veggie lasagna that combined two recipes - one vegan and one by Gia De Laurentis - that did neither justice, I'm afraid. It was a lot of ingredients and work and in the end, it came out bland. With some salt, it was decent, though.

I've been experimenting with roasting veggies and using my new rice cooker and trying to figure out tofu. It's a learning process and nothing memorable enough to blog about.

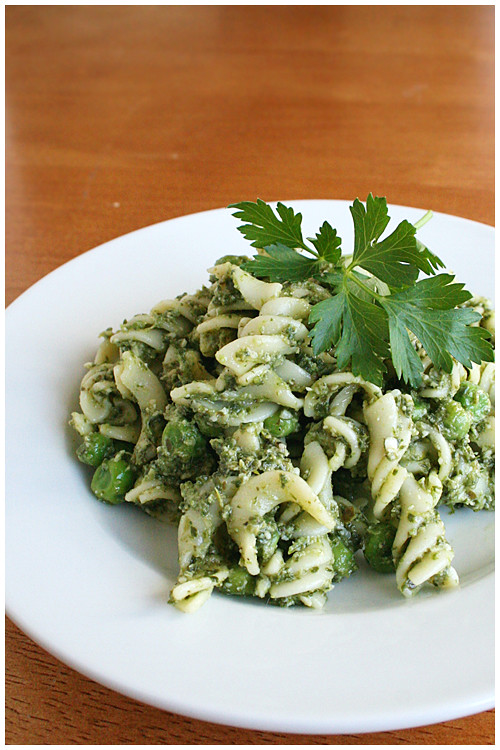
Until this, I suppose. I was looking for spinach recipes because I kind of looooooove spinach. I found this pasta from Ina Garten and it has good fats (olive oil) and veggies (spinach/peas) and I used ~fortified pasta for extra fiber/vitamins. I'm not completely sold on "fortified" products when everything says whole wheat (rice/pasta/flour) is best so just go with that. But it just tasted so yummy and was on sale. I think next time I'll just go with whole wheat but this fortified business was worth a try.

This would be a great potluck dish too!


PASTA, PESTO AND PEAS
Source: Ina Garten

3/4 pound fusilli pasta
3/4 pound bow tie pasta (I used rotini because I just love the shape)
1/4 cup good olive oil
1 1/2 cups pesto, packaged
1 (10-ounce) package frozen chopped spinach, defrosted and squeezed dry
3 tablespoons freshly squeezed lemon juice
1 1/4 cups good mayonnaise
1/2 cup freshly grated Parmesan
1 1/2 cups frozen peas, defrosted
1/3 cup pignolis (pine nuts)
3/4 teaspoon kosher salt
3/4 teaspoon freshly ground black pepper


Cook the fusilli and bow ties separately in a large pot of boiling salted water for 10 to 12 minutes until each pasta is al dente. Drain and toss into a bowl with the olive oil. Cool to room temperature.

In the bowl of a food processor fitted with a steel blade, puree the pesto, spinach, and lemon juice. Add the mayonnaise and puree. Add the pesto mixture to the cooled pasta and then add the Parmesan, peas, pignolis, salt, and pepper. Mix well, season to taste, and serve at room temperature.


Thursday, September 17, 2009

Chocolate & Raspberry always works


I saw the movie Hot Fuzz the other day and while it was awesome, one moment stuck out: Nick Frost's character was munching away on a chocolate cake with some sort of red filling. I was asked to make a cake for my friend's birthday and that's the first thing I proposed.

This was another one of those collecting pieces of recipes from all over to create something. I get nervous when I do this; it feels like creating a Frankenstein monster. Who knows if it'll be okay or such a disaster, the townsfolk start gathering their pitchforks. Thankfully, it was the former.

I went with the trusty Ina Garten but, more importantly, a chocolate cake she'd featured in her show from a "Beatty", that had unheard-of positive reviews. 5 stars, almost across the board. And I could very well go to Food Network.com and add my own rave review because this cake was phenomenal. It was moist but not too dense, perfectly chocolately without being overpowering. Absolutely terrific.


Now, for the red filling, I had to start scouring the web in search of what existed in my mind but which I wasn't sure I'd seen materialized outside of a Simon Pegg movie. A few came up that never sounded exactly right but then I finally stumbled on a straightforward Raspberry Filling recipe from Wilton.com, strangely enough. I'd never used any of their recipes before but this appeared so easy and I was going for a simple taste that wouldn't complicate the cake. It came out exactly as I'd hoped, thickened by the corn starch and tart but still sweet and seriously hard to stop eating.

To even out the tartness of the raspberry filling and the richness of the chocolate, I added a layer of whipped cream. Chocolate ganache topped it off and voila! Chocolate raspberry cake! It was a hit with the birthday girl and my family. I was honestly surprised at how much I enjoyed it. It took some time to prepare all the components but it was absolutely worth it!


BEATTY'S CHOCOLATE CAKE WITH RASPBERRY FILLING
Source: Ina Garten

Butter, for greasing the pans


1 3/4 cups all-purpose flour, plus more for pans
2 cups sugar
3/4 cups good cocoa powder
2 teaspoons baking soda
1 teaspoon baking powder
1 teaspoon kosher salt
1 cup buttermilk, shaken
1/2 cup vegetable oil
2 extra-large eggs, at room temperature
1 teaspoon pure vanilla extract
1 cup freshly brewed hot coffee

Chocolate Ganache (recipe follows)
Raspberry Filling (recipe follows)
Whipped cream (recipe follows)
Preheat the oven to 350 degrees F. Butter 2 (8-inch) round cake pans. Line with parchment paper, then butter and flour the pans.

Sift the flour, sugar, cocoa, baking soda, baking powder, and salt into the bowl of an electric mixer fitted with a paddle attachment and mix on low speed until combined. In another bowl, combine the buttermilk, oil, eggs, and vanilla. With the mixer on low speed, slowly add the wet ingredients to the dry. With mixer still on low, add the coffee and stir just to combine, scraping the bottom of the bowl with a rubber spatula. Pour the batter into the prepared pans and bake for 35 to 40 minutes, until a cake tester comes out clean. Cool in the pans for 30 minutes, then turn them out onto a cooling rack and cool completely.


Assemble the bottom of the cake, flat side up, with a layer of raspberry filling then whipped cream (recipes follow). Set top cake layer on the filling layers. Refrigerate to set filling layers to cakes.

Make chocolate ganache then let come to room temperature. You may need to let it sit in the fridge as well (continue stirring every five minutes or so to allow to chill evenly). When it is a thick, spreading consistency, spread evenly over cake. It will be a thin layer (ganache is dense and strong) so it is easiest to pour all ganache in the center and slowly work out and down the sides with a flat spatula.

Serve soon or refrigerate if storing. Whipped cream will not keep long.


RASPBERRY FILLING
Adapted from: Wilton.com

1 pkg (16 ounces) frozen raspberries packed in sugar thawed
1/3 cup granulated sugar
3 tablespoons cornstarch
1 teaspoon lemon juice

Makes: Filling serves 2 cups.

Drain raspberries, reserving liquid. Add enough water to liquid to equal 1 1/4 cups.

In large saucepan, combine liquid, sugar, cornstarch and lemon juice; mix well. Heat and stir until mixture boils and thickens. Cool completely.


WHIPPED CREAM

1/2 cup heavy cream, well chilled
1 tbsp confectioners' sugar
1/4 tsp vanilla extract

Place a mixing bowl and beaters from electric mixer in the freezer or refrigerator until well chilled, about 15 minutes.

Combine the heavy cream, confectioners' sugar, and vanilla extract in the mixing bowl.

With an electric mixer on low speed, begin beating the cream, gradually increasing the speed to high as cream thickens. (Do this slowly, or the cream will splatter.)

Beat until the cream is thickened, past soft peaks. It should have some structure so it can stand on its own as a layer under the top of the cake.


CHOCOLATE GANACHE
Source: Ina Garten

1/2 cup heavy cream
8 ounces good semisweet chocolate chips
1/2 teaspoon instant coffee granules

Cook the heavy cream, chocolate chips, and instant coffee in the top of a double boiler over simmering water until smooth and warm, stirring occasionally.

Tuesday, August 19, 2008

ChocoNanaButter, Experiment 2

The chocolate-banana-peanut butter experimenting continues. I feel a little like a mad scientist, just concocting stuff with three ingredients and hoping it'll hold together. My more wackier ideas are looking better and better as I work on the balance of said ingredients. The key seems to be the banana is very easily overpowered by the strong chocolate and peanut butter flavors. Even here, with banana creme filling in the cupcakes, the intense chocolate and creamy peanut butter completely take over and then just a hint of banana comes through in a bite.

I'd like to start toying with more predominantly banana recipes (like banana ice cream with chocolate or maybe peanut butter cup chunks stirred in) to see if that helps balance the flavors. I also bought banana flavoring which I am, admittedly, terrified of (mostly because it's "imitation" and alcohol based). I'm just not too comfortable with putting something like that in my cooking...

But even if you're not feeling adventurous or, you know,
inclined to this ChocoNanaButter creation, the straight peanut butter and chocolate cupcakes are amazing. They're Ina Garten's (with a guest author for the peanut butter icing) so you know they're good.

The icing is sweet buttery goodness..

PEANUT BUTTER CHOCOLATE & BANANA CUPCAKES
Adapted from Ina Garten


Chocolate Cupcakes

12 tablespoons (1 1/2 sticks) unsalted butter, at room temperature
2/3 cup granulated sugar
2/3 cup light brown sugar, packed
2 extra-large eggs, at room temperature
2 teaspoons pure vanilla extract
1 cup buttermilk, shaken, at room temperature
1/2 cup sour cream, at room temperature
2 tablespoons brewed coffee
1 3/4 cups all-purpose flour
1 cup good cocoa powder
1 1/2 teaspoons baking soda
1/2 teaspoon kosher salt
Kathleen's Peanut Butter Icing, recipe follows
Banana Creme Filling, recipe follows
Chopped salted peanuts, to decorate, optional

Preheat the oven to 350 degrees F. Line cupcake pans with paper liners.

In the bowl of an electric mixer fitted with a paddle attachment, cream the butter and 2 sugars on high speed until light and fluffy, approximately 5 minutes.

Lower the speed to medium, add the eggs 1 at a time, then add the vanilla and mix well. In a separate bowl, whisk together the buttermilk, sour cream, and coffee. In another bowl, sift together the flour, cocoa, baking soda, and salt. On low speed, add the buttermilk mixture and the flour mixture alternately in thirds to the mixer bowl, beginning with the buttermilk mixture and ending with the flour mixture. Mix only until blended. Fold the batter with a rubber spatula to be sure it's completely blended.

Divide the batter among the cupcake pans (1 rounded standard ice cream scoop per cup is the right amount). Bake in the middle of the oven for 20 to 25 minutes, until a toothpick comes out clean. Cool for 10 minutes, remove from the pans, and allow to cool completely before filling with banana creme and frosting.


Kathleen's Peanut Butter Icing:

1 cup confectioners' sugar
1 cup creamy peanut butter
5 tablespoons unsalted butter, at room temperature
3/4 teaspoon pure vanilla extract
1/4 teaspoon kosher salt
1/3 cup heavy cream

Place the confectioners' sugar, peanut butter, butter, vanilla, and salt in the bowl of an electric mixer fitted with a paddle attachment. Mix on medium-low speed until creamy, scraping down the bowl with a rubber spatula as you work. Add the cream and beat on high speed until the mixture is light and smooth.


Banana Creme Filling

1 cup milk
1/2 cup sugar
3 tablespoons flour
1/8 teaspoon salt
2 egg yolks, slightly beaten
1 teaspoon vanilla (optional)
1 large banana
1 tablespoon lemon juice

Heat the milk in a heavy bottomed pan until very hot but not boiling.

Mix the sugar, flour and salt together in a bowl. Stir in the hot milk and beat until well blended. Pour back into the pan and continue to stir vigorously over low heat for minutes, until very thick and smooth. Add the egg yolks and cook for a few more minutes. Cool, stirring from time to time.

Mash the banana and beat it until smooth. Add tablespoon of lemon juice, 1 teaspoon vanilla (optional), and stir the mixture into the cooled filling.

Cut a cone out of the cooled cupcakes. Trim tip of top cone, fill cupcake with cooled banana creme and return top of cupcake.

Frost each cupcake with Peanut Butter Icing and sprinkle with chopped peanuts, if desired.


Sunday, July 20, 2008

Cuckoo for Coco

For my birthday back in April, my best friend got me this adorable cupcake tree that I've wanted since the beginning of time. Or, uh, since I first saw it a few years ago.

She got me the one for mini cupcakes which I've, surprisingly, never made before. I know, right? I'm a cupcake maniac; you'd think I'd be all over the map with my cupcake adventures. I've also never made (or eaten) coconut cake. So, naturally, I went to my reliable Ina. They were good, of course, but I find Ina's cakes sometimes to be a little more dense than I'd like. I'm not looking for a chiffon-type texture but something a little lighter. I'll definitely try another recipe later to compare the two. Maybe my perfect cake is a pipe dream...

But these were absolutely worth making. They were a hit with my taste testers! :)


COCONUT CUPCAKES
Source: Ina Garten (cupcakes) and Williams-Sonoma (icing)

For the Cupcakes:

3/4 pound unsalted butter at room temperature (3 sticks)
2 cups sugar
5 extra-large eggs at room temperature
1 1/2 teaspoons pure vanilla extract
1 1/2 teaspoons pure almond extract
3 cups all-purpose flour
1 teaspoon baking powder
1/2 teaspoon baking soda
1/2 teaspoon salt
1 cup buttermilk
14 oz. sweetened, shredding coconut


For the vanilla frosting:

12 Tbs. (1 1/2 sticks) unsalted butter, at room temperature
3 1/4 cups confectioners' sugar
2 tablespoons heavy cream
2 teaspoons vanilla extract
1/4 teaspoon salt
2 cups sweetened, shredded coconut


Preheat oven to 325 degrees.

In the bowl of an electric mixer fitted with the paddle attachment, cream the butter and sugar for 5 minutes – until light and fluffy. With the mixer running on low, add the eggs one at a time, scraping down the sides of the bowl after each addition. Add the vanilla and almond extracts and mix well.

In a separate bowl, sift together the flour, baking powder, baking soda, and salt. In three parts, alternately add the ingredients and the buttermilk to the batter, beginning and ending with the dry. Mix until just combined. Fold in 7 ounces of coconut.

Lin a muffin pan with paper liners. Fill each cup to the top with batter. Bake for 20 to 35 minutes, until the tops are brown and a toothpick comes out clean. Allow to cool in the pan for 15 minutes. Remove to a baking rack and cool completely.

While cupcakes are cooling, make the icing. In the bowl of an electric mixer fitted with the paddle attachment, beat together the butter, confectioners' sugar, cream, vanilla and salt on low speed until smooth, about 3 minutes. Pour the 2 cups coconut into a shallow bowl.

Using an icing spatula, frost the top of each cupcake, mounding the icing in the center. Holding the bottom of each cupcake, roll the frosted top in the coconut.


Thursday, July 17, 2008

Blueberries Better With Crumbs

I had these blueberries left from my massive fruit buying bonanza a few weeks ago, so I quickly froze them before they went bad and went in search of a recipe. I was thisclose to making blueberry pie but backed out; I was told they're just not that good.

One can never go wrong with blueberries and streusel topping, though. I found this out last year when I made blueberry muffins. This was very nice as well; moist and perfectly sweet with the combination of the streusel top. It's definitely a serve-the-day-of dessert, though. It goes dry pretty fast. But right after cooling completely? Perfectly soft and delicious!

BLUEBERRY CRUMB CAKE
Source: Ina Garten

For the streusel:
1/4 cup granulated sugar
1/3 cup light brown sugar, lightly packed
1 teaspoon ground cinnamon
1/8 teaspoon ground nutmeg
1/4 pound (1 stick) unsalted butter, melted
1 1/3 cups all-purpose flour

For the cake:
6 tablespoons unsalted butter, at room temperature (3/4 stick)
3/4 cup granulated sugar
2 extra-large eggs, at room temperature
1 teaspoon pure vanilla extract
1/2 teaspoon grated lemon zest
2/3 cup sour cream
1 1/4 cups all-purpose flour
1 teaspoon baking powder
1/4 teaspoon baking soda
1/2 teaspoon kosher salt
1 cup fresh blueberries
Confectioners' sugar for sprinkling

Preheat the oven to 350 degrees F. Butter and flour a 9-inch round baking pan.

For the streusel:

Combine the granulated sugar, brown sugar, cinnamon, and nutmeg in a bowl. Stir in the melted butter and then the flour. Mix well and set aside.

For the cake:

Cream the butter and sugar in the bowl of an electric mixer fitted with the paddle attachment on high speed for 4 to 5 minutes, until light. Reduce the speed to low and add the eggs 1 at a time, then add the vanilla, lemon zest, and sour cream. In a separate bowl, sift together the flour, baking powder, baking soda, and salt. With the mixer on low speed, add the flour mixture to the batter until just combined. Fold in the blueberries and stir with a spatula to be sure the batter is completely mixed.

Spoon the batter into the prepared pan and spread it out with a knife. With your fingers,
crumble the topping evenly over the batter. Bake for 40 to 50 minutes, until a cake tester comes out clean. Cool completely and serve sprinkled with confectioners' sugar.

Tuesday, June 24, 2008

Tarts, tarts and more tarts


There's little that's more disappointing than failure. Especially when you pour time and effort into something that results in a complete waste of both. This is what happened with my first attempt at mini tarts.

My first mistake, probably, was believing I could splice a couple recipes together without having adequate knowledge of the procedure in the first place. Without specific instructions on how thick to roll the dough, I did it TOO thick. The mini crusts weren't weighed down with beans or pie weights and they came out thick, pale and barely cooked. The custard was a disaster: cooked too long and turning into a glob of rubbery goo. If ever there was a time to describe a baking attempt as a TOTAL failure, this was it.

And yet, as a perfectionist, I can't leave something done wrong. It has to be right. So, in classic cliché form (yes, I DID say to myself, "If at first you don't succeed..."), I tossed the failure in the garbage and started again with a new recipe and some determination. I'd learned a few things so maybe screwing up is necessary every now and then. I made the crust thinner, weighed it down (as the hasn't-failed-me-yet Ina instructed), baked it until I felt it was done. I was WAY more cautious with the custard, took it off the heat the moment it came together enough for me and added the last bit of butter and vanilla while still in the pan. It was so good, I was licking the spoon. And the bowl. ...and the pan a little after it cooled.


In the end, I guess my comically bad first attempt was a good learning experience because it made this success all the more satisfying. It felt much more like an accomplishment than it otherwise would have.

Oh and they taste really good. :)


MINI BERRY TARTS
Adapted from Ina Garten

Tart Shells:
1 1/4 cups all-purpose flour
3 tablespoons sugar
1/2 teaspoon kosher salt
6 tablespoons (3/4 stick) cold unsalted butter, diced
2 tablespoons cold shortening (recommended: Crisco)
1/4 cup ice water


Pastry Cream:
5 extra-large egg yolks, room temperature
3/4 cup sugar
3 tablespoons cornstarch
1 1/2 cups scalded milk
1/2 teaspoon pure vanilla extract
1 tablespoon unsalted butter
1 tablespoon heavy cream

1–2 cups mixed berries (strawberries, blueberries, blackberries, raspberries)
1/3 cup apricot jelly


Combine the flour, sugar, and salt in a small bowl and place in the freezer for 30 minutes. Put the flour mixture in the bowl of a food processor fitted with a steel blade. Add the butter and shortening and pulse about 10 times, or until the butter is in the size of peas. Add the ice water and process until the dough comes together. Dump on a well-floured board and form into a disk. Wrap in plastic and chill for at least 30 minutes.

Meanwhile, preheat the oven to 375 degrees F.

Roll out the dough to roughly 1/4-inch thick and use round cutters (or small bowls) to cut shapes to fit into 5 (3-inch) tart pans (or your preferred size mini tins). Don't stretch the dough when placing it in the pans or it will shrink during baking. Cut off the excess by rolling the pin across the top of each pan. Line the tart shells with a piece of buttered aluminum foil, butter side down, and fill them with dried beans or rice. Bake for 10 minutes. Remove the beans and foil, prick the bottom of the shells all over with a fork, and bake for another 15 to 20 minutes until lightly browned. Set aside to cool.


In the bowl of an electric mixer fitted with the paddle attachment, beat the egg yolks and sugar on medium-high speed for 4 minutes, or until very thick. Reduce to low speed, and add the cornstarch.

With the mixer still on low, slowly pour the hot milk into the egg mixture. Pour the mixture into a medium saucepan and cook over low heat, stirring constantly with a wooden spoon, until the mixture thickens, 5 to 7 minutes. Don't be alarmed when the custard comes to a boil and appears to curdle; switch to a whisk and beat vigorously. Cook, whisking constantly, for another 2 minutes; the custard will come together and become very thick, like pudding. Stir in the vanilla, Cognac, butter, and heavy cream. Pour the custard through a sieve into a bowl. Place plastic wrap directly on the custard and refrigerate until cold.

Before serving, fill the tart shells with the pastry cream. Arrange the berries decoratively on top of the cream. Melt the apricot jelly with 1 teaspoon of water and brush the top of the tarts.

Seriously tart Tart

You know when something doesn't turn out exactly as you wanted so then it's this complete disappointment? To you and you alone? Yeah. I mean, I don't know what I was expecting but it wasn't this really, REALLY tart (I mean, strong?), powerful lemon tart. I mean, seriously intense. And the recipe calls for no whipped cream whatsoever so this is how it's supposed to be eaten. I would make whipped cream were I to serve it to human people.
As you can see from the second picture, the crust came out thicker than I expected too but I discovered that was damn near necessary to counter the strong lemon flavor. And I think I have a misconception about tart dough: it is not, in fact, PIE dough. It's supposed to be denser and not flakey and flimsy. A tart must stand on it's own; it doesn't have a pie plate to hold all those lovely, crumbly flakes of crust together. It was pretty good in the end and I enjoyed it with the lemon.

One thing about the curd, though, which I wish the recipe would've mentioned but didn't: when you add the lemon juice to the egg mixture, the entire thing looks awful and curdled! Even after I put it on the stove and began stirring my hand off, the stuff just looked like curdled eggs! I was sure I was ruined. And yet, I stirred and stirred until FINALLY the mix began to turn and eventually became the silky smooth consistency. So when the mix looks curdled, don't worry! It's not!

But seriously. Serve this with a dollop of whipped cream. Or a big glass of milk.


LEMON CURD TART
Source: Ina Garten

For the tart shell:
12 tablespoons (1 1/2 sticks) unsalted butter, plus more for greasing, at room temperature
1/2 cup sugar
1/2 teaspoon pure vanilla extract
1 3/4 cups all-purpose flour
Pinch salt

For the lemon curd:
4 lemons, at room temperature
1 1/2 cups sugar
1/4 pound (1 stick) unsalted butter, at room temperature
4 extra-large eggs, at room temperature
1/8 teaspoon salt


For the tart shell:

Mix the butter and sugar together in the bowl of an electric mixer fitted with a paddle attachment until they are just combined. Add the vanilla. In a medium bowl, sift together the flour and salt, then add them to the butter-and-sugar mixture. Mix on low speed until the dough starts to come together. Dump onto a surface dusted with flour and shape into a flat disk. Press the dough into a 10-inch-round or 9-inch-square false-bottom tart pan, making sure that the finished edge is flat. Chill until firm.

Meanwhile, preheat the oven to 350 degrees F.

Butter 1 side of a square of aluminum foil to fit inside the chilled tart and place it, buttered side down, on the pastry. Fill with beans or rice. Bake for 20 minutes. Remove the foil and beans, prick the tart all over with the tines of a fork, and bake again for 20 to 25 minutes more, or until lightly browned. Allow to cool to room temperature.


For the lemon curd:

Remove the zest of the lemons with a vegetable peeler or zester, being careful to avoid the white pith. Squeeze the lemons to make 1/2 cup of juice and set the juice aside. Put the zest in a food processor fitted with a steel blade. Add the sugar and process for 2 to 3 minutes, until the zest is very finely minced. In the bowl of an electric mixer fitted with a paddle attachment, cream the butter with the sugar and lemon zest. Add the eggs, 1 at a time, and then add the lemon juice and salt. Mix until combined.

Pour the mixture into a 2-quart saucepan and cook over low heat, stirring constantly, until thickened, about 10 minutes. The lemon curd will thicken at about 175 degrees F, or just below a simmer. Remove from the heat.

Fill the tart shell with warm lemon curd and allow to set at room temperature.


Wednesday, December 26, 2007

More Peppermint??

You guys know me; I'm always going to try to find a way to work cupcakes into any season. Christmas was no exception. I found only a few peppermint cake recipes, however, and feared it was because it just plain didn't taste good. Twas not the case!

I tried two different things: one batch with bits of the Peppermint Bark I made earlier sprinkled on the top of the cakes and another without. One thing I've learned is that white chocolate does NOT bake well. It gets all gunky and brown and it's not real chocolate so I don't know what's going on with it. They tasted fine; there was a crunchy-but-not texture to the top. But I'm a traditionalist and I ended up enjoying the plain cake-with-peppermint-icing ones better. It was important to leave the cake unflavored as I used peppermint oil again and it was very crisp and sharp. The icing is flavored and the cake wonderfully takes the edge off so the whole thing goes together well.

Also to note? The peppermint pieces sprinkled on top go all melty and watery the next day so frost and sprinkle at the last minute if possible (OR frost and sprinkle and then freeze). In case you're wondering, I just threw some candy canes in a double bagged baggie and went to smashing with the edge of a can.

CHOCOLATE CUPCAKES
(Adapted from Barefoot Contessa at Home)
  • 12 tablespoons (1 1/2 sticks) unsalted butter, at room temperature
  • 2/3 cup granulated sugar
  • 2/3 cup light brown sugar, packed
  • 2 extra-large eggs, at room temperature
  • 2 teaspoons pure vanilla extract
  • 1 cup buttermilk, shaken, at room temperature
  • 1/2 cup sour cream, at room temperature
  • 2 tablespoons brewed coffee
  • 1 3/4 cups all-purpose flour
  • 1 cup good cocoa powder
  • 1 1/2 teaspoons baking soda
  • 1/2 teaspoon kosher salt

Preheat the oven to 350 degrees F. Line cupcake pans with paper liners.

In the bowl of an electric mixer fitted with a paddle attachment, cream the butter and 2 sugars on high speed until light and fluffy, approximately 5 minutes. Lower the speed to medium, add the eggs 1 at a time, then add the vanilla and mix well. In a separate bowl, whisk together the buttermilk, sour cream, and coffee. In another bowl, sift together the flour, cocoa, baking soda, and salt. On low speed, add the buttermilk mixture and the flour mixture alternately in thirds to the mixer bowl, beginning with the buttermilk mixture and ending with the flour mixture. Mix only until blended. Fold the batter with a rubber spatula to be sure it’s completely blended.

Divide the batter among the cupcake pans (1 rounded standard ice cream scoop per cup is the right amount). Bake in the middle of the oven for 20 to 25 minutes, until a toothpick comes out clean. Cool for 10 minutes, remove from the pans, and allow to cool completely before frosting.


PEPPERMINT ICING
Adapted from Ooh You Tasty Little Things

  • 1 cup (2 sticks) butter, softened
  • 6 to 8 cups confectioners' sugar
  • 1/4 cup heavy cream
  • 1/2 teaspoon peppermint oil (less if desired; use to taste)

Mix butter in a large mixing bowl with 4 cups of sugar. Add cream and peppermint oil. On medium speed of electric mixer, beat until smooth and creamy, about 3 to 5 minutes. Gradually add the remaining sugar, 1 cup at a time, beating well after each addition (about 2 minutes), until the icing is thick enough to be of good spreading consistency. You may not need to add all of the sugar. Chill for about 15 minutes in the refrigerator before using, and only use to ice cold cupcakes.


Wednesday, December 19, 2007

CookiesCookiesCookies

Being a stickler for tradition, I can only make the classic Peanut Butter Blossoms at Christmas although there's nothing really inherently Christmasy about them. It's chocolate and peanut butter, you know? Alas, it's a Christmas Cookie in our family so when the month of December rolls around, it's one of the first things I look forward to. The light peanut butter cookie, the melty chocolate Kiss... Heaven.

I got kind of ambitious with the many things on my list of Christmas Foods this year so I started early. The first week I made four batches of cookies alone. (This week I'm on the more intense cakes and candies but I'll get to that later.) I made two batches of the blossoms then wanted something that would travel well and wasn't chocolate. I settled on Coconut Macaroons which turned out really good but, as my mom says, what with Eagle Brand isn't good?

Last, I knew I was going to make cut-out sugar cookies later but still craved a sugary cookie without all the work. I found a Soft Sugar Cookie on All Recipes that took a few tries with the shaping but finally came out quite nice. Simple but with a good taste. My Christmas color theme this year is red and light blue (like the former Houston Oilers! Holla!) so I rolled one set of the sugar cookies in blue and sprinkled a little more in the center just for pop.


PEANUT BUTTER BLOSSOMS

Cream together:

1/2 cup shortening
1/2 cup peanut butter
1/2 cup sugar
1/2 cup packed brown sugar (light)

Mix in:

1 egg slightly beaten
1 tsp vanilla
1 level tsp baking soda
1/2 tsp salt

Stir in:

1 1/4 cups of flour (watch for consistency; should look shiny but hold together. Add less if needed)

Roll into balls, coat w/sugar, bake 375 degrees for 10 min. Remove from oven, press chocolate kisses into each center spreading ball so edges crack. Bake additional 1-2 minutes until chocolate melts.


COCONUT MACAROONS
Source: Ina Garten

14 ounces sweetened shredded coconut
14 ounces sweetened condensed milk
1 teaspoon pure vanilla extract
2 extra-large egg whites, at room temperature
1/4 teaspoon kosher salt

Preheat the oven to 325 degrees F.

Combine the coconut, condensed milk, and vanilla in a large bowl. Whip the egg whites and salt on high speed in the bowl of an electric mixer fitted with the whisk attachment until they make medium-firm peaks. Carefully fold the egg whites into the coconut mixture.

Drop the batter onto sheet pans lined with parchment paper using either a 1 3/4-inch diameter ice cream scoop, or two teaspoons. Bake for 25 to 30 minutes, until golden brown. Cool and serve.


SOFT SUGAR COOKIES IV
From AllRecipes.com, Submitted by Laura Stearns


2/3 cup shortening
2/3 cup butter
1 1/2 cups white sugar
2 eggs
2 teaspoons vanilla extract
3 1/2 cups all-purpose flour
2 teaspoons baking powder
1 teaspoon salt
1/3 cup granulated sugar for decoration

Preheat oven to 350 degrees F (175 degrees C).

In a medium bowl, cream together the butter, shortening and sugar. Stir in the eggs and vanilla. Combine the flour, baking powder and salt, stir into the creamed mixture until dough comes together. Roll dough into walnut sized balls and roll the balls in sugar. Place them on an unprepared cookie sheet about 2 inches apart. Press gently with bottom of a glass to make into evenly thick discs.

Bake cookies 10 to 12 minutes in the preheated oven, until bottom is light brown. Remove from baking sheets to cool on wire racks.

Sunday, October 28, 2007

Chocolate Ghost Cake


Look! I baked! I know, it's been a while. I wasn't properly inspired lately. But now Halloween is days away and I was dying to try this cake, seen originally at
Martha Stewart's site. I didn't follow either recipe for her cake or icing and was mildly annoyed there was no further instruction on even how to make the cake decorations. So I winged it.

I had to buy the 6-inch round pans which were smaller than I anticipated. Think top tier of a wedding cake. They also took longer to bake because they were taller than normal when I split the batter into thirds for three layers. There was much testing; many toothpicks were used but it turned out around 30-35 minutes and, thanks to Ina Garten's lovely recipe, they came out still moist.

The little ghosts perched atop the cake were relatively easy but they're pretty delicate on the whole. Icing isn't strong enough to hold the marshmallows together; toothpicks work much better. I forgot I didn't have little marshmallows to make the mini-ghosts so I had to simply pipe them on, like the bigger ghost's tops. The eyes were drawn on with just a toothpick dipped in black coloring except for the little guys; those are chocolate jimmies (because the coloring just won't stick as well to buttercream icing).

The thing is kind of a nuisance to store. It's so tall! After the marshmallows, it's nearly a foot tall. Too big for a cake stand cover, too delicate decorative top to cover with foil. Maybe syran wrap. I've since frozen it but I recommend if you're going to serve it, to do so directly after assembly. It will not travel easy... But Ina's chocolate cake is delish and even if you don't end up making this cake specifically, give the regular cake a try. Mmm. Chocolate...


CHOCOLATE CAKE
Adapted from The Barefoot Contessa

2 1/2 cups all-purpose flour
1 1/2 cups good cocoa powder
2 1/4 teaspoons baking soda
1/2 teaspoon kosher salt
1/2 pound (2 sticks) unsalted butter, at room temperature
1 cup granulated sugar
1 cup light brown sugar, packed
3 extra-large eggs, at room temperature
3 teaspoons pure vanilla extract
1 1/2 cups buttermilk, at room temperature
3/4 cup sour cream, at room temperature
3 tablespoons brewed coffee


Preheat the oven to 350 degrees F. Butter and flour three 6-inch round pans.

In a medium bowl, sift together the flour, cocoa, baking soda, and salt.

In the bowl of an electric mixer fitted with a paddle attachment, cream the butter and sugars on high speed until light, approximately 5 minutes. Add the eggs and vanilla and mix well. Combine the buttermilk, sour cream, and coffee. On low speed, add the flour mixture and the buttermilk mixture alternately in thirds, beginning with the buttermilk mixture and ending with the flour mixture. Mix the batter only until blended.

Pour the batter into the prepared pans, smooth the tops with a spatula, and bake in the center of the oven for 30 to 35 minutes, or until a toothpick comes out clean. Cool to room temperature.


VANILLA BUTTERCREAM ICING

1 cup Crisco Shortening
1/2 stick butter, room temperature
2 tbsps heavy whipping cream
1 tsp vanilla
4 cups powdered sugar, sifted (measure then sift)

In your mixer bowl, beat the shortening until it's smooth, add the butter and beat together until smooth and light and fluffy. Add smaller amount of the heavy cream indicated in the recipe and the vanilla and mix well.

Add half the powdered sugar and mix for 5 minutes on low-med speed. Add remaining sugar and mix well. Add more cream or powdered sugar if necessary to adjust the consistency

Cut rounded tops off to make even layers of cake. Cover each of two layers with icing; turn third layer upside down using flat, smooth bottom as the top of the cake. Spread thin layer of icing over entire cake to act as "crumb coat". Freeze cake to allow icing to set completely (2-3 hours). Spread remaining icing over set coat, generously (but save a little for tops of ghosts).

Assemble marshmallow ghosts with toothpicks onto top of cake.


Saturday, September 15, 2007

Vanilla Cupcakes cure EVERYTHING

I've been having a weird couple of weeks where I didn't want to do anything, including baking. Felt a little burned out. Got some good news this week and was off and running again. And what best to start back on than good ol' cupcakes?


VANILLA CUPCAKES WITH CREAM CHEESE ICING
Source: Ina Garten


18 tablespoons (2 1/4 sticks) unsalted butter, at room temperature
3 cups sugar
6 extra-large eggs, at room temperature
1 cup sour cream, at room temperature
1 1/2 teaspoons pure vanilla extract
3 cups all-purpose flour
1/3 cup cornstarch
1 teaspoon kosher salt
1 teaspoon baking soda


For the icing:

3/4 pound (3 sticks) unsalted butter, at room temperature
1 pound cream cheese, at room temperature
3/4 pound confectioners' sugar, sifted
1 1/4 teaspoons pure vanilla extract

Heat the oven to 350 degrees F. Line muffin pans with paper liners.

Cream the butter and sugar in the bowl of an electric mixer fitted with the paddle attachment on high speed, until light and fluffy. On medium speed, add the eggs, 2 at a time, then add the sour cream and vanilla. Scrape down the sides and stir until smooth.

Sift together the flour, cornstarch, salt, and baking soda in a bowl. With the mixer on low speed, add the flour mixture to the butter mixture until just combined. Fill the cupcake liners to the top with batter. Bake in the center of the oven for 20 to 30 minutes, until a toothpick comes out clean. Cool to room temperature.

For the icing, mix the butter, cream cheese, sugar, and vanilla in the bowl of an electric mixer fitted with the paddle attachment, on low speed, mixing just until smooth. Spread the frosting generously on top of each cupcake.

Thursday, August 23, 2007

Lemon Cupcakes: Conquered

In approximately two months, I've completed four flavors of my self-appointed mission to find a really really good recipe for each cupcake flavor I fancied. At four batches per each flavor (except Lemon which I scored on the third), two dozen per batch, I've roughly made 360 cupcakes in the past two months. The bad news is, that was for only the first four flavors: Vanilla, Chocolate, Strawberry and Lemon, and I have many many more to go (Coconut, Banana, Red Velvet, Pistachio, and on and on). The good news? Well, I'm getting pretty decent at whipping up a cake. Practice and all that. I think I've earned a slight reprieve from cake, though. There is so much more to explore.

But for now, I can celebrate in finding Lemon! I was becoming seriously disillusioned with the first couple recipes that came out either dense or crumbly (ugh) or not sweet enough, etc. In them, the lemon juice is added to the batter and there is a significant increase in the eggs. In the last, winning recipe, the eggs are normal, there is only lemon ZEST in the batter. Now, not lemony enough, you cry? WELL. Ina Garten thinks of everything. The lemon juice is sweetened in a saucepan and spooned over the cake for a perfectly lemony but sweet jolt of flavor that infuses through every bite.


The first two attempts I took a shot at different lemon buttercreams (as you'll see in some pictures as the piped icing) but it was just okay. To me, lemon cake is too subtle for the almost-greasy flavor of buttercreams. Ina's recipe called for a simple glaze over the top but her recipe was also for two pound cake pans that are a presentation onto themselves. I needed an icing for cupcakes and a glaze just won't do. I found a very yummy cream cheese frosting recipe on All Recipes but made a few changes, taking out the lemon zest in favor of a smoother, gentler taste so the lemon-on-lemon icing-and-cake combo wasn't overpowering. It came out lovely and they go terrifically together!


LEMON CUPCAKES
Adapted from Barefoot Contessa

1/2 pound (2 sticks) unsalted butter at room temperature
2 1/2 cups granulated sugar, divided
4 extra-large eggs, at room temperature
1/3 cup grated lemon zest lightly packed (6 to 8 large lemons - Use only fresh lemon juice and zest)
3 cups all-purpose flour
1/2 teaspoon baking powder
1/2 teaspoon baking soda
1 teaspoon salt
3/4 cup freshly squeezed lemon juice
3/4 cup buttermilk, at room temperature
1 teaspoon pure vanilla extract

Preheat the oven to 350 degrees F. Prepare two muffin pans with paper liners or non-stick cooking spray.

1. Cream the butter and 2 cups granulated sugar in the bowl of an electric mixer fitted with the paddle attachment. You cannot beat too much at this stage so get it very light and fluffy, about 5 minutes. With the mixer on medium speed add the eggs, 1 at a time, and the lemon zest.

2. Sift together the flour, baking powder, baking soda, and salt in a bowl. Separately, combine 1/4 cup lemon juice, the buttermilk, and vanilla.

3. Add the flour and buttermilk mixtures alternately, beginning and ending with the flour. Spoon into the pans, smooth the tops, and bake for 18-20 minutes, until a cake tester comes out clean.

4. Cook 1/2 cup granulated sugar with 1/2 cup lemon juice in a small saucepan and cook over low heat until the sugar dissolves. When the cupcakes are done, cool for 5 minutes, then set them onto a rack set over a tray and spoon the lemon syrup over the cakes. Allow the cakes to cool completely.


LEMON CREAM CHEESE FROSTING
Makes about 3 cups
  • 1 (8 ounce) package cream cheese, softened
  • 1/4 cup butter
  • 2 tablespoons lemon juice
  • 1 teaspoon vanilla extract
  • 5 cups confectioners' sugar

1. Beat cream cheese, butter, lemon juice, lemon rind, and vanilla together until smooth and light.

2. Add confectioners' sugar slowly. Beat until creamy. Add more powder sugar or juice as needed for desired consistency.

Wednesday, July 18, 2007

Chocolate Cupcakes Pwned.

I'm on a mission. A quest, if you will, to find excellent recipes for each and every cupcake flavor I fancy. There's a list. #1 was Vanilla and that was done. #2 was Chocolate. For some reason, chocolate hates me and the feeling (in the form of cake substance) is mutual. Each batch seemed wrought with new problems that just didn't coincide with the user reviews or other positive backing each recipe had.

Eventually (the fourth try), I finally found it. The recipe is one I found on another food blog as the author modified an existing recipe with her own adjustments. It came out wonderful! Chocolatey but still light and soft! Just what I expect from a cake.

I started with chocolate buttercream icings (the second row you can see I went a little overboard with the mixing and got a way too airy result) but I realized quickly I was in search of a more fudgy, thicker frosting. The best tasting one I found is a modified version of the AllRecipe.com Chocolate Frosting I which was not too sweet and just the right consistency (when adding about 2 extra tbsps of milk).

And now chocolate is done. \o/ I'm going to go collapse now.


CHOCOLATE CUPCAKES
(Adapted from Barefoot Contessa at Home)

12 tablespoons (1 1/2 sticks) unsalted butter, at room temperature
2/3 cup granulated sugar
2/3 cup light brown sugar, packed
2 extra-large eggs, at room temperature
2 teaspoons pure vanilla extract
1 cup buttermilk, shaken, at room temperature
1/2 cup sour cream, at room temperature
2 tablespoons brewed coffee
1 3/4 cups all-purpose flour
1 cup good cocoa powder
1 1/2 teaspoons baking soda
1/2 teaspoon kosher salt

Preheat the oven to 350 degrees F. Line cupcake pans with paper liners.

In the bowl of an electric mixer fitted with a paddle attachment, cream the butter and 2 sugars on high speed until light and fluffy, approximately 5 minutes. Lower the speed to medium, add the eggs 1 at a time, then add the vanilla and mix well. In a separate bowl, whisk together the buttermilk, sour cream, and coffee. In another bowl, sift together the flour, cocoa, baking soda, and salt. On low speed, add the buttermilk mixture and the flour mixture alternately in thirds to the mixer bowl, beginning with the buttermilk mixture and ending with the flour mixture. Mix only until blended. Fold the batter with a rubber spatula to be sure it’s completely blended.

Divide the batter among the cupcake pans (1 rounded standard ice cream scoop per cup is the right amount). Bake in the middle of the oven for 20 to 25 minutes, until a toothpick comes out clean. Cool for 10 minutes, remove from the pans, and allow to cool completely before frosting.


CHOCOLATE FROSTING
(Adapted from AllRecipes.com Chocolate Frosting I by Tianne)

1/4 cup margarine, melted
2/3 cup unsweetened cocoa powder
1/3 cup milk
1 teaspoon vanilla extract
3 cups confectioners' sugar


1. In a large bowl, beat margarine and cocoa together until combined. Add milk and vanilla; beat until smooth. Gradually beat in confectioners' sugar until desired consistency is achieved. Adjust with more milk or confectioners' sugar if necessary.