Showing posts with label Williams-Sonoma. Show all posts

Saturday, July 10, 2010

Happy Birthday, AMERICA.


YES, I am a week late for the 4th of July festivities. But, no, these cookies were not late. I made these two weeks ago in anticipation of a week-long vacation from which I just returned. So I have a good excuse and it's better late than never!

Quick story on how these patriotic treats came to be. See, I'm a big football/soccer fan and have been since I got into it a few years back in London. It was great rooting for the Three Lions (England's national team) but once I got back to the States, it had to be Team USA all the way! (Especially since we were such underdogs and needed support.) So this World Cup, I went all out and, what do you know: America flags, shirts, beads, etc all pop up in stores, right in time for our big games (and July 4th, but whatever).


My 5 year old niece saw me with all this America bling. A few days went by and we were visiting at my mom's house where she proceeded to bring me a set of patriotic cookie cutters that she bought at the store. I said, "What's this?" and she replied, "They're for YOU ... to make cookies. For ME." Oooohhkay! So I kinda had to at that point. I mean, it was sort of an order.

But truth be told, I love doing this stuff. It's not that much work and the final product coming out cute is worth every minute!

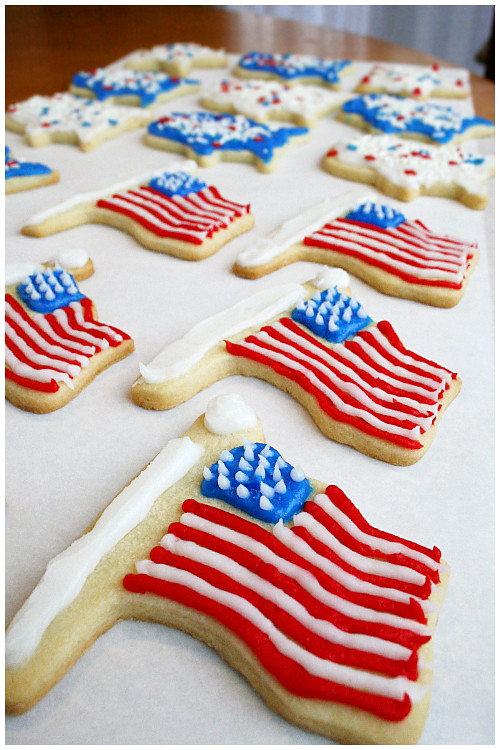
I tried a new sugar cookie recipe because I'm always on the prowl for the perfect sugar cookie. These came out nice and soft, held their shape perfectly and were hard to mess up (even after re-rolling). They never browned but did get crisp (though light) if I rolled thin enough. Keep them at a respectable thickness and they'll be nice and soft!

Also, the icing is from those tubes of Wilton "frosting" you buy in the stores. I struggled with the thought of royal icing and in the end, just made do with what I had. Turns out, that sweet frosting is really good on cookies. Think of those Lofthouse soft sugar cookies you get in the store. Mmm. But I piped on the lines and just spread the rest with a knife! It's all about adapting with what you have!


SUGAR COOKIES
Source: Williams-Sonoma

16 Tbs. (2 sticks) unsalted butter, at room temperature

3/4 cup sugar
3 egg yolks
1 piece vanilla bean, about 2 inches long, or 1 1/2 tsp. vanilla extract
2 1/2 cups all-purpose flour
1 tsp. baking powder
1/2 tsp. salt

In the bowl of an electric mixer fitted with the flat beater, beat together the butter and sugar on medium speed until light and fluffy, about 4 minutes. Add the egg yolks one at a time, beating well after each addition. Cut the vanilla bean in half lengthwise and, using a small, sharp knife, scrape the seeds into the butter mixture. If using vanilla extract, add it now. Mix well.

In a sifter, combine the flour, baking powder and salt. Sift the flour mixture directly onto the butter mixture. Reduce the speed to low and beat until well mixed.

Turn the dough out onto a work surface and divide into 4 equal portions. Shape each portion into a ball, then flatten the balls into disks. Wrap in plastic wrap and refrigerate overnight. (The dough can be prepared up to 3 days ahead.) Let it soften slightly at room temperature before continuing.

Position a rack in the upper third of an oven and preheat to 350°F. Prepare 2 large baking sheets with parchment paper.

On a lightly floured work surface, roll out a dough disk 1/4 inch thick. Using cookie cutters, cut out desired shapes. Transfer the cutouts to the prepared baking sheets. Gather up and reroll the scraps and cut out more cookies. Repeat with the remaining dough disks

Bake until the cookies are golden on the edges, about 8 minutes. Transfer the cookies to wire racks and let cool completely. Decorate the cookies as desired with colored sugars and decorating pens. Store in an airtight container at room temperature for up to 1 week.

Makes 24 to 30 cookies, depending on cutter size.

And, P.S. I AM heartbroken by our results at the World Cup. But it doesn't lessen my love for our national team and players. They're still awesome and I love them!

Sunday, May 31, 2009

Yes. More lemon.

I think about half of my baking comes from having ingredients I need to use or lose. Okay, maybe a quarter. This is one such recipe.

I STILL had lemons sitting around that I just couldn't ignore for another weekend but knew absolutely what I DIDN'T want to make from them (cake/cupcakes or sorbet/ice cream). That left me with a tart (which I've done before) or curd. Making the tart shells seemed like too much effort so I settled on curd.

It's relatively easy to make in the same way custard is; you cook it VERY slowly over low heat so the eggs don't curdle. I was actually considering cooking longer (even though I went the recommended time) because I imagined curd as thicker. However, I saw a bit of cooked egg and immediately took it off the fire (then put it through a sieve, of course).

It was quite good because c'mon; it's full of butter. What's not to like?

I then had to make some scones for it to go on and they're like mildly sweet biscuits. I think I could do better but they are better than my first batch many moons ago which were like hockey pucks. I'm improving!


SCONES
Adapted from: Tyler Florence


2 cups all-purpose flour
1 tablespoon baking powder
1/2 teaspoon salt
2 tablespoons sugar
5 tablespoons unsalted butter, cold, cut in chunks
1 cup heavy cream, plus more for brushing the scones


Preheat the oven to 400 degrees F.

In a food processor, mix together the dry ingredients; the flour, baking powder, salt, and sugar. Cut butter into cubes and pulse into processor until mixture looks like coarse crumbs. Transfer to large bowl and make a well in the center. Pour heavy cream into well and fold everything together just to incorporate; do not overwork the dough. (Refrigerate or freeze for a few minutes to firm up butter if it has gotten warm.)

Press the dough out on a lightly floured surface into a rectangle about 12 by 3 by 1 1/4 inches. Cut the rectangle in 1/2 then cut the pieces in 1/2 again, giving you 4 (3-inch) squares. Cut the squares in 1/2 on a diagonal to give you the classic triangle shape. Place the scones on an ungreased cookie sheet and brush the tops with a little heavy cream. Bake for 15 to 20 minutes until beautiful and brown. Let the scones cool a bit before you serve.


LEMON CURD

Source: Williams-Sonoma

5 egg yolks
1/2 cup sugar
1/4 cup fresh lemon juice
Grated zest of 2 lemons
6 Tbs. (3/4 stick) unsalted butter


In a heavy saucepan, combine the egg yolks and sugar and whisk vigorously for 1 minute. Add the lemon juice and zest and whisk for 1 minute more. Set the pan over low heat and cook gently, stirring constantly, until slightly thickened, 10 to 15 minutes.

Remove the pan from the heat and stir in the butter. Let cool, stirring occasionally. Cover tightly and refrigerate before using. Makes about 1 cup.


WHIPPED CREAM

1/2 cup heavy cream, well chilled
1 tbsp confectioners' sugar
1/4 tsp vanilla extract

1. Place a mixing bowl and beaters from electric mixer in the freezer or refrigerator until well chilled, about 15 minutes.

2. Combine the heavy cream, confectioners' sugar, and vanilla extract in the mixing bowl.

3. With an electric mixer on low speed, begin beating the cream, gradually increasing the speed to high as cream thickens. (Do this slowly, or the cream will splatter.)

4. Beat until the cream forms soft peaks. Test to see if it is ready by turning off the mixer and lifting the beaters out of the cream - if the cream makes soft peaks that topple over slightly, then it's done.

Serve immediately or cover with plastic wrap and refrigerate for up to 2 hours.

Altogether, it was delish!

Friday, May 29, 2009

Lucky number 4


I think me and pound cake are done, professionally. #1, was bland and disappointing. #2, was okay but dry and nothing special. #3, I completely screwed up (under-baked in an attempt to not dry it out) AND it tasted junky. #4, was the best yet but still not Perfection In A Loaf Pan. What can I say; I seek perfection.

With four, count them, FOUR ultimate disappointments, I think I'm through with pound cake. At least for now. Maybe I'll go back to it some day. I just need to move on.

I would like to share this recipe, however, because it did come out the best of what I tried. It was from the ever-trustworthy Williams-Sonoma. It wasn't dry but not overly moist. It came out nice and soft (due to the very light and fluffy beat-the-butter phase) but not entirely a cake-like consistency. It was definitely worth making though I, personally, will probably continue on, in search of the Perfect pound cake before I make this again.
POUND CAKE
Source: Williams-Sonoma


1 1/2 cups all-purpose flour
1/4 tsp. baking soda
1/4 tsp. salt
12 Tbs. (1 1/2 sticks) unsalted butter, at room temperature
1 cup sugar
1 1/2 tsp. vanilla extract
1/4 tsp. almond extract (optional - but seriously do it)
2 eggs, at room temperature
1/2 cup sour cream, at room temperature


Preheat an oven to 325°F. Lightly grease an 8 1/2-by-4 1/2-inch loaf pan, preferably glass, and dust with flour.

In a bowl, whisk together the flour, baking soda and salt until blended. In the bowl of an electric mixer, beat together the butter, sugar, vanilla and almond extract on medium to medium-high speed until light and fluffy. Add the eggs one at a time, beating well after each addition until just blended. Sprinkle half of the flour mixture over the egg mixture and stir until both are just incorporated. Stir in the sour cream, then sprinkle with the remaining flour mixture and stir until evenly distributed.

Pour the batter into the prepared pan and tap gently on the counter to even out and settle the ingredients. Bake until a toothpick inserted into the center comes out clean, about 70 minutes, or longer if using a metal pan. Transfer the pan to a wire rack and let cool for 15 minutes.

Run a thin knife around the inside of the pan, invert the cake onto the rack and lift off the pan. Place the cake on one of its sides and continue cooling. Serve warm or at room temperature. Serves 8 to 10.

Monday, March 30, 2009

Simple

I am embarrassed, of course, at my lack of updating. But trust in the fact that it's not that I've been baking up a storm and just neglecting my blog; I haven't been baking ANYTHING. It's all the XBox's fault; I got one for Christmas and never got off of it.

I finally found the motivation to bake something and had to scrounge up what I had in the house. That ended up being the most basic of basics: vanilla pound cake. It needed something extra, though, and I immediately thought of berry compote (because I had frozen mixed berries).

I grabbed a high rated recipe from All Recipes and you know what? I'm kind of starting to get irritated with All Recipes. Or, at least, the people reviewing on it. I made this highly rated recipe and it is utterly mediocre. I mean, to have that many stars, you'd think it'd be mouth wateringly AWESOME. But it's just not. It's bland and absolutely NEEDS the compote or other accompaniment. I always thought of a good pound cake as one so buttery and delish, it melts in your mouth a little. Because of all the butter. Delicious butter... But this one doesn't.

The berry compote, however, I got from Williams-Sonoma and it IS good. I think I'm going to stick to legit sources from now on... I won't be making this pound cake again but the compote is a keeper. I used a bag of frozen mixed berries that included raspberries, blueberries and marrionberries.

Together, they're good, but maybe that's because you're mostly just tasting the compote...


Cream Cheese Pound Cake III
Source: All Recipes, Submitted by: Nanci

1 (8 ounce) package cream cheese
1 1/2 cups butter
3 cups white sugar
6 eggs
3 cups all-purpose flour
1 teaspoon vanilla extract


1. Preheat oven to 325 degrees F (160 degrees C) grease and flour a 10 inch tube pan.

2. In a large bowl, cream butter and cream cheese until smooth. Add sugar gradually and beat until fluffy.

3. Add eggs two at a time, beating well with each addition. Add the flour all at once and mix in. Add vanilla.

4. Pour into a 10 inch tube pan. Bake at 325 degrees F (160 degrees C) for 1 hour and 20 minutes. Check for doneness at 1 hour. A toothpick inserted into center of cake will come out clean.


Berry Compote
Source: Williams-Sonoma

6 cups mixed berries
5 Tbs sugar
2 tsp lemon juice

In a saucepan over medium heat, stir together the berries, 2 Tbs. of the sugar and the lemon juice. Bring to a simmer and cook, stirring occasionally, until most of the berries have broken down and the mixture is thickened, about 30 minutes; reduce the heat if the compote sticks to the pan. Remove from the heat and let the compote cool to room temperature.

Friday, October 10, 2008

Pumpkin On!


The pumpkin madness continues! I noticed a weird trend, though, when I jumped back in my blog to last fall: THEN I made a bread pudding, a pumpkin dessert, some chocolate chip cookies, some strawberry and tea cookies, a crème brûlée... Are we sensing a pattern here? Yeah, these are all things I've made THIS fall too. Granted, they're variations on flavors this year but still. Seems like in the fall I get cravings for a lot of the same stuff: comfort foods and pumpkin! I have to make it my mission to try some new stuff when I get back from my vacation.

But back to THIS recipe. The funny thing about pumpkin desserts which inevitably have the same familiar spices is, they kind of all remind you of pumpkin pie. This crème brûlée was just like that, pie-like, only in a softer texture.


The exciting thing with this crème brûlée, however, is that I borrowed my mom's serious, hardware-section blow torch and it worked PERFECTLY. No more putting the custards under a broiler and hoping they come out evenly done (but always burning just a little bit too much). I had complete control to make it an even, perfectly browned, sugar top! I will never use anything else again!

And my mom said it didn't need whipped cream but I just can't help it; pumpkin just seems wrong without it...


PUMPKIN CRÈME BRÛLÉE
Source: Williams-Sonoma

1 1/2 cups heavy cream
1 1/2 tsp. freshly grated cinnamon
1/4 tsp. ground allspice
1/2 tsp. freshly grated ginger
3/4 tsp. freshly grated nutmeg
5 egg yolks
1/2 tsp. vanilla extract
Pinch of salt
6 Tbs. pumpkin puree
1/3 cup plus 4 tsp. granulated sugar
1 Tbs. firmly packed light brown sugar


Preheat an oven to 300°F. Have a pot of boiling water ready.

Pour the cream into a small saucepan and whisk in the cinnamon, allspice, ginger and nutmeg. Set over medium-low heat and warm the cream mixture until bubbles form around the edges of the pan and steam begins to rise from the surface, about 3 minutes. Remove from the heat and let stand for 15 minutes.

In a large bowl, whisk together the egg yolks, vanilla, salt, pumpkin puree, the 1D3 cup granulated sugar and the brown sugar until smooth and blended. Slowly pour in the cream mixture, stirring until blended. Pour the mixture through a fine-mesh sieve set over a bowl. Divide the mixture among four 8-fl.-oz. ramekins and place in a large baking pan. Add boiling water to fill the pan halfway up the sides of the ramekins. Cover the pan loosely with aluminum foil and bake until the custards are just set around the edges, about 30 minutes.

Transfer the ramekins to a wire rack and let cool to room temperature. Cover with plastic wrap and refrigerate for at least 4 hours or up to 3 days.

Just before serving, sprinkle 1 tsp. granulated sugar evenly over the surface of each custard. Using a kitchen torch according to the manufacturer's instructions, move the flame continuously in small circles over the surface until the sugar melts and lightly browns. Refrigerate until sugar top hardens slightly then serve. Serves 4.

Sunday, September 21, 2008

Chocolate. Bread. Pudding!


There's a restaurant chain in Houston, TX, where I'm from, called Pappa's. The original was seafood but over the past 30+ years, they've expanded to separate restaurants specializing in Cajun, barbeque, steak, burgers, Greek and Mexican. It's at the excellent Pappasito's Cantina (the best Mexican restaurant that I know of) that I first tasted chocolate bread pudding.


It was magnificent. It contradicted what I believed bread pudding to be - it was solid, rich and decadent. It quickly became a staple of the ultimate meal at Pappasito's. The restaurant serves it at room temperature (or even slightly chilled) with crème anglaise AND a scoop of cinnamon ice cream. The two creamy sides compliment the rich chocolate dessert perfectly.

So when I went in search of a chocolate bread pudding recipe, I started getting discouraged: those with pictures clearly looked nothing like the kind from Pappasito's. They were more traditional bread pudding, thin, kind of goopy or loose, and none had terrific reviews. Then I stumbled on one called "DOUBLE Chocolate Bread Pudding" and I was intrigued. The recipe was directly from a restaurant called South City Kitchen in Georgia and the picture looked JUST like Pappasito's (in terms of consistency). However, it called for croissants instead of a regular French bread and having seen bits of bread-bread in Pappasitos', I knew I would have to alter their recipe. That made for a little uncertainty but once the finished product came out, I had absolute NO complaints.

It was better than I could've hoped for. VERY close to Pappasitos' recipe. I even made sure to have crème anglaise with it! I ended up using hoagie bread which are just small (about 5-6 inch long), oval loaves and they weren't stale or hard. They were still soft and they soaked up the custard very well, making a solid pudding.

This is, without a doubt, one of my favorite things. If you enjoy rich, chocolatey desserts, you MUST make this.

DOUBLE CHOCOLATE BREAD PUDDING
Adapted from South City Kitchen, Vinings

8 ounces semi-sweet chocolate, cut into small chunks
1 cup milk
1 1/2 cups heavy cream
1/4 cup (1/2 stick) unsalted butter
4 eggs
1/2 cup granulated sugar
1 tablespoon vanilla extract
1 teaspoon cinnamon
1/4 teaspoon nutmeg
1 pinch salt
8 ounces bread (about 3 large hoagie-sized pieces)
1 cup (6 ounces) semi-sweet chocolate chips


Preheat oven to 225 degrees. Place the semisweet chocolate in a large mixing bowl and set aside. In a saucepan over medium heat, heat the milk, cream and butter until butter is melted. Add to the semisweet chocolate, cover with a plate and set aside for a few minutes, then whisk until smooth.

In a small bowl, beat together the eggs, sugar, vanilla, cinnamon, nutmeg and salt. Beat a small amount of the warm chocolate mixture into the eggs, then whisk all of the egg mixture into the warm chocolate mixture.

Break up the bread into about 1-inch pieces and fold them into the custard mixture. (Add only enough to coat the bread very well and have a little liquid left over.) Then fold in the chocolate chips.

Pour into a buttered 2 quart baking dish (or 8-inch square pan). Bake until set, about 1 1/2 hours. Let rest at room temperature for 10 minutes; serve warm. Chill remainder as soon as possible. Leftovers can be reheated in a microwave oven.


CREME ANGLAISE
Source: Williams-Sonoma

2 cups milk
2 eggs plus 1 egg yolk
1/4 cup sugar
2 tsp. vanilla extract


Rinse the inside of a nonaluminum saucepan with water and shake out the excess water. Pour in the milk, place over medium-low heat and cook until small bubbles form around the edges of the pan, about 5 minutes.

In a small bowl, combine the eggs, egg yolk and sugar and whisk just until blended. Gradually whisk in half of the hot milk, then pour the egg mixture into the pan. Set over low heat and cook, stirring constantly, until the mixture is thick enough to coat the back of a spoon and leaves a clear trail when a finger is drawn through it, 6 to 8 minutes. Do not allow it to boil.

Strain the mixture through a fine-mesh sieve into a bowl. Stir in the vanilla. Cover with plastic wrap, pressing it directly on the surface to prevent a skin from forming, and let cool. Refrigerate for at least 2 hours or for up to 2 days.

Makes about 2 cups.


Sunday, July 20, 2008

Cuckoo for Coco

For my birthday back in April, my best friend got me this adorable cupcake tree that I've wanted since the beginning of time. Or, uh, since I first saw it a few years ago.

She got me the one for mini cupcakes which I've, surprisingly, never made before. I know, right? I'm a cupcake maniac; you'd think I'd be all over the map with my cupcake adventures. I've also never made (or eaten) coconut cake. So, naturally, I went to my reliable Ina. They were good, of course, but I find Ina's cakes sometimes to be a little more dense than I'd like. I'm not looking for a chiffon-type texture but something a little lighter. I'll definitely try another recipe later to compare the two. Maybe my perfect cake is a pipe dream...

But these were absolutely worth making. They were a hit with my taste testers! :)


COCONUT CUPCAKES
Source: Ina Garten (cupcakes) and Williams-Sonoma (icing)

For the Cupcakes:

3/4 pound unsalted butter at room temperature (3 sticks)
2 cups sugar
5 extra-large eggs at room temperature
1 1/2 teaspoons pure vanilla extract
1 1/2 teaspoons pure almond extract
3 cups all-purpose flour
1 teaspoon baking powder
1/2 teaspoon baking soda
1/2 teaspoon salt
1 cup buttermilk
14 oz. sweetened, shredding coconut


For the vanilla frosting:

12 Tbs. (1 1/2 sticks) unsalted butter, at room temperature
3 1/4 cups confectioners' sugar
2 tablespoons heavy cream
2 teaspoons vanilla extract
1/4 teaspoon salt
2 cups sweetened, shredded coconut


Preheat oven to 325 degrees.

In the bowl of an electric mixer fitted with the paddle attachment, cream the butter and sugar for 5 minutes – until light and fluffy. With the mixer running on low, add the eggs one at a time, scraping down the sides of the bowl after each addition. Add the vanilla and almond extracts and mix well.

In a separate bowl, sift together the flour, baking powder, baking soda, and salt. In three parts, alternately add the ingredients and the buttermilk to the batter, beginning and ending with the dry. Mix until just combined. Fold in 7 ounces of coconut.

Lin a muffin pan with paper liners. Fill each cup to the top with batter. Bake for 20 to 35 minutes, until the tops are brown and a toothpick comes out clean. Allow to cool in the pan for 15 minutes. Remove to a baking rack and cool completely.

While cupcakes are cooling, make the icing. In the bowl of an electric mixer fitted with the paddle attachment, beat together the butter, confectioners' sugar, cream, vanilla and salt on low speed until smooth, about 3 minutes. Pour the 2 cups coconut into a shallow bowl.

Using an icing spatula, frost the top of each cupcake, mounding the icing in the center. Holding the bottom of each cupcake, roll the frosted top in the coconut.


Saturday, July 5, 2008

Pistachios in Your Ice Cream

Ah, on to my third favorite flavor of ice cream (after coffee then cinnamon): pistachio. You know, Williams-Sonoma's recipes are swiftly becoming a safe bet; every one I've tried has come out really well. This was no exception. Creamy but not too sweet; a terrific balance of nutty pistachios and sweet cream!

Now that I've covered my absolute favs with success, I'm going to move on to more challenging flavors (banana, peanut butter?). The good news to all this ice cream making is, I'm getting pretty decent at getting a custard together. Practice really builds the confidence, you know? So much so, I think I'm ready to tackle more experimental flavors like... bacon. (I KNOW, RIGHT? Madness! Wish me luck...)


PISTACHIO ICE CREAM
Source: Williams-Sonoma

1 cup unsalted whole pistachios, roughly chopped
2/3 cup sugar
1 1/2 cups milk
1 1/2 cups heavy cream
4 egg yolks
Pinch of salt
1/2 tsp. almond extract


Preheat an oven to 350°F.

Arrange the pistachios in a single layer on a baking sheet and bake, shaking the pan occasionally, until the nuts are lightly golden and toasted, 5 to 7 minutes. Let cool to room temperature.

In a mini-food processor or standard-size food processor, combine 1/2 cup of the pistachios with the sugar and process until finely chopped and well blended. Reserve the remaining 1/2 cup pistachios.

In a saucepan, combine the milk, cream and the pistachio-sugar mixture and stir to blend. Set the pan over medium-low heat and warm the mixture, stirring occasionally, until the sugar is dissolved and steam begins to rise from the surface, 3 to 4 minutes. Remove from the heat and let the mixture steep for 10 to 15 minutes.

In a bowl, whisk together the egg yolks and salt until blended. Form a kitchen towel into a ring and place the bowl on top to prevent it from moving. Whisk in 1/2 cup of the pistachio-cream until smooth and blended, then pour the egg mixture back into the pan. Cook over medium-low heat, stirring slowly and continuously with a wooden spoon or spatula, until the custard thickens and a finger drawn across the back of the spoon leaves a path, 8 to 10 minutes; do not allow the custard to boil.

Pour the custard through a fine-mesh sieve set over a clean bowl; discard the pistachios. Nestle the bowl in a larger one filled halfway with ice and water and cool the custard to room temperature, stirring occasionally. Refrigerate until chilled, at least 1 hour.

Stir the almond extract into the custard, transfer to an ice cream maker and freeze according to the manufacturers instructions. At the end of the freezing stage, add the remaining 1/2 cup pistachios and continue processing just until they are blended into the ice cream. Transfer the ice cream to a chilled container, cover and freeze until firm, at least 3 hours or up to 3 days, before serving.

Makes about 1 quart.


Wednesday, June 18, 2008

Like the doughnut

You know what's EASY to photograph? Muffins.

The sole motivation for this was simply to make something EASY. Nothing is easier than cake. Easier still is a cake without icing. Hence, the muffin.

I was even looking for something simple in terms of ingredients. No special anything here, folks: butter, sugar, cinnamon, etc. It's so straight-forward, you could make it in your sleep. (But, seriously, don't do that; you'll burn the house down and I couldn't live with the guilt.)

I got the recipe from Williams-Sonoma (again). They have such adorable pictures next to all their recipes! It's hard not to just sit and browse until something jumps out at you. So I found these little muffins that the site correctly asserts taste just like cinnamon sugar cake doughnuts (but without the frying). They're especially good slightly warmed with a big glass of milk. Mmm, simple pleasures...


CINNAMON-BUTTERMILK MUFFINS
Source: Williams-Sonoma


For the muffins:

7 Tbs. unsalted butter, at room temperature
2/3 cup sugar
1 egg
1 1/2 cups all-purpose flour
1 1/2 tsp. baking powder
1/2 tsp. baking soda
1/2 tsp. salt
1/2 tsp. freshly grated nutmeg
1/2 cup buttermilk
1 1/2 tsp. vanilla extract


For the topping:

2/3 cup sugar
1 Tbs. ground cinnamon
6 Tbs. (3/4 stick) unsalted butter, melted


Preheat an oven to 350°F. Grease 9 standard muffin cups with butter or butter-flavored nonstick cooking spray; fill the unused cups one-third full with water to prevent warping.

To make the muffins, in the bowl of an electric mixer fitted with the flat beater, combine the butter and sugar and beat on medium speed until light and fluffy. Add the egg and beat well until pale and smooth.

In another bowl, stir together the flour, baking powder, baking soda, salt and nutmeg. Add to the butter mixture in 2 additions, alternating with the buttermilk and vanilla. Stir just until evenly moistened. The batter will be slightly lumpy.

Spoon the batter into the prepared muffin cups, filling each three-fourths full. Bake until the muffins are golden, dry and springy to the touch and a toothpick inserted into the center of a muffin comes out clean, 20 to 25 minutes. Transfer the pan to a wire rack and let cool for 5 minutes. Unmold the muffins and let stand until cool enough to handle.

To make the topping, in a small, shallow bowl, stir together the sugar and cinnamon. Put the melted butter in another small bowl. Holding the bottom of a muffin, dip the top into the melted butter, turning to coat it evenly. Immediately dip the top in the cinnamon-sugar mixture, coating it evenly, then tap it to remove excess sugar. Transfer the muffin, right side up, to the rack. Repeat with the remaining muffins. Let cool completely before serving. Makes 9 muffins.


Monday, June 16, 2008

German Chocolate Cake Ice Cream... Almost


You know what's hard to photograph? Ice cream. Even after you prep and do everything in your power short of shooting it IN the freezer, it just gives up on you and starts to melt in mere minutes. With this particular ice cream, it was SECONDS. I even froze the stuff in the shape of scoops so there was no lag between the freezer and my shots but still. It started breaking down about twenty seconds in. Prissy friggin' food.

Other than the prima donna act it gave me in front of the camera, this flavor really delivered. I got the chocolate base from Williams-Sonoma and had to modify it only superficially: I had no half-and-half so I substituted half milk and half cream (theoretically, half and half from scratch). They weren't kidding about it being rich. And after cooking the custard over the heat so there was no raw egg situation, I felt extremely comfortable licking the bowl of chocolate custard and dipping brownie in the creamy stuff as well. Mmmm. Chocolate 'splosion.

When I envisioned this flavor, I was aiming for German Chocolate cake. Then after I got home from the store, I remembered there are pecans in the caramel coconut part. Oh well. It came out just fine. The only complaint I'd have against the stuff is that the caramel is very sweet and the ice cream is very rich. It makes for an intense flavor. But some people like very sweet/very rich a lot so it's just up to personal tastes, really.

I was rather pleased with making the brownies and caramel sauce myself. It felt good to look at the final product and know I made every bit from scratch. This, from a novice cook, that is. I mean, watching the caramel come to a boil? Terrifying. I just knew it was going to burn the second I looked away. (So I never looked away.)

I've encountered a few issues with ice cream, though.

#1. It doesn't give you immediate results. I'm used to baking something and having it ready to eat right then. This, you go through all the work and then? Put it away (to freeze completely). It's somewhat unsatisfying.


#2. It's not portable. If the stuff melts only minutes out of the freezer, imagine a ten, fifteen or twenty minute car ride to someone's house! So people have to come to IT (again, with the prissy nature). It makes it difficult to get to family and friends.

However, my love of creating personal flavors outweighs any faults the cooking process may have. I see pistachio and then banana on the horizon...


MMMMM... BROWNIES
Source: cicada77 at AllRecipes.com


1/2 cup white sugar
2 tablespoons butter
2 tablespoons water
1 1/2 cups semisweet chocolate chips
2 eggs
1/2 teaspoon vanilla extract
2/3 cup all-purpose flour
1/4 teaspoon baking soda
1/2 teaspoon salt


Preheat the oven to 325 degrees F (165 degrees C). Grease an 8x8 inch square pan.

In a medium saucepan, combine the sugar, butter and water. Cook over medium heat until boiling. Remove from heat and stir in chocolate chips until melted and smooth. Mix in the eggs and vanilla. Combine the flour, baking soda and salt; stir into the chocolate mixture. Spread evenly into the prepared pan.

Bake for 25 to 30 minutes in the preheated oven, until brownies set up. Do not overbake! Cool in pan.

After completely cool, cut out 1/4 of pan and freeze. When hard, cut into 1 inch cubes (roughly 1 cup of chunks) and refreeze until ready to use.


CARAMEL COCONUT SWIRL
Adapted from Gourmet, Nov 1998

1/2 cup sugar
1/3 cup light corn syrup
1/4 cup water
7 tablespoons heavy cream
1/2 teaspoon vanilla
3/4 - 1 cup shredded coconut


In a 3-quart heavy saucepan boil sugar, corn syrup, water, and a pinch salt over moderate heat, stirring, until sugar is dissolved. Boil mixture, without stirring, gently swirling pan, until a deep golden caramel. Remove pan from heat and carefully pour cream and vanilla down side of pan (mixture will vigorously steam and caramel will harden). Simmer mixture, stirring, until caramel is dissolved. Remove pan from heat, add coconut and cool caramel. Caramel swirl may be made 1 week ahead and chilled, covered. Bring caramel swirl to room temperature before using. (If caramel swirl is too stiff to pour, heat slightly.)


CHOCOLATE ICE CREAM
Adapted from Williams Sonoma


1 1/2 cups heavy cream
1 1/2 cups whole milk
6 oz. bittersweet chocolate, finely chopped
(about 1 1/3 cups)
5 egg yolks
1 cup sugar
Pinch of salt
1 tsp. vanilla extract


In a saucepan over medium heat, warm the heavy cream and milk until bubbles form around the edges of the pan. Remove from the heat, add the chocolate and stir until smooth and blended.

In a large bowl, whisk together the egg yolks, sugar and salt until blended. Slowly add the chocolate cream, whisking constantly until fully incorporated.

Pour the mixture into a bowl on top of a double boiler. Set the pan over but not touching simmering water in the bottom pan. Cook, stirring constantly with a wooden spoon, until a finger drawn across the back of the spoon leaves a path, 10 to 12 minutes; do not allow the custard to boil. Pour the custard through a fine-mesh sieve set over a clean bowl and stir in the vanilla. Nestle the bowl in a larger one filled halfway with ice and water. Cool the custard, stirring occasionally, about 30 minutes.

Transfer the custard to an ice cream maker and freeze according to the manufacturer's instructions. Just before ice cream is finished churning, add brownie chunks and stir in completely. Transfer one third ice cream to an airtight container and drizzle one third caramel swirl over it. Repeat layering with remaining ice cream and caramel swirl. Cover and freeze until firm, 3 to 4 hours, before serving. Makes about 1 quart.