skip to main |
skip to sidebar
 My family knows I love baking. They also know that there's nothing I love more than baking BIRTHDAY CAKE. The best thing about birthday cakes is, because they come around every year, my fam usually gives me a challenge and requests something different each time. So I get to try new techniques and recipes AND do something for my loved ones at the same time!
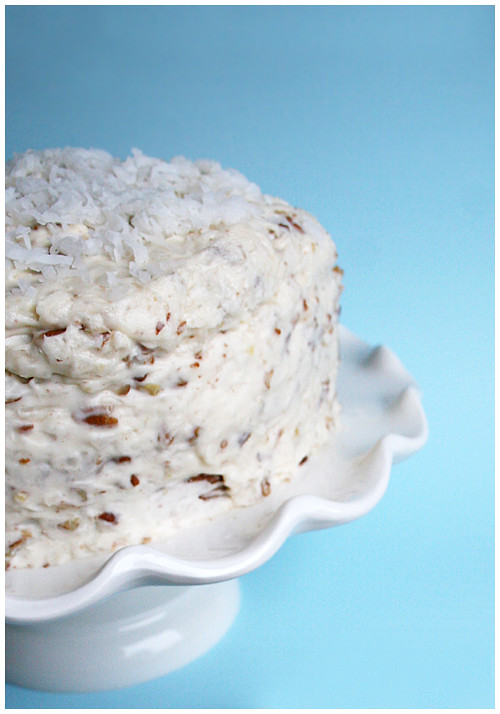
This year, my dad just said coconut cake but I had something special in mind. My friend from work and I share our cooking adventures and recipes with each other and she brought in a piece of this Italian Cream Cake a few months ago from her husband's birthday. It was DIVINE. So moist and coconutty. Auuggghhhh. She generously gave me the recipe and I sat on it, waiting for the perfect time to try it. HULLO, BIRTHDAY!
So, a few things first off: when you combine the baking soda and buttermilk, IT WILL FIZZ. I turned away for five seconds and when I looked back, it had overflowed from my cup. You've been warned! Use bigger than a 1 cup measuring cup.
Second, something in the chemical makeup of this batter cooks the eggs. You'll see pieces of scrambled egg and I don't know what I did to cause it. HOWEVER. I picked out the bigger pieces that made me nervous and baked and you couldn't tell ANYTHING in the final cake. So breathe easy; the egg will disappear!
Third, it'll seem like there's not enough icing for a three layer cake. I spread as thin a layer as possible on the insides (not even going all the way to the edge of the cake) and covered generously over the outside because that's the part that matters. You want the pretty swirliness on the outside. The inside layers were fine! The cake itself is sweet enough that it doesn't need too much icing. It was perfect the way it was!
This delish cake went SO FAST. It was just so gooooood. It's absolutely going on my all-time favorites!
 ITALIAN CREAM CAKE
Cake
1/2 cup shortening, room temperature
1/2 cup butter, room temperature
2 cups sugar
5 eggs, room temperature
1 cup buttermilk
1 teaspoon baking soda
2 cups flour
1 teaspoon vanilla
1 2/3 cup coconut
Icing
1/2 cup butter, room temperature
8 oz cream cheese, room temperature
1 box (~ 4 cups) sifted powdered sugar
1 teaspoon vanilla
1 cup coconut
1 cup chopped nuts (I used pecans)
1. Blend shortening and butter and sugar until creamy. Blend in egg yolks into mixture.
2. Add baking soda to buttermilk. Stir buttermilk and flour, alternately into egg mixture.
3. Beat egg whites until stiff; add vanilla. Fold stiff egg whites into batter, and then fold in coconut.
4. Divide batter into 3 8 or 9” cake pans that are greased and floured. Bake at 350° for 25-30 minutes or until toothpick comes out clean.
5. For Icing: Mix butter and cream cheese. Add sugar and vanilla. After mixed, add coconut and chopped nuts. Sprinkle coconut on top of cake after it is frosted. (I did mine just on top but it would look super pretty all the way around the sides too!)

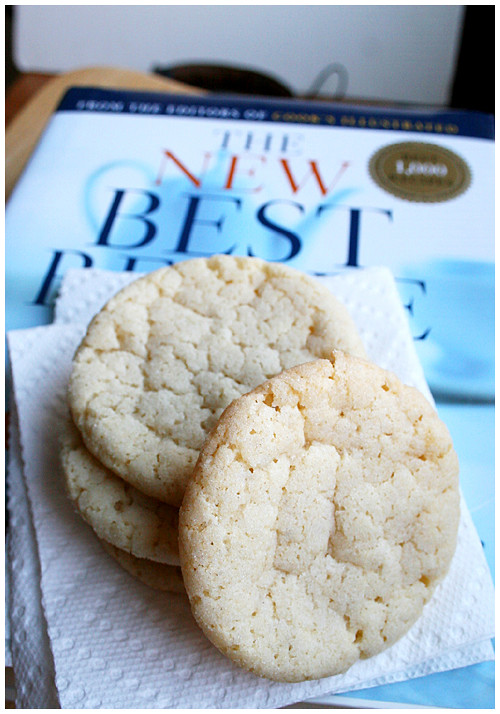 One can never have too many sugar cookie recipes. I've discovered this on my neverending journey to find the absolute best. Because I stumbled on a problem: there is no BEST. Sometimes you want chewy sugar cookies and sometimes you want sturdy but tasty ones for decorating and sometimes you want crispy, etc. Old Reliable (Cook's Illustrated) has taken care of one of these categories: the Chewy Sugar Cookie.
There's a few different techniques you can use to make each batch of these different and just a little alteration will affect them dramatically. Just a little more bake time and a perfectly crisp outer ring with chewy center turns into a full-on crunch show. So tread carefully with the first batch and see what works for you.
You can also press the ball of dough with the bottom of a glass to get the aforementioned perfect crisp/chew OR you can leave the dough in balls which results in a chewier, more raw taste (but it's cooked; trust). You can see the difference in appearance as well.
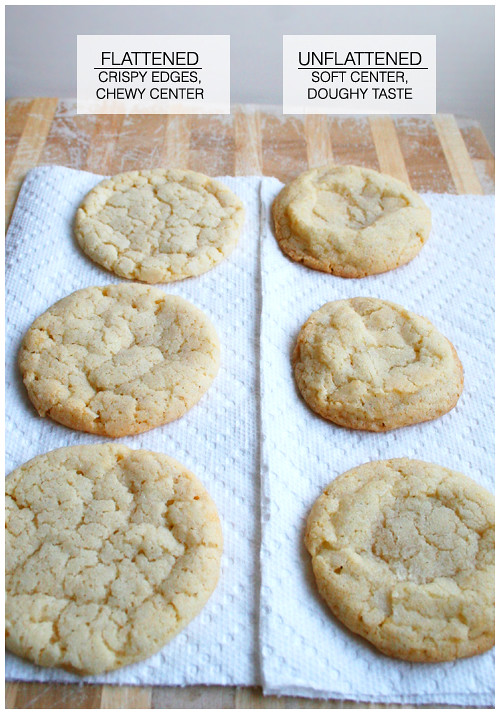 Personally, I like the flatter cookies because they came out with that chewy, soft center every time. I had family over for the holidays as I made these and they were served warm, fresh from the oven. An instant hit! (They keep really well too.)
CHEWY SUGAR COOKIES
Source: Cook's Illustrated
Note: The final dough will be slightly softer than most cookie dough. For the best results, handle the dough as briefly and gently as possible when shaping the cookies. Overworking the dough will result in flatter cookies.
2 1/4 cups (11 1/4 ounces) unbleached all-purpose flour
1/2 teaspoon baking soda
1 teaspoon baking powder
1/2 teaspoon table salt
1 1/2 cups (10 1/2 ounces) sugar, plus 1/3 cup for rolling
2 ounces cream cheese, cut into 8 pieces
6 tablespoons (3/4 stick) unsalted butter, melted and still warm
1/3 cup vegetable oil
1 large egg
1 tablespoon milk
2 teaspoons vanilla extract
1. Adjust oven rack to middle position and heat oven to 350 degrees. Line 2 large rimmed baking sheets with parchment paper. Whisk flour, baking soda, baking powder, and salt together in medium bowl. Set aside.
2. Place 1 1/2 cups sugar and cream cheese in large bowl. Place remaining 1/3 cup sugar in shallow baking dish or pie plate and set aside. Pour warm butter over sugar and cream cheese and whisk to combine (some small lumps of cream cheese will remain but will smooth out later). Whisk in oil until incorporated. Add egg, milk and vanilla; continue to whisk until smooth. Add flour mixture and mix with rubber spatula until soft homogeneous dough forms.
3. Divide dough into 24 equal pieces, about 2 tablespoons each (or use #40 portion scoop). Using hands, roll dough into balls. Working in batches, roll balls in reserved sugar to coat and evenly space on prepared baking sheet, 12 dough balls per sheet. Using bottom of drinking glass, flatten dough balls until 2 inches in diameter (or a little less than 1/2 inch tall).
4. Bake, 1 tray at a time, until edges are set and just beginning to brown, 11 to 13 minutes, rotating tray after 7 minutes. Cool cookies on baking sheets 5 minutes. Using wide metal spatula, transfer cookies to wire rack and cool to room temperature.
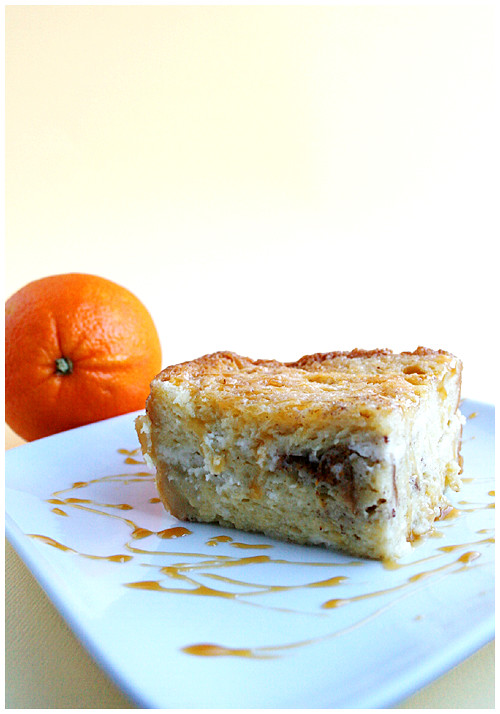 Do you want to know what's great about bread pudding? Everything. Everything is great about bread pudding. The richness, the texture, the simplicity of flavor and the versatility. In my quest for orange recipes for my orange-themed holidays, I came across many, tried a few then made this and knew all my searching hadn't been in vain. After this, I could wipe my hands clean of Orange Christmas 2010; I'd reached the pinnacle of success.
Now, full disclosure: I LOVE bread pudding. So maybe I'm a little biased. Maybe I ate this for breakfast a few times and maybe I also forked it into my mouth, directly out of the pan, because it was so addictive and lovely and I have little self-control. I kinda had my heart set on orange/chocolate recipes and I did find one for bread pudding on Food Network's site but it wasn't popular or reviewed more than 2 or 3 times and those always give me pause. This one, on the other hand, called for almond paste and the minute I see those two words, a flashing neon sign goes off in my head. WINNER. WINNER. WINNER. How does that delicious, yet shamefully unhealthy paste taste so good? Oh right, it's shamefully unhealthy. But it was Christmas so I indulged!
This had such an amazing smell when it was baking up as well and that was a big part of my Christmas baking too. I wanted the scent of orange and cinnamon and warmth permeating the house and this was spot on! And even though it's pictured, I didn't make the caramel sauce the recipe called for. That's a store bought for plate decoration. To me, it needed absolutely nothing else. It's rich and flavorful all on its own! Don't feel the need to add more sweetness to it; let the pudding speak for itself!!
If you have any inclination toward bread pudding at all, you absolutely must try this one. ugh. I miss it like an old friend. ...And it's only been 3 weeks since I've made it. want more!
 ORANGE ALMOND BREAD PUDDING
Adapted from: Sweet Pea's Kitchen
2 cups whole milk
2 cups heavy cream
Grated zest of 4 oranges
1/2 cup sugar, plus more for sprinkling
6 large egg yolks
1/2 teaspoon vanilla extract
1/4 teaspoon almond extract
1 tablespoon orange flavored liqueur such as Triple Sec, Grand Marnier or Contreau
1/2 teaspoon cinnamon
1 large egg white, at room temperature
7 ounces almond paste, crumbled
1 loaf (1 pound) of firm-textured white bread, cut into 1/2″ slices
1. In a medium saucepan, warm milk, heavy cream, orange zest and 1/2 cup of sugar to 110 degrees; Stirring often to dissolve the sugar. Remove from heat, cover, and let steep for one hour.
2. After one hour, reheat the cream mixture until it’s very warm (110 degrees). In a medium bowl, whisk the yolks then gradually whisk in the warm milk-cream mixture, whisking constantly to prevent eggs from cooking. Whisk in the vanilla extract, almond extract, orange liqueur, and cinnamon. Pour mixture through a strainer into another bowl to remove orange zest. Set aside.
3. Butter an 8x8 baking dish OR a shallow 2-quart baking dish or souffle mold. (Baking time will be longer with 8x8 as it will be thicker, as pictured.)
4. In a small bowl, beat the egg whites and almond paste until smooth. Spread a spoonful of almond paste over one side of a slice of bread, then place the slice in the prepared baking dish, almond paste side down. Continue spreading paste on bread, and layering slices into the dish. Pour the milk-egg yolk mixture over the bread and gently press down, submerging the layers in the liquid.
5. Cover with plastic wrap and place in the refrigerator at least an hour or overnight, pressing down occasionally to make sure the top layers of bread are soaked through.
6. Preheat oven to 350°F. If you’ve put the bread pudding in the fridge, allow it to come to room temperature before baking by placing it on the counter for at least an hour.
7. Sprinkle the top of the bread pudding liberally with sugar. Set the baking dish in a water bath by setting it in a large roasting pan, and then filling the roaster with water until it is halfway up the sides of the pudding’s baking dish.
8. Bake until pudding is puffed up in the center and the top is brown, about 1 to 1 1/2 hours. (Place loose aluminum foil over top if center isn't puffed; will keep top from burning.)
9. Let cool until warm. Serve warm. Optional: drizzle with caramel sauce.
Yields: 8-10 servings

I'm not sure if I've mentioned this (I have) but I live in Alaska. It's cold. And dark. And every winter, I fight for every bit of sun I can when taking pictures. But when you get off work at 3pm and it looks like that up there at 3:30 in the afternoon, it's hard to stay enthusiastic about taking pics. Some years are better than others, though. This year, I had some time off over the holidays and I took FULL advantage.

My mom wanted to make something different for Christmas dessert because every year we have pecan pie, pumpkin pie, flan and magic cookie bars. She went with a pumpkin flan in lieu of separate pie and custard and I took the opportunity to try a chocolate pie. The pictures don't do it justice because this pie was awesome! Thicker than pudding but as smooth, and rich chocolate but not overwhelming. It's got just as many glowing reviews from Epicurious so you know it's not just me!
It was a little time intensive and took planning but it was totally worth it in the end. Keeper!

CHOCOLATE CREAM PIE
Source: Gourmet, via Epicurious
For crust:
1 1/3 cups chocolate wafer crumbs (from about 26 cookies such as Nabisco Famous Chocolate Wafers)
5 tablespoons unsalted butter, melted
1/4 cup sugar
For filling:
2/3 cup sugar
1/4 cup cornstarch
1/2 teaspoon salt
4 large egg yolks
3 cups whole milk
5 oz fine-quality bittersweet chocolate (not unsweetened), melted
2 oz unsweetened chocolate, melted
2 tablespoons unsalted butter, softened
1 teaspoon vanilla
For topping:
3/4 cup chilled heavy cream
1 tablespoon sugar
Make crust:
Put oven rack in middle position and preheat oven to 350°F.
Stir together crumbs, butter, and sugar and press on bottom and up side of a 9-inch pie plate (1-quart capacity). Bake until crisp, about 15 minutes, and cool on a rack.
Make filling:
Whisk together sugar, cornstarch, salt, and yolks in a 3-quart heavy saucepan until combined well, then add milk in a stream, whisking. Bring to a boil over moderate heat, whisking, then reduce heat and simmer, whisking, 1 minute (filling will be thick).
Force filling through a fine-mesh sieve into a bowl, then whisk in chocolates, butter, and vanilla. Cover surface of filling with a buttered round of wax paper and cool completely, about 2 hours.
Spoon filling into crust and chill pie, loosely covered, at least 6 hours.
Make topping:
Just before serving, beat cream with sugar in a bowl using an electric mixer until it just holds stiff peaks, then spoon on top of pie.
Cooks' note: Pie (without topping) can be chilled up to 1 day.


