Showing posts with label chocolate. Show all posts

Saturday, February 9, 2013

Chocolate chocolate cake cake

I'm always a little floored when I get compliments from strangers on my baking. It takes a second and I get all flustered and don't know how to appropriately convey my utter gratitude so it comes out like a rushed 'oh thanks...' Which is too casual and completely inadequate with how amazing their compliment makes me feel.

The ultimate compliment, of course, is being asked to make something special for someone. My best friend asked me to make her first son's birthday cake (which I bombed by making a blue monstrosity - I'm sorry, Tres! ILU!) and I've happily donated cakes for office parties. This petite cake was made for an individual in the office who just asked for a small chocolate cake. It's two layers of a 6-inch round which might be my favorite mini cake size ever.

I'm a sucker for berries and chocolate so I liked how it turned out. And the ganache finally dripped so prettily!

I used the same chocolate cake recipe I always use, Beatty's Chocolate and a basic chocolate buttercream BUT I have to share the ganache ratio since it took me forever to find one that works:

Chocolate Ganache
6 ounces semi-sweet chocolate
2/3 cup heavy cream
1 tablespoon corn syrup


Good luck not putting that stuff on everything - berries, cookies, toast. It's allll good.


Wednesday, November 23, 2011

Fancied Up Chocolate Raspberry

I have a 14 year old nephew that's kind of a foodie. He wants to be a chef. But he also likes a lot of different foods so when I asked him what kind of cake he wanted for his birthday and he said the same chocolate/raspberry one I'd made for another friend before, I wasn't challenged. It was a smidge disappointing. So I went in search of at least prettying it up. I found a beautiful picture on flickr of a chocolate raspberry cake that I've, regrettably, lost the link to. I attempted to duplicate it and didn't quite succeed but my nephew liked it a lot so that was my main goal.

The thing I didn't prepare for was how time consuming every bit of this cake was. From the ganache to cutting the three layers to making the raspberry filling then chocolate buttercream then whipped cream THEN white chocolate marble decoration. so much work. But I'm glad it came out nice. And it was just as yummy as chocolate and raspberry always are. Win!

And it's six layers with three ganache fills and two raspberries. Mmmm!

Monday, January 17, 2011

Chocolate Pie for keeps


I'm not sure if I've mentioned this (I have) but I live in Alaska. It's cold. And dark. And every winter, I fight for every bit of sun I can when taking pictures. But when you get off work at 3pm and it looks like that up there at 3:30 in the afternoon, it's hard to stay enthusiastic about taking pics. Some years are better than others, though. This year, I had some time off over the holidays and I took FULL advantage.


My mom wanted to make something different for Christmas dessert because every year we have pecan pie, pumpkin pie, flan and magic cookie bars. She went with a pumpkin flan in lieu of separate pie and custard and I took the opportunity to try a chocolate pie. The pictures don't do it justice because this pie was awesome! Thicker than pudding but as smooth, and rich chocolate but not overwhelming. It's got just as many glowing reviews from Epicurious so you know it's not just me!

It was a little time intensive and took planning but it was totally worth it in the end. Keeper!


CHOCOLATE CREAM PIE
Source: Gourmet, via Epicurious

For crust:

1 1/3 cups chocolate wafer crumbs (from about 26 cookies such as Nabisco Famous Chocolate Wafers)
5 tablespoons unsalted butter, melted
1/4 cup sugar


For filling:

2/3 cup sugar
1/4 cup cornstarch
1/2 teaspoon salt
4 large egg yolks
3 cups whole milk
5 oz fine-quality bittersweet chocolate (not unsweetened), melted
2 oz unsweetened chocolate, melted
2 tablespoons unsalted butter, softened
1 teaspoon vanilla


For topping:

3/4 cup chilled heavy cream
1 tablespoon sugar


Make crust:
Put oven rack in middle position and preheat oven to 350°F.

Stir together crumbs, butter, and sugar and press on bottom and up side of a 9-inch pie plate (1-quart capacity). Bake until crisp, about 15 minutes, and cool on a rack.

Make filling:
Whisk together sugar, cornstarch, salt, and yolks in a 3-quart heavy saucepan until combined well, then add milk in a stream, whisking. Bring to a boil over moderate heat, whisking, then reduce heat and simmer, whisking, 1 minute (filling will be thick).

Force filling through a fine-mesh sieve into a bowl, then whisk in chocolates, butter, and vanilla. Cover surface of filling with a buttered round of wax paper and cool completely, about 2 hours.

Spoon filling into crust and chill pie, loosely covered, at least 6 hours.

Make topping:
Just before serving, beat cream with sugar in a bowl using an electric mixer until it just holds stiff peaks, then spoon on top of pie.


Cooks' note: Pie (without topping) can be chilled up to 1 day.


Monday, December 20, 2010

Oranges for Christmas


Every Christmas, since I've been living on my own, I've picked a very rigid color theme to decorate my tree and home. At first, my family snickered at me because I couldn't have anything but the Designated Color/Theme wrapping paper under my tree. And I don't know WHY I started doing this. Probably because I'm a control freak. But start I did. The first year was relatively easy: silver and gold. The second year, I had this magnificent idea: turquoise and lime green! My mom balked at me and my enthusiasm deflated and I settled on red, white and silver. I will never go against my instinct again; I regretted it the whole time and the next season, all the stores had those turquoise and green decorations! But the draw to it had passed. If only I'd followed my gut! ARGH.

The year after, 2007, was my Houston Oiler's colors, red and light blue. It was lovely! Then 2008 was inspired by the Pottery Barn garden theme so it was all naturals and greens and golds! I think that one was my favorite because there were birds and butterflies and adorableness. Of course, with all that natural greenery, I went the opposite in 2009 and was all winter: blues and silvers and whites and snow. And that was okay but nothing that I was crazy about.


This year, like every year I'm crazy about a theme, I see one thing and cling to it and make my entire theme around it. This year, it was a wreath from Williams-Sonoma: simple evergreen with dried oranges and pinecones. Orange and chocolate. It hooked me immediately. And the thing is, I don't even really like oranges in general. But they're such a wonderful Christmas tradition that I never even knew about. My theme evolved to winter fruits, oranges and cranberries, so there's splashes of red color mixed in!

First, I made dried orange slices for Christmas ornaments and, dude! They came out WAY better than I could've hoped for! So vibrant and natural and purdy! And EASY. I also made a clove orange pomander (as seen above) that came out lovely! Probably my favorite thing this season so far!


DRIED ORANGE SLICES

1. Preheat oven to 250. Slice oranges 1/4" thick. Dip in mixture of half fresh lemon juice, half water. Place on wire rack set above rimmed cookie sheet. (Or you can place slices directly on your oven rack as some instructions say, but I was afraid of juices dripping in my oven.)

2. Let dry out at 250 for 1 hour, turning slices over every 30 minutes for even drying. Lower oven temperature to 225 and dry for another 2 hours, again, turning every 30 minutes.

3. Take out of oven and let cool to room temperature. I did not even store the dried slices in an air-tight container because I was afraid moisture would build up in it; I WANT them dry and preserved! So I hung them right away and it's been two weeks! So far, so good!


Then I started looking for orange or orange/chocolate recipes. I found a few and, long story short (too late), none have blown my skirt up. I made Cranberry Orange Muffins from Williams-Sonoma that were thoroughly disappointing with fresh cranberries. They were unbearably tart and the recipe called for too many! Then there was an orange-flavored chocolate ganache tart. Mreh. Too simplistic and nothing amazing. I'm waiting for that awesome dessert to wow me and this year, I'm just not feeling it.


I did, however, catch these cookies on Paula Deen's cookie exchange episode. They've been quite finicky for me so I say, watch carefully: since they're chocolate, there's no way of judging their doneness by how dark they are! So the first batch, I followed the Food Network recipe of 10 minutes bake time and they came out as goopy messes. The second batch I went about 13-15 minutes and they were sturdy and had a nice soft chewiness in the center. Perfect! The THIRD batch, I let go for about 15-17 minutes and wow they came out completely crunchy and hard. ARGH. Curse you, brown colored cookies!

So know your oven and make a few batches to find out how you want your cookies. I think it also made a difference in the shape: the first batch, I rolled into balls as I saw the woman do on the show. The second, which came out perfect, I left as round discs and just pat the rough edges down before sugar dusting. That gave them the nice edges and chewy center!

Overall, these are a very chocolatey and delish cookie! They're keepers!


TOP SECRET CHOCOLATE COOKIES
Source: Christy Hyer

2 1/2 sticks unsalted butter, at room temperature
2 cups sugar
2 large eggs
1 tablespoon vanilla extract
3/4 cup Dutch process cocoa powder
2 cups all-purpose flour
1 teaspoon baking soda
1/2 teaspoon salt
White Sanding sugar, for garnish

1. In a large bowl, add the butter and sugar and cream together with mixer. Add the eggs and vanilla extract to the creamed mixture and mix until combined. In a medium bowl, mix the cocoa powder, flour, baking soda, and salt. Slowly add the dry ingredients and continue mixing until incorporated.

2. Roll the dough into 2 logs that are about 2-inches high and 1-foot long. Wrap them in waxed paper and place in the refrigerator for 2 hours.

3. Preheat oven to 350 degrees F

Once thoroughly chilled, slice the cookies into 1/2-inch thick rounds and cover with sanding sugar. Place on a parchment paper lined cookie sheet and bake for 10 minutes.

Remove to a wire rack to cool.


And there's more orange and chocolateness to come! HAPPY HOLIDAYS, EVERYONE!!

Sunday, February 28, 2010

February and chocolate, CHECK

AH HA. I caught you, last day of February! Take THAT, procrastination!

These are just a few mini cupcakes I made in a hurry for Valentine's. They're a box mix. I know. I bring shame on my family. HOWEVER the buttercream icing is real! It's my favorite [because it's so terrible for you]. And they were serious good. Two quick bites of delish. :)


VANILLA BUTTERCREAM ICING

1 cup Crisco Shortening
1/2 stick butter, room temperature
2 tbsps heavy whipping cream
1 tsp vanilla
4 cups powdered sugar, sifted (measure then sift)


In your mixer bowl, beat the shortening until it's smooth, add the butter and beat together until smooth and light and fluffy. Add smaller amount of the heavy cream indicated in the recipe and the vanilla and mix well.

Add half the powdered sugar and mix for 5 minutes on low-med speed. Add remaining sugar and mix well. Add more cream or powdered sugar if necessary to adjust the consistency

Add coloring as desired.


I'm making a resolution here and now: MARCH is going to be my baking month. I always tell myself I'm going to make calendar-appropriate recipes like Irish soda bread and green stuff but I never do. Well, I'm putting the pressure on myself right now. SOMETHING GREEN IS GOING TO BE HAPPENING IN MARCH. Or at least have the spirit of Irish-ness.

Monday, February 1, 2010

Chocolate and failure

You know, when I started this blog, it was not to be Niki's Baking Triumphs or anything. It was meant to chronicle the ups and downs, the successes and failures, of my baking adventures. I guess I lost sight of that, only wanting to publish my wins and sweep the failures under the rug. I got the impression that people reading might be taking my posts as an endorsement of the recipes I attempted instead of reading through and discovering I found it lacking or ho-hum.


I would be lying if I said I hadn't baked since those little pumpkin pies, way back in October. I've baked plenty. The holidays always bring out the excitement in me so I made my annual peanut butter blossoms, sweet potatoes for Thanksgiving and a bread pudding for my dad visiting. So baking was going on, I simply didn't have the time (or natural lighting of daylight to take pictures thanks to living in this eternal night wasteland called Alaska; DEAR MIDNIGHT SUN SUMMER, WHERE ARE YOU). But I digress. There's been baking but no posting. Which brings me to now.


I got another idea in my head that I couldn't shake. A pie. A chocolate pie. And Julie & Julia was no help; just as Keri Russell's pie maker in Waitress whipped up a dark chocolate pie, so too did Amy Adams in that flick and both immediately inspired me to want one of my own. But this idea was very specific; it was of a dense but soft, almost cheesecake-consistency but not. Something you could cut into but would melt in your mouth with a not too overpowering taste. Almost a flourless chocolate cake but not so strong. Anyway, I went on the hunt.


The first chocolate pie I found was a "grandma's" recipe so I thought, hey, that might work. I don't understand why they're not just called chocolate PUDDING pie because that's what they are. Or is that assumed? I don't know; I've never had someone else's chocolate pie. I imagined something dark and rich and solid and that certainly wasn't. Also, the crust called for oil as the fat and after reading The Best Recipe book, it explains that oil makes for a hard crust because it holds no water that can evaporate during the cooking process and release air that makes crusts usually pocketed and flaky. Yeah, I'm never using oil in pie crust again.


The next I tried was from a friend from work who I often discuss cooking techniques with. She has a wealth of experience and she's an awesome source of help. She gave me a Fudge Pie recipe and I thought, Ooo, that sounds promising! Thick like fudge! I made it and it wasn't quite as thick as fudge. My version was definitely thicker than the pudding pie and it tasted lovely but it was still pretty soft (more like a soft cheese consistency) and not exactly what I was searching for.


Then I started rifling through my mom's old newspaper cut-out recipes and booklets. I found a Fudge Brownie Pie in an old Eagle Brand recipe booklet and figured a thicker, brownie consistency might be just what I'm looking for. Yeah, no. It tasted like a brownie in a completely unnecessary pie crust. Disappointment continued.

Upon talking it over more with my mom, I began to realize I was really in search of one thing: a silk pie. And not a FRENCH silk pie because those seemed to be more airy and light and with whipped cream and such. But a silk pie like the kind we used to get all the time from one business that pulled up stakes and moved out of town: the Alaska Silk Pie Company. Yeah, they're not in Alaska anymore and they charge around $40 to send about a 6" pie here. But their pies are
heavenly. That can't be denied.


So I went looking for silk pie recipes. The thing about silk pies is they're not baked and raw eggs are used. On their cooking channel special, the creator of the Alaska silk pies said she used 'pasteurized eggs'. Well, the only thing we could come up with was Egg Beaters. (I've since discovered techniques for home pasteurizing that are intriguing...) I found a seemingly simple French Silk pie recipe I figured I could weigh down with less beating and went to using Egg Beaters. It curdled up on me about 2/3 of the way through. I freaked out and called Mom for advice. She said throw it in the blender and that did the trick perfectly: it went back to a nice, smooth consistency. It called for refrigeration but when I uncoiled the spring form pan, it barely held together and it was, unfortunately a true French Silk filling; it was meant for a pie crust and meant to be soft. The other thing that bothers me a little is the fact that Egg Beaters is mostly egg whites which have a higher water content than whole eggs. Did that have something to do with the consistency? Perhaps.


So here I am. Four failures in and nothing to show for the quest. My mom caved and ordered an Alaska silk pie just to have a reminder and it was just as good as we remember. I'm afraid I'm going to have to try again because it was just so lovely.


As for posting, I will attempt to keep up here too; even when my kitchen is a den of failure. This blog is to chronicle ALL my adventures. Especially the losses so I won't make the same mistakes. NEVER FORGET.


Thursday, October 29, 2009

Boo, ghosts. Boo.


Halloween is, by far, my favorite holiday. I'm not sure why because I've never been big on costumes or being scared at haunted houses or even trick-or-treating. But I guess it's fall and cute/spooky treats and decorations. Pumpkins were sent from Jesus as the greatest food stuff known to man. This is not a pumpkin entry; that's coming up next.

THIS is a Halloween cake entry because I seem to have those every other year. My best friend has a fall baby on the way (due late November) and she loves Halloween just as much and so decided the baby shower would be a perfect opportunity to have the best of both worlds. Hallo-baby party-shower! I'd seen these petits fours on Martha Stewart last year and almost died of the cute. I HAD to make them. But the holiday rolled around and went and I missed the chance. When this shower came up, I knew it would be the perfect occasion.

The thing about this blog I think I've found most fulfilling is the ability to go through a recipe, experience the process, and then post my reactions, good and bad, and try to help others not make the same mistakes. Or, in this case, say flat out: I will not make this recipe again. Don't get me wrong; another baker might look at it and decide it'll be worth the trouble. I can only say that from my standpoint, it's not.

I devised a few shortcuts from the word go that I thought would help me out. I'd bake the cake and freeze it so a hard (and not pillowy soft) cake would cut through easier when using the small biscuit round cutter. Yeah, no. Turns out, the cold cake stuck to the metal cutter and subsequently couldn't cut the third and fourth rounds neatly at all. There was much cleaning, cutting, cleaning, cutting.


I then saw that the pan made the cake too tall for the stumpy little ghosts. I had to go through and cut all the tops off the cylinders although this did provide me with a fun little sampler disk of cake. Mmm.


And that's another thing: this recipe WASTES so much cake. There's just something in me that cringes at having leftover bits with nothing to do with. I froze the trimmings and have yet to decide their fate.


So I piped the little cones of buttercream on top and froze that as well. There's always an issue of exposed cake drying out so I had to do a quick freeze for the frosting to set up then went back and lightly covered a hollow cake pan with plastic wrap so only the tops were touching. Froze them again so I could glaze the day of the shower.


Now. The glaze. Perhaps a more experienced petits-fours-making-person would've thinned it out further but there were two issues: #1. I didn't know if a thinner glaze would set up or if it would remain too liquid, and #2. Would a thinner glaze show the imperfections of the cake/frosting instead of being a smooth, ghosty outside? I don't know the answer to either still because I was too chicken to try thinning the glaze. As it is, it's kind of thick and VERY sweet. The ghosts came out okay but not great. The witch hats, however, were a small disaster. The chocolate "glaze" is nothing more than a ganache that completely smothers the tiny round of delicate cake. With the buttercream cone on top of that, you've got a giant helping of chocolate and frosting and not much else. I wanted to throw them away but, again, felt uneasy wasting food. They were an unadulterated failure, though.

One last thing: the chocolate piping. I wish I'd read Bakerella's notes on piping chocolate for faces in which she instructs to add a little vegetable oil to make the substance more fluid because MARTHA sure didn't. So, thanks to Martha Stewart, the chocolate was too thick, hard to manage and came out looking junky. Bakerella's, on the other hand, came out looking great (that's the pumpkin coming up next). Thanks for nothing, Martha!

The guests at the party were extremely nice and said they really liked the little ghosts but I was disappointed. I will absolutely never make these again but I'm glad I went through the experience and could pass it on to you guys. Attempt at your own risk!


GHOULISH PETITS FOURS
Martha Stewart

For witch hats, make petits fours through step two. Then create a brim using a dab of icing: Affix each petit four to a 2-to-2 1/2-inch chocolate wafer cookie. Proceed to step three, coating with Chocolate Glaze instead of Butter Glaze. In lieu of step four, wrap one or two pieces of licorice lace around the base of the hat immediately after glazing.


Makes about 40
White Sheet Cake
Confectioners' Sugar Icing
Butter Glaze
4 ounces semisweet chocolate, for eyes and mouth


Using a 1 1/2-inch cookie cutter, cut out circles from cake. Brush off any crumbs with a pastry brush.

Fit a pastry bag with a plastic coupler, and top cake rounds with icing in a ghost or hat shape, about 1 inch high.

Place a wire rack over a rimmed baking sheet; set aside. Set an iced cake round on a fork; hold over bowl of glaze. Using a large spoon, drizzle glaze evenly over cake and icing until completely covered. Transfer to wire rack. Repeat with remaining rounds. Let set, about 5 minutes.

Place chocolate in a heatproof bowl microwave at 50% power, stirring chocolate every 30 seconds until melted. Add small amount of vegetable oil to make more fluid. Transfer to a disposable pastry bag or resealable plastic bag; snip off tip with scissors. Pipe eyes and a mouth onto ghosts.


WHITE SHEET CAKE

Makes one 12-by-17-inch cake

1 cup (2 sticks) plus 2 tablespoons unsalted butter, room temperature, plus more for baking sheet and wire rack
4 1/2 cups sifted cake flour (not self-rising), plus more for baking sheet
2 tablespoons baking powder
3/4 teaspoon salt
1 1/2 cups milk
1 1/2 tablespoons pure vanilla extract
2 1/4 cups sugar
7 large egg whites

Preheat oven to 350 degrees. Butter a 12-by-17-by-1-inch rimmed baking sheet. Line bottom with parchment paper. Butter parchment, and dust with flour, tapping off any excess. Set sheet aside.

Into a medium bowl, sift together flour, baking powder, and salt; set aside. In a measuring cup, combine milk and vanilla; set aside. In the bowl of an electric mixer fitted with the paddle attachment, cream butter until very smooth. With mixer on medium speed, add sugar in a slow, steady stream; beat until mixture is light and fluffy, about 3 minutes.

Reduce speed to low. Add reserved flour mixture in three batches, alternating with reserved milk mixture, and starting and ending with flour. Mix until just combined; do not overmix. Set aside.

In a clean bowl, beat egg whites until stiff but do not let dry peaks form. Fold one-third of the egg whites into batter to lighten, then gently fold in remaining whites in two batches.

Scrape batter into prepared sheet; smooth top with an offset spatula. Bake in oven until cake is springy to the touch and a cake tester inserted in the center comes out clean, about 30 minutes. Transfer to a wire rack, and let cool 15 minutes. Loosen sides of cake with a small metal spatula or paring knife; invert onto a buttered wire rack. Peel off parchment. To prevent splitting, reinvert cake so top is facing up. Let cake cool completely.


CONFECTIONERS' SUGAR ICING
(I would HALVE this; it made WAY too much)

Makes about 7 cups

1 1/2 cups unsalted butter (3 sticks), room temperature
3 pounds confectioners' sugar
3/4 teaspoon salt
3 tablespoons pure vanilla extract
3/4 cup milk, plus more if needed


In the bowl of an electric mixer fitted with the paddle attachment, beat together the butter and sugar until well combined. Add salt, vanilla, and milk; beat until icing is smooth and creamy. The icing should be thick enough to pipe and hold its shape. If icing seems too thick, add 1 tablespoon milk at a time until proper consistency is reached. Use immediately, or refrigerate in an airtight container up to 2 days. If refrigerating, bring icing to room temperature before using, and lightly beat until creamy if necessary.


BUTTER GLAZE
Makes about 1 1/2 cups

2 1/2 cups sifted confectioners' sugar
1/2 cup (1 stick) unsalted butter
5 tablespoons milk


Place sugar in a medium bowl, and set aside. In a small saucepan, melt butter over medium heat. Immediately pour the melted butter into the bowl with the sugar. Add the milk, and whisk until mixture is smooth. Cover bowl, and store at room temperature until ready to use.


CHOCOLATE GLAZE (for witch hats)
Makes 1 1/2 cups

6 ounces best-quality bittersweet or semisweet chocolate
1 cup heavy cream


Chop the chocolate into small pieces, and place in a medium bowl. In a small saucepan, heat cream over medium-high heat until just simmering, and pour it over the chocolate. Let mixture stand 5 minutes, then stir until smooth. Let stand at room temperature about 10 minutes before using.


Sunday, September 20, 2009

Fall starts today


Fall is official in my house. It always starts with the football season beginning (last week) and then the Halloween candy appears in the grocery stores. But it's not OFFICIAL in my house until I haul out the tubs of Halloween decorations, light up my favorite fall spice candle and bake something with pumpkin. Today, it has arrived.


These are the pumpkin swirl brownies from Martha Stewart and they sounded so damn easy, how could I pass them up? I was also assured the pumpkin & chocolate flavors meshed well by my last chocopumpkin attempt with muffins. There would be a big difference between the two, but I'll get to that in a second.

I had to adjust the baking time because I didn't have a 9" square pan, but an 8"; it took an added 20 minutes and it was only just coming out with the toothpick clean. I also didn't add any nuts as the original recipe suggests sprinkling on top and now I wish I had. I think walnuts would've been perfect. My instinct to omit them was completely wrong.

Now, the difference from these brownies and the muffins: the thing about the muffins was, it was all pumpkin then lovely little bits of chocolate chips. In these brownies, there is equal amounts of pumpkin and chocolate and, to be honest, the chocolate kind of takes over. It's like they stepped into the ring and the pumpkin got KO'ed. However, the batter doesn't mix completely (as you can see from the layers), so you can taste them separately. The cayenne, especially, is noticeable in the pumpkin layers (and it's the tiniest bite but it's good!)

These were good but I kind of want a big pumpkin flavor when I make something with it. My pumpkin craving wasn't satisfied at all from this so I'm definitely looking for what's next!


PUMPKIN SWIRL BROWNIES
Source: Martha Stewart

Makes 16

8 tablespoons (1 stick) unsalted butter, plus more for pan
6 ounces bittersweet chocolate, chopped
2 cups all-purpose flour
1 teaspoon baking powder
1/4 teaspoon cayenne pepper
1/2 teaspoon salt
1 3/4 cups sugar
4 large eggs
1 tablespoon pure vanilla extract
1 1/4 cups solid-pack pumpkin
1/4 cup vegetable oil
1 teaspoon ground cinnamon
1/4 teaspoon ground nutmeg

Optional: 1/2 cup chopped hazelnuts or other nuts


Preheat oven to 350 degrees. Butter a 9-inch square baking pan or dish. Line bottom of pan with parchment paper; butter lining.

Melt chocolate and butter in a heatproof bowl set over a pan of simmering water, stirring occasionally until smooth.

Whisk together flour, baking powder, cayenne, and salt in a large bowl; set aside. Put sugar, eggs, and vanilla in the bowl of an electric mixer fitted with the paddle attachment; beat until fluffy and well combined, 3 to 5 minutes. Beat in flour mixture.

Divide batter between two medium bowls (about 2 cups per bowl). Stir chocolate mixture into one bowl. In other bowl, stir in pumpkin, oil, cinnamon, and nutmeg. Transfer half of chocolate batter to prepared pan smoothing top with a rubber spatula. Top with half of pumpkin batter. Repeat to make one more chocolate layer and one more pumpkin layer. Work quickly so batters don't set.

With a small spatula or a table knife, gently swirl the two batters to create a marbled effect.

Bake until set, 40 to 55 minutes. Let cool in pan on a wire rack. Cut into 16 squares.

Thursday, September 17, 2009

Chocolate & Raspberry always works


I saw the movie Hot Fuzz the other day and while it was awesome, one moment stuck out: Nick Frost's character was munching away on a chocolate cake with some sort of red filling. I was asked to make a cake for my friend's birthday and that's the first thing I proposed.

This was another one of those collecting pieces of recipes from all over to create something. I get nervous when I do this; it feels like creating a Frankenstein monster. Who knows if it'll be okay or such a disaster, the townsfolk start gathering their pitchforks. Thankfully, it was the former.

I went with the trusty Ina Garten but, more importantly, a chocolate cake she'd featured in her show from a "Beatty", that had unheard-of positive reviews. 5 stars, almost across the board. And I could very well go to Food Network.com and add my own rave review because this cake was phenomenal. It was moist but not too dense, perfectly chocolately without being overpowering. Absolutely terrific.


Now, for the red filling, I had to start scouring the web in search of what existed in my mind but which I wasn't sure I'd seen materialized outside of a Simon Pegg movie. A few came up that never sounded exactly right but then I finally stumbled on a straightforward Raspberry Filling recipe from Wilton.com, strangely enough. I'd never used any of their recipes before but this appeared so easy and I was going for a simple taste that wouldn't complicate the cake. It came out exactly as I'd hoped, thickened by the corn starch and tart but still sweet and seriously hard to stop eating.

To even out the tartness of the raspberry filling and the richness of the chocolate, I added a layer of whipped cream. Chocolate ganache topped it off and voila! Chocolate raspberry cake! It was a hit with the birthday girl and my family. I was honestly surprised at how much I enjoyed it. It took some time to prepare all the components but it was absolutely worth it!


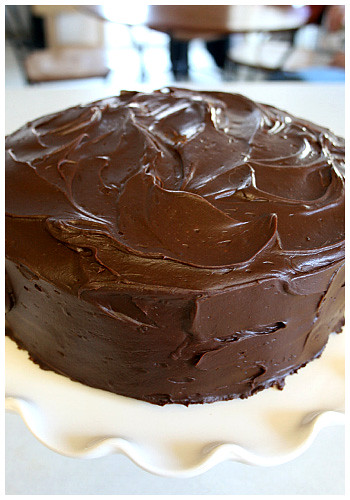
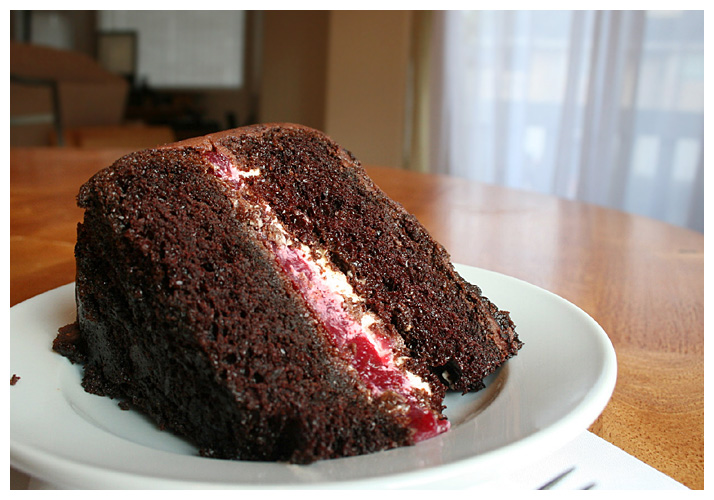
BEATTY'S CHOCOLATE CAKE WITH RASPBERRY FILLING
Source: Ina Garten

Butter, for greasing the pans


1 3/4 cups all-purpose flour, plus more for pans
2 cups sugar
3/4 cups good cocoa powder
2 teaspoons baking soda
1 teaspoon baking powder
1 teaspoon kosher salt
1 cup buttermilk, shaken
1/2 cup vegetable oil
2 extra-large eggs, at room temperature
1 teaspoon pure vanilla extract
1 cup freshly brewed hot coffee

Chocolate Ganache (recipe follows)
Raspberry Filling (recipe follows)
Whipped cream (recipe follows)
Preheat the oven to 350 degrees F. Butter 2 (8-inch) round cake pans. Line with parchment paper, then butter and flour the pans.

Sift the flour, sugar, cocoa, baking soda, baking powder, and salt into the bowl of an electric mixer fitted with a paddle attachment and mix on low speed until combined. In another bowl, combine the buttermilk, oil, eggs, and vanilla. With the mixer on low speed, slowly add the wet ingredients to the dry. With mixer still on low, add the coffee and stir just to combine, scraping the bottom of the bowl with a rubber spatula. Pour the batter into the prepared pans and bake for 35 to 40 minutes, until a cake tester comes out clean. Cool in the pans for 30 minutes, then turn them out onto a cooling rack and cool completely.


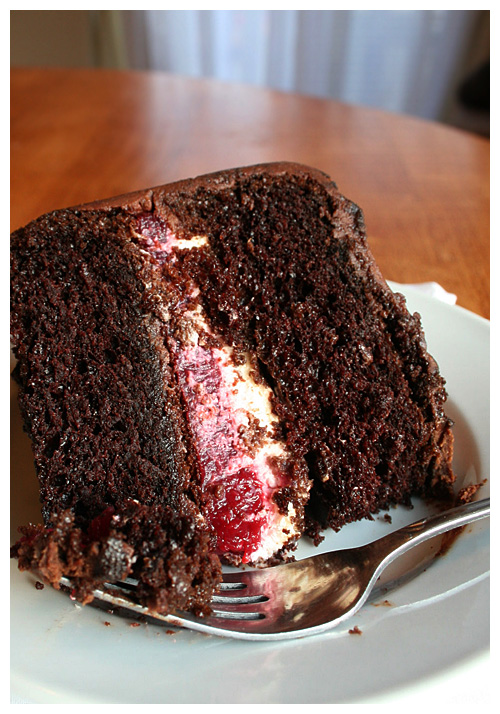
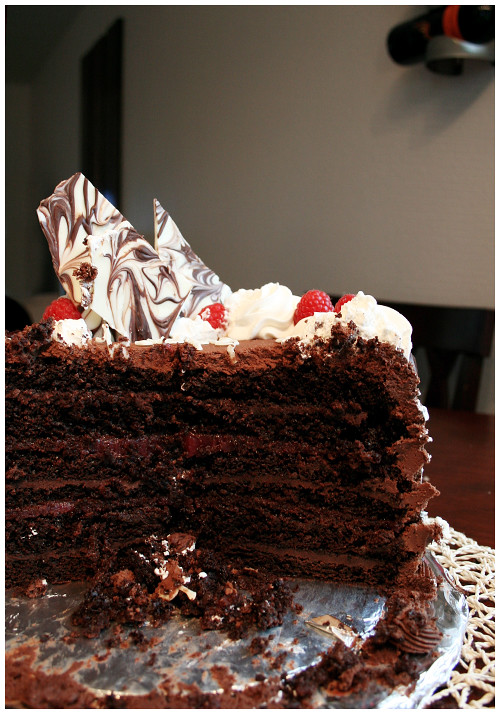
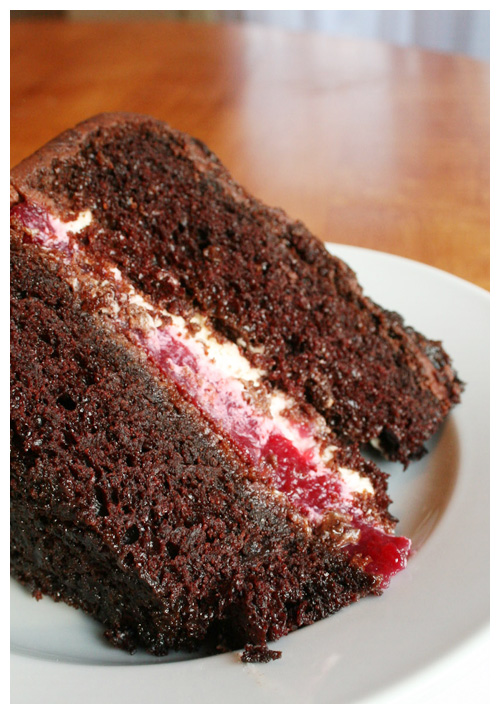
Assemble the bottom of the cake, flat side up, with a layer of raspberry filling then whipped cream (recipes follow). Set top cake layer on the filling layers. Refrigerate to set filling layers to cakes.

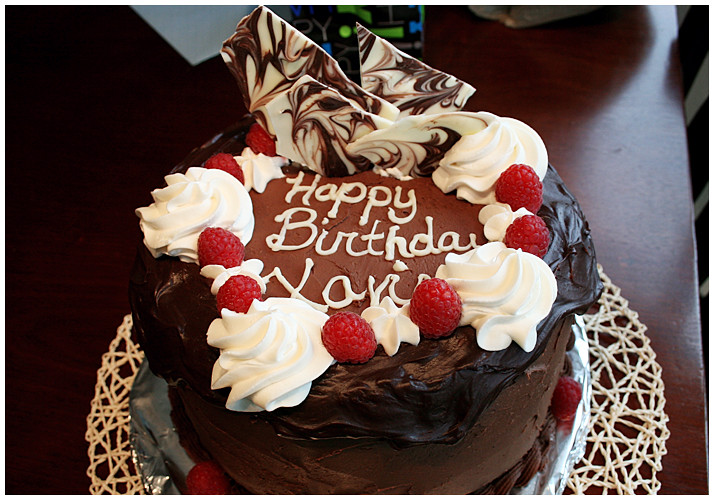
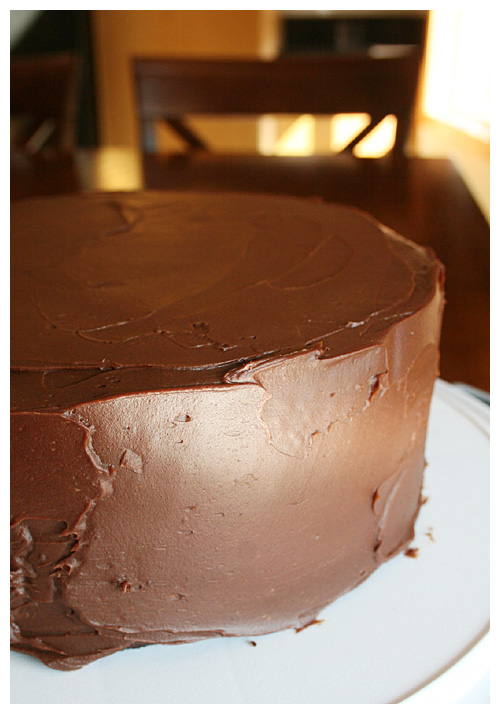
Make chocolate ganache then let come to room temperature. You may need to let it sit in the fridge as well (continue stirring every five minutes or so to allow to chill evenly). When it is a thick, spreading consistency, spread evenly over cake. It will be a thin layer (ganache is dense and strong) so it is easiest to pour all ganache in the center and slowly work out and down the sides with a flat spatula.

Serve soon or refrigerate if storing. Whipped cream will not keep long.


RASPBERRY FILLING
Adapted from: Wilton.com

1 pkg (16 ounces) frozen raspberries packed in sugar thawed
1/3 cup granulated sugar
3 tablespoons cornstarch
1 teaspoon lemon juice

Makes: Filling serves 2 cups.

Drain raspberries, reserving liquid. Add enough water to liquid to equal 1 1/4 cups.

In large saucepan, combine liquid, sugar, cornstarch and lemon juice; mix well. Heat and stir until mixture boils and thickens. Cool completely.


WHIPPED CREAM

1/2 cup heavy cream, well chilled
1 tbsp confectioners' sugar
1/4 tsp vanilla extract

Place a mixing bowl and beaters from electric mixer in the freezer or refrigerator until well chilled, about 15 minutes.

Combine the heavy cream, confectioners' sugar, and vanilla extract in the mixing bowl.

With an electric mixer on low speed, begin beating the cream, gradually increasing the speed to high as cream thickens. (Do this slowly, or the cream will splatter.)

Beat until the cream is thickened, past soft peaks. It should have some structure so it can stand on its own as a layer under the top of the cake.


CHOCOLATE GANACHE
Source: Ina Garten

1/2 cup heavy cream
8 ounces good semisweet chocolate chips
1/2 teaspoon instant coffee granules

Cook the heavy cream, chocolate chips, and instant coffee in the top of a double boiler over simmering water until smooth and warm, stirring occasionally.

Sunday, August 23, 2009

A return with cheesecake


I know. I KNOW. I've been MIA for months. The thing is, I've been trying to eat better and that consists of no baking cupcakes or puddings or ice creams. Too much unnecessary temptation! However something started happening recently that will absolutely change my mind: FALL.

I love fall stupid. I sing its praises every year, it seems like. I get excited about pumpkin stuff and warm puddings and cozy autumn harvest-themed teas. So there's no way I'm going to skip baking this fall. To go along with the season, I had a craving for something a little heavier and a little stronger. Cheesecake was something I hadn't made for years (the last was unremarkable) so I decided on that. But regular cheesecake is kind of boring so I went with my favorite: turtle.

I found a highly reviewed recipe by Tyler Florence named The Ultimate Cheesecake. It was your standard with a blueberry sauce on top so I made a few adjustments (taking out the lemon zest and swapping graham cracker crust for chocolate). Then I settled on mini chocolate chips instead of a chocolate sauce, hoping to replicate Lawler's turtle cheesecake as closely as possible. Of course, there's always little things with every recipe...


I watched the video Food Network supplied with the recipe as it baked because I got conflicting reports from the comments left by others. After 45 minutes, Tyler showed what it should look like and boy was it dodgy looking. He said he liked his cheesecake to have a smooth and silky consistency but, to be honest, that's not the kind of cheesecake I like. When I think cheesecake, I think THICK. Like, a solid brick that your fork leaves indentions in and you have to take small bites because it's so strong. This was not that.

And while it wasn't my perfect cheesecake, it still came out pretty good. The chocolate, pecans and caramel couldn't've hurt. I'd like to try another cheesecake because, like the pound cake, I have a tiny compulsion to keep trying things until they turn out perfect...


ULTIMATE TURTLE CHEESECAKE
Adapted from Tyler Florence

Crust:
2 1/2 cups finely ground chocolate cookies
1 stick unsalted butter, melted

Filling:
1 pound cream cheese, 2 (8-ounce) blocks, softened
3 eggs
1 cup sugar
1 pint sour cream
1 tsp vanilla extract

Caramel Topping
1 cup semisweet mini chips
1 cup chopped toasted pecans


Preheat the oven to 350 degrees F.

In a mixing bowl, combine the cookie crumbs and butter with a fork until evenly moistened. Lightly coat the bottom and sides of an 9-inch springform pan with nonstick cooking spray. Pour the crumbs into the pan and, using the bottom of a measuring cup or the smooth bottom of a glass, press the crumbs down into the base and up the sides. Refrigerate for 5 minutes.


For the Filling:

In the bowl of an electric mixer, beat the cream cheese on low speed for 1 minute until smooth and free of any lumps. Add the eggs, 1 at a time, and continue to beat slowly until combined. Gradually add sugar and beat until creamy, for 1 to 2 minutes. Add sour cream and vanilla. Periodically scrape down the sides of the bowl and the beaters. The batter should be well mixed but not over-beaten. Pour the filling into the crust-lined pan and smooth the top with a spatula.

Set the cheesecake pan on a large piece of aluminum foil and fold up the sides around it. Place the cake pan in a large roasting pan. Pour boiling water into the roasting pan until the water is about halfway up the sides of the cheesecake pan; the foil will keep the water from seeping into the cheesecake. Bake for 45 minutes to 1 hour. The cheesecake should still jiggle (it will firm up after chilling), so be careful not to overcook. I turned off the oven and let it sit inside for 30 minutes (Tyler suggests to just ‘Let cool in pan for 30 minutes’). Chill in the refrigerator, loosely covered, for at least 4 hours. Loosen the cheesecake from the sides of the pan by running a thin metal spatula around the inside rim. Unmold and transfer to a cake plate. Drizzle caramel topping then mini chips and pecans over the surface.

Slice the cheesecake with a thin, non-serrated knife that has been dipped in hot water. Wipe dry after each cut.


Saturday, May 16, 2009

Making candy now

So, remember that aside I made in the coconut ice cream post about every time I have coconut I start wishing there was some chocolate with it? It was more than an aside in my life. It was a CRAVING.

A normal individual might get in their car, drive to the store and purchase that which they crave: a Mounds bar. To those unacquainted, it's a chocolate covered, coconut-filled candy. And it's delish. I, however, am almost shamefully lazy and didn't want to drive to the store. So I made it.

I went with the first semi-reputable recipe I could find that got rave reviews. I had all the necessary ingredients (I love having tons of chocolate and coconut cream just sitting around my house) so I went to it.

I did run into a slight snafu when I opened the can of coconut cream and found something that appeared to be a greyish-tan sludge. I'm talking tub paste here, people. The kind your kids spoon out with that stick attached to the top of the lid. D: Needless to say, I called in for help and Mom assured me that could probably (maybe?) be okay. The label on the can said it might solidify in cooler temperatures and I am in Alaska so, okay. I set the can in a bowl of warm water and waited it out. It turned liquid in no time so all was well. Crisis averted.

The coconut mixture itself was extremely wet and sticky and impossible to shape. I wish I could've figured out another way. Another problem I encountered was coating the frozen coconut balls; my chocolate was not warm enough or maybe just not thin enough because it coated too thick. I didn't hear complaints from the people who ate them but they're just not very pretty all globbed up with chocolate...

Other than that, I got a great reaction from those who did try them! They're sweet but they definitely defeated that chocolate and coconut craving I was having!


HOMEMADE MOUNDS BARS

12 ounces flaked coconut
1 cup confectioner's sugar, sifted
1/2 can cream of coconut milk
12 ounces semi-sweet chocolate
1 tsp of vegetable shortening


Mix together coconut, confectioner's sugar and cream of coconut. Roll into 1-inch balls and chill thoroughly or freeze. Freezing is not necessary, but it helps with the chocolate coating.

Melt chocolate and vegetable shortening in double boiler (or microwave in 30 second intervals and careful not to burn) and dip frozen centers, using a wooden skewer or toothpick.

One batch makes about 60 pieces of candy.

Friday, April 17, 2009

I'm back, baby

After my last disappointing baking venture, I took a week or so off then decided to try something new. I settled on something easy but good, fresh for spring and pretty: lemon madeleines. I got everything set up, turned on the oven to preheat, mixed all the dry ingredients, had the eggs broke in a bowl and at room temperature. I'm just about to mix the wet and dry ingredients together when I notice the oven has never beeped that it's preheated. Curiously, I open the door and see that it's dead cold. :-O WUT.

Long story short, two weeks later a new (expensive) part is shipped in and the repair guy restores old [not-so] faithful! IT'S BACK. And I've been DYING to bake for the past two weeks like crazy. Well, tomorrow's the day!!

But before all this happened (the day before, to be exact), I got my mom's birthday cake baked. She wanted something chocolatey and I remembered this cake from last year as rather intense. What I DIDN'T remember was that it calls for deeper pans than I had because it expands a lot. Thankfully, I remembered before the pans went into the oven (I made a mini 6" cake with the extra batter). So. Beware, if you make this. It makes a lot of cake. But moist and yummy! Good the next few days too!

Sunday, November 30, 2008

Invisible cakes and pies

Okay, here's the thing: I HAVE been baking over this past month. However. It's been for work parties and such so I haven't been able to take proper pictures and cut them open, etc. Unless I cut a piece out and took it to work that way. 'Happy Birthday! Oh BTW, I already had a piece. That's cool, right?'

So I've made a pumpkin cake with cream cheese icing which was pretty all right. I'd make it again (and might so I can post about it and someone other than my coworkers can taste it). I also made a pumpkin pie for Thanksgiving that was an experiment that I didn't love. It involved a crumb topping that didn't work out. I won't make that again.

Then I made a chocolate pecan pie which is a Thanksgiving tradition in my family. It's very rich and very sweet but we love it; we have it every year. It might look like a lot but trust me, if your tastes run decadent, this pie is definitely for you.

SOUTHERN CHOCOLATE PECAN PIE

1/2 cup sugar
1/4 cup butter (melted)
1 cup light corn syrup
1/4 tsp salt
1 tsp vanilla
3 eggs
1/2 cup chocolate chips (plus more for drizzling on top)
1 to 1/2 cups pecans
1 9-inch deep dish pie shell (unbaked)


1. Preheat oven to 350 degrees F.

2. Mix sugar and butter well in mixing bowl. Add syrup, salt and vanilla. Mix again. Add eggs one at a time and mix after each.

3. Spread chocolate chips over bottom of unbaked pie crust. Spread pecans over chocolate chips. Pour mixture on top of both chocolate and pecans.

4. Bake until top is brown and pie set (about 45-55 minutes). Toothpick stuck in center of pie should come out almost dry.

5. When pie is completely cool, drizzle melted white and dark chocolate on top (easiest way is to slowly microwave in a Ziplock freezer bag and cut small hole in bottom corner of baggie).

Monday, November 3, 2008

Spider Cake

This is getting to be a THING, methinks...

I made this for the cake walk at my work and the woman who picked it was very pleased! She had a gathering the next night and said all her friends enjoyed it and asked for the recipe! It was awesome!


It was just my usual chocolate cake in two layers and vanilla buttercream (recipe here). The lady who took it really liked the frosting. lol. I thought, who doesn't??

The black is the premade Wilton tube frosting; I didn't want to mess with trying to color my own because black is never as good as Wilton's makes it. And it tasted fine!

It didn't come out perfect; if I were to do it again, I'd use a thinner tip for the web and I'd make a GIANT spider (possibly with balloons...)

Sunday, September 21, 2008

Chocolate. Bread. Pudding!


There's a restaurant chain in Houston, TX, where I'm from, called Pappa's. The original was seafood but over the past 30+ years, they've expanded to separate restaurants specializing in Cajun, barbeque, steak, burgers, Greek and Mexican. It's at the excellent Pappasito's Cantina (the best Mexican restaurant that I know of) that I first tasted chocolate bread pudding.


It was magnificent. It contradicted what I believed bread pudding to be - it was solid, rich and decadent. It quickly became a staple of the ultimate meal at Pappasito's. The restaurant serves it at room temperature (or even slightly chilled) with crème anglaise AND a scoop of cinnamon ice cream. The two creamy sides compliment the rich chocolate dessert perfectly.

So when I went in search of a chocolate bread pudding recipe, I started getting discouraged: those with pictures clearly looked nothing like the kind from Pappasito's. They were more traditional bread pudding, thin, kind of goopy or loose, and none had terrific reviews. Then I stumbled on one called "DOUBLE Chocolate Bread Pudding" and I was intrigued. The recipe was directly from a restaurant called South City Kitchen in Georgia and the picture looked JUST like Pappasito's (in terms of consistency). However, it called for croissants instead of a regular French bread and having seen bits of bread-bread in Pappasitos', I knew I would have to alter their recipe. That made for a little uncertainty but once the finished product came out, I had absolute NO complaints.

It was better than I could've hoped for. VERY close to Pappasitos' recipe. I even made sure to have crème anglaise with it! I ended up using hoagie bread which are just small (about 5-6 inch long), oval loaves and they weren't stale or hard. They were still soft and they soaked up the custard very well, making a solid pudding.

This is, without a doubt, one of my favorite things. If you enjoy rich, chocolatey desserts, you MUST make this.

DOUBLE CHOCOLATE BREAD PUDDING
Adapted from South City Kitchen, Vinings

8 ounces semi-sweet chocolate, cut into small chunks
1 cup milk
1 1/2 cups heavy cream
1/4 cup (1/2 stick) unsalted butter
4 eggs
1/2 cup granulated sugar
1 tablespoon vanilla extract
1 teaspoon cinnamon
1/4 teaspoon nutmeg
1 pinch salt
8 ounces bread (about 3 large hoagie-sized pieces)
1 cup (6 ounces) semi-sweet chocolate chips


Preheat oven to 225 degrees. Place the semisweet chocolate in a large mixing bowl and set aside. In a saucepan over medium heat, heat the milk, cream and butter until butter is melted. Add to the semisweet chocolate, cover with a plate and set aside for a few minutes, then whisk until smooth.

In a small bowl, beat together the eggs, sugar, vanilla, cinnamon, nutmeg and salt. Beat a small amount of the warm chocolate mixture into the eggs, then whisk all of the egg mixture into the warm chocolate mixture.

Break up the bread into about 1-inch pieces and fold them into the custard mixture. (Add only enough to coat the bread very well and have a little liquid left over.) Then fold in the chocolate chips.

Pour into a buttered 2 quart baking dish (or 8-inch square pan). Bake until set, about 1 1/2 hours. Let rest at room temperature for 10 minutes; serve warm. Chill remainder as soon as possible. Leftovers can be reheated in a microwave oven.


CREME ANGLAISE
Source: Williams-Sonoma

2 cups milk
2 eggs plus 1 egg yolk
1/4 cup sugar
2 tsp. vanilla extract


Rinse the inside of a nonaluminum saucepan with water and shake out the excess water. Pour in the milk, place over medium-low heat and cook until small bubbles form around the edges of the pan, about 5 minutes.

In a small bowl, combine the eggs, egg yolk and sugar and whisk just until blended. Gradually whisk in half of the hot milk, then pour the egg mixture into the pan. Set over low heat and cook, stirring constantly, until the mixture is thick enough to coat the back of a spoon and leaves a clear trail when a finger is drawn through it, 6 to 8 minutes. Do not allow it to boil.

Strain the mixture through a fine-mesh sieve into a bowl. Stir in the vanilla. Cover with plastic wrap, pressing it directly on the surface to prevent a skin from forming, and let cool. Refrigerate for at least 2 hours or for up to 2 days.

Makes about 2 cups.