Showing posts with label Martha Stewart. Show all posts

Thursday, October 29, 2009

Boo, ghosts. Boo.


Halloween is, by far, my favorite holiday. I'm not sure why because I've never been big on costumes or being scared at haunted houses or even trick-or-treating. But I guess it's fall and cute/spooky treats and decorations. Pumpkins were sent from Jesus as the greatest food stuff known to man. This is not a pumpkin entry; that's coming up next.

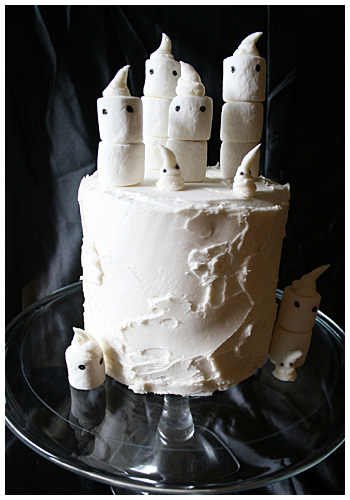
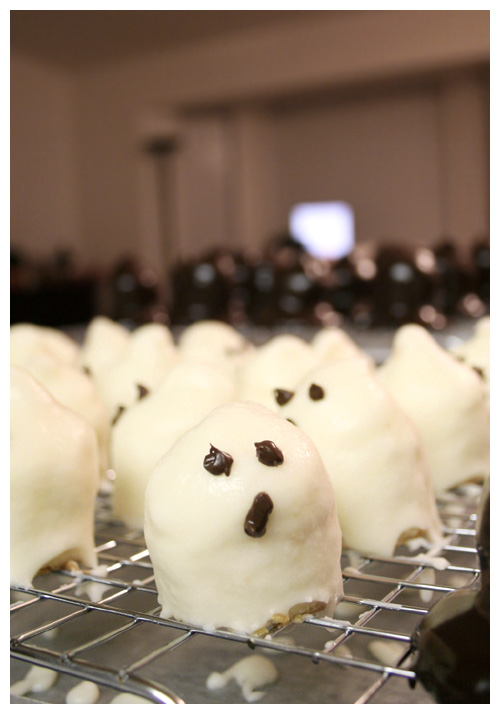
THIS is a Halloween cake entry because I seem to have those every other year. My best friend has a fall baby on the way (due late November) and she loves Halloween just as much and so decided the baby shower would be a perfect opportunity to have the best of both worlds. Hallo-baby party-shower! I'd seen these petits fours on Martha Stewart last year and almost died of the cute. I HAD to make them. But the holiday rolled around and went and I missed the chance. When this shower came up, I knew it would be the perfect occasion.

The thing about this blog I think I've found most fulfilling is the ability to go through a recipe, experience the process, and then post my reactions, good and bad, and try to help others not make the same mistakes. Or, in this case, say flat out: I will not make this recipe again. Don't get me wrong; another baker might look at it and decide it'll be worth the trouble. I can only say that from my standpoint, it's not.

I devised a few shortcuts from the word go that I thought would help me out. I'd bake the cake and freeze it so a hard (and not pillowy soft) cake would cut through easier when using the small biscuit round cutter. Yeah, no. Turns out, the cold cake stuck to the metal cutter and subsequently couldn't cut the third and fourth rounds neatly at all. There was much cleaning, cutting, cleaning, cutting.


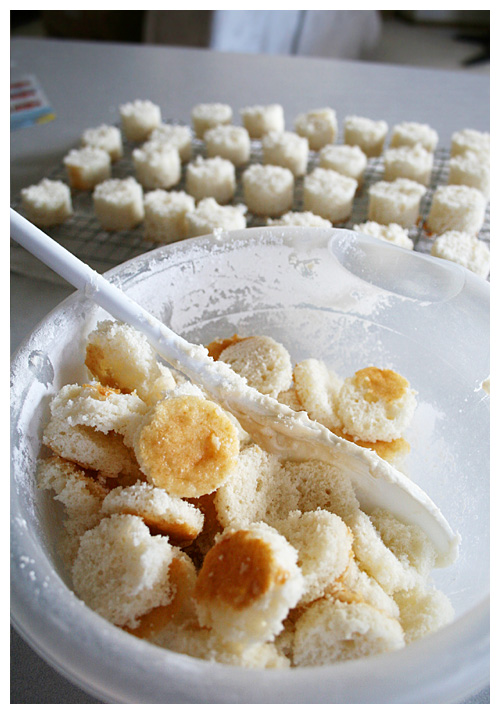
I then saw that the pan made the cake too tall for the stumpy little ghosts. I had to go through and cut all the tops off the cylinders although this did provide me with a fun little sampler disk of cake. Mmm.


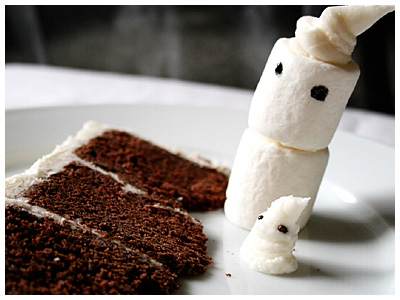
And that's another thing: this recipe WASTES so much cake. There's just something in me that cringes at having leftover bits with nothing to do with. I froze the trimmings and have yet to decide their fate.


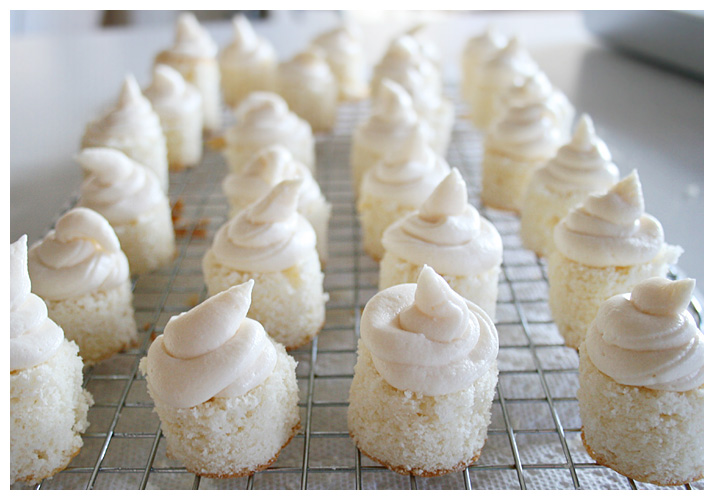
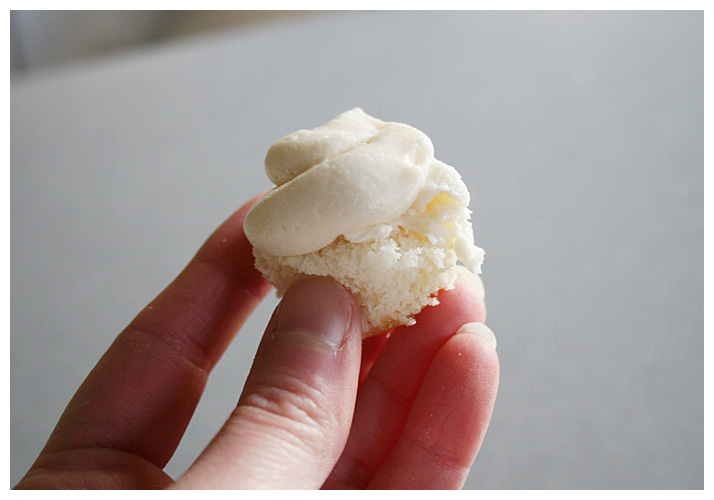
So I piped the little cones of buttercream on top and froze that as well. There's always an issue of exposed cake drying out so I had to do a quick freeze for the frosting to set up then went back and lightly covered a hollow cake pan with plastic wrap so only the tops were touching. Froze them again so I could glaze the day of the shower.


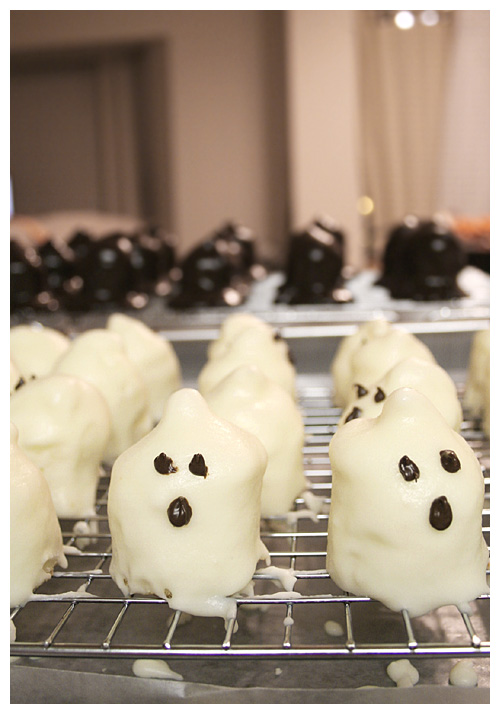
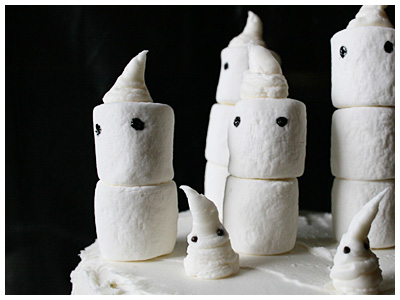
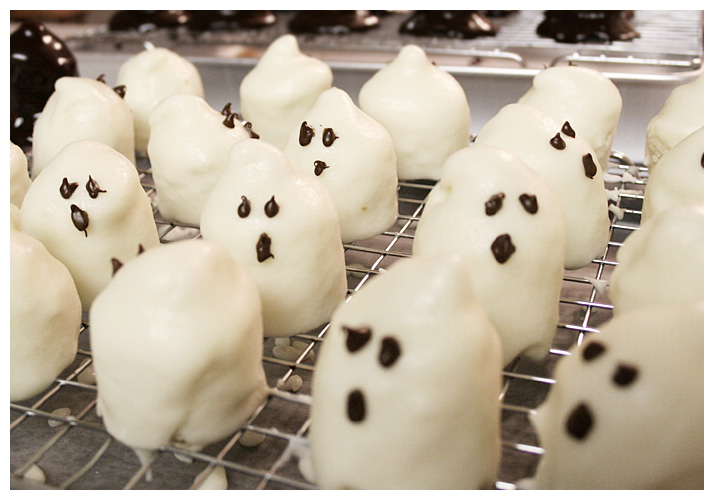
Now. The glaze. Perhaps a more experienced petits-fours-making-person would've thinned it out further but there were two issues: #1. I didn't know if a thinner glaze would set up or if it would remain too liquid, and #2. Would a thinner glaze show the imperfections of the cake/frosting instead of being a smooth, ghosty outside? I don't know the answer to either still because I was too chicken to try thinning the glaze. As it is, it's kind of thick and VERY sweet. The ghosts came out okay but not great. The witch hats, however, were a small disaster. The chocolate "glaze" is nothing more than a ganache that completely smothers the tiny round of delicate cake. With the buttercream cone on top of that, you've got a giant helping of chocolate and frosting and not much else. I wanted to throw them away but, again, felt uneasy wasting food. They were an unadulterated failure, though.

One last thing: the chocolate piping. I wish I'd read Bakerella's notes on piping chocolate for faces in which she instructs to add a little vegetable oil to make the substance more fluid because MARTHA sure didn't. So, thanks to Martha Stewart, the chocolate was too thick, hard to manage and came out looking junky. Bakerella's, on the other hand, came out looking great (that's the pumpkin coming up next). Thanks for nothing, Martha!

The guests at the party were extremely nice and said they really liked the little ghosts but I was disappointed. I will absolutely never make these again but I'm glad I went through the experience and could pass it on to you guys. Attempt at your own risk!


GHOULISH PETITS FOURS
Martha Stewart

For witch hats, make petits fours through step two. Then create a brim using a dab of icing: Affix each petit four to a 2-to-2 1/2-inch chocolate wafer cookie. Proceed to step three, coating with Chocolate Glaze instead of Butter Glaze. In lieu of step four, wrap one or two pieces of licorice lace around the base of the hat immediately after glazing.


Makes about 40
White Sheet Cake
Confectioners' Sugar Icing
Butter Glaze
4 ounces semisweet chocolate, for eyes and mouth


Using a 1 1/2-inch cookie cutter, cut out circles from cake. Brush off any crumbs with a pastry brush.

Fit a pastry bag with a plastic coupler, and top cake rounds with icing in a ghost or hat shape, about 1 inch high.

Place a wire rack over a rimmed baking sheet; set aside. Set an iced cake round on a fork; hold over bowl of glaze. Using a large spoon, drizzle glaze evenly over cake and icing until completely covered. Transfer to wire rack. Repeat with remaining rounds. Let set, about 5 minutes.

Place chocolate in a heatproof bowl microwave at 50% power, stirring chocolate every 30 seconds until melted. Add small amount of vegetable oil to make more fluid. Transfer to a disposable pastry bag or resealable plastic bag; snip off tip with scissors. Pipe eyes and a mouth onto ghosts.


WHITE SHEET CAKE

Makes one 12-by-17-inch cake

1 cup (2 sticks) plus 2 tablespoons unsalted butter, room temperature, plus more for baking sheet and wire rack
4 1/2 cups sifted cake flour (not self-rising), plus more for baking sheet
2 tablespoons baking powder
3/4 teaspoon salt
1 1/2 cups milk
1 1/2 tablespoons pure vanilla extract
2 1/4 cups sugar
7 large egg whites

Preheat oven to 350 degrees. Butter a 12-by-17-by-1-inch rimmed baking sheet. Line bottom with parchment paper. Butter parchment, and dust with flour, tapping off any excess. Set sheet aside.

Into a medium bowl, sift together flour, baking powder, and salt; set aside. In a measuring cup, combine milk and vanilla; set aside. In the bowl of an electric mixer fitted with the paddle attachment, cream butter until very smooth. With mixer on medium speed, add sugar in a slow, steady stream; beat until mixture is light and fluffy, about 3 minutes.

Reduce speed to low. Add reserved flour mixture in three batches, alternating with reserved milk mixture, and starting and ending with flour. Mix until just combined; do not overmix. Set aside.

In a clean bowl, beat egg whites until stiff but do not let dry peaks form. Fold one-third of the egg whites into batter to lighten, then gently fold in remaining whites in two batches.

Scrape batter into prepared sheet; smooth top with an offset spatula. Bake in oven until cake is springy to the touch and a cake tester inserted in the center comes out clean, about 30 minutes. Transfer to a wire rack, and let cool 15 minutes. Loosen sides of cake with a small metal spatula or paring knife; invert onto a buttered wire rack. Peel off parchment. To prevent splitting, reinvert cake so top is facing up. Let cake cool completely.


CONFECTIONERS' SUGAR ICING
(I would HALVE this; it made WAY too much)

Makes about 7 cups

1 1/2 cups unsalted butter (3 sticks), room temperature
3 pounds confectioners' sugar
3/4 teaspoon salt
3 tablespoons pure vanilla extract
3/4 cup milk, plus more if needed


In the bowl of an electric mixer fitted with the paddle attachment, beat together the butter and sugar until well combined. Add salt, vanilla, and milk; beat until icing is smooth and creamy. The icing should be thick enough to pipe and hold its shape. If icing seems too thick, add 1 tablespoon milk at a time until proper consistency is reached. Use immediately, or refrigerate in an airtight container up to 2 days. If refrigerating, bring icing to room temperature before using, and lightly beat until creamy if necessary.


BUTTER GLAZE
Makes about 1 1/2 cups

2 1/2 cups sifted confectioners' sugar
1/2 cup (1 stick) unsalted butter
5 tablespoons milk


Place sugar in a medium bowl, and set aside. In a small saucepan, melt butter over medium heat. Immediately pour the melted butter into the bowl with the sugar. Add the milk, and whisk until mixture is smooth. Cover bowl, and store at room temperature until ready to use.


CHOCOLATE GLAZE (for witch hats)
Makes 1 1/2 cups

6 ounces best-quality bittersweet or semisweet chocolate
1 cup heavy cream


Chop the chocolate into small pieces, and place in a medium bowl. In a small saucepan, heat cream over medium-high heat until just simmering, and pour it over the chocolate. Let mixture stand 5 minutes, then stir until smooth. Let stand at room temperature about 10 minutes before using.


Sunday, September 20, 2009

Fall starts today


Fall is official in my house. It always starts with the football season beginning (last week) and then the Halloween candy appears in the grocery stores. But it's not OFFICIAL in my house until I haul out the tubs of Halloween decorations, light up my favorite fall spice candle and bake something with pumpkin. Today, it has arrived.


These are the pumpkin swirl brownies from Martha Stewart and they sounded so damn easy, how could I pass them up? I was also assured the pumpkin & chocolate flavors meshed well by my last chocopumpkin attempt with muffins. There would be a big difference between the two, but I'll get to that in a second.

I had to adjust the baking time because I didn't have a 9" square pan, but an 8"; it took an added 20 minutes and it was only just coming out with the toothpick clean. I also didn't add any nuts as the original recipe suggests sprinkling on top and now I wish I had. I think walnuts would've been perfect. My instinct to omit them was completely wrong.

Now, the difference from these brownies and the muffins: the thing about the muffins was, it was all pumpkin then lovely little bits of chocolate chips. In these brownies, there is equal amounts of pumpkin and chocolate and, to be honest, the chocolate kind of takes over. It's like they stepped into the ring and the pumpkin got KO'ed. However, the batter doesn't mix completely (as you can see from the layers), so you can taste them separately. The cayenne, especially, is noticeable in the pumpkin layers (and it's the tiniest bite but it's good!)

These were good but I kind of want a big pumpkin flavor when I make something with it. My pumpkin craving wasn't satisfied at all from this so I'm definitely looking for what's next!


PUMPKIN SWIRL BROWNIES
Source: Martha Stewart

Makes 16

8 tablespoons (1 stick) unsalted butter, plus more for pan
6 ounces bittersweet chocolate, chopped
2 cups all-purpose flour
1 teaspoon baking powder
1/4 teaspoon cayenne pepper
1/2 teaspoon salt
1 3/4 cups sugar
4 large eggs
1 tablespoon pure vanilla extract
1 1/4 cups solid-pack pumpkin
1/4 cup vegetable oil
1 teaspoon ground cinnamon
1/4 teaspoon ground nutmeg

Optional: 1/2 cup chopped hazelnuts or other nuts


Preheat oven to 350 degrees. Butter a 9-inch square baking pan or dish. Line bottom of pan with parchment paper; butter lining.

Melt chocolate and butter in a heatproof bowl set over a pan of simmering water, stirring occasionally until smooth.

Whisk together flour, baking powder, cayenne, and salt in a large bowl; set aside. Put sugar, eggs, and vanilla in the bowl of an electric mixer fitted with the paddle attachment; beat until fluffy and well combined, 3 to 5 minutes. Beat in flour mixture.

Divide batter between two medium bowls (about 2 cups per bowl). Stir chocolate mixture into one bowl. In other bowl, stir in pumpkin, oil, cinnamon, and nutmeg. Transfer half of chocolate batter to prepared pan smoothing top with a rubber spatula. Top with half of pumpkin batter. Repeat to make one more chocolate layer and one more pumpkin layer. Work quickly so batters don't set.

With a small spatula or a table knife, gently swirl the two batters to create a marbled effect.

Bake until set, 40 to 55 minutes. Let cool in pan on a wire rack. Cut into 16 squares.

Sunday, April 26, 2009

The lemon madeleines of doom


You know, the idea to make lemon madeleines started innocently enough. I just wanted something easy to get me back into baking after a winter-induced hiatus. And then the debacle with the oven breaking happened but I was determined to still make them once it came back. I mean, I still had the lemons and those things go bad if you don't use them.

And the thing about madeleines which makes them great and terrible at the same time is, they don't last more than a day. I'd argue a few hours, to be honest. Because they're best when they're warm out of the oven and after a few hours, they're dry and a little stale. The second day, they're useless. I probably won't make them again unless I have someone over to enjoy them as well.

But they're quite lovely anyway. :)


LEMON MADELEINES
Source: Martha Stewart

Makes 2 dozen

3/4 cup unsalted butter (1 1/2 sticks), melted, plus more for pans
1 1/2 cups cake flour, sifted (not self-rising)
1/2 teaspoon baking powder
1/4 teaspoon coarse salt
3 large eggs
2 large egg yolks
3/4 cup granulated sugar
1 teaspoon pure vanilla extract
2 tablespoons finely grated lemon zest
2 tablespoons fresh lemon juice (2 to 3 lemons total)
Confectioners' sugar, for dusting (optional)


Preheat oven to 350 degrees. Butter (or Pam spray) two madeleine pans; set aside.

Sift flour, baking powder, and salt into a bowl; set aside.

Put eggs, egg yolks, granulated sugar, vanilla, and lemon zest and juice in the bowl of an electric mixer fitted with the paddle attachment. Mix on medium-high speed until pale and thickened, about 5 minutes. Mix in butter. Using a spatula, fold flour mixture into egg mixture. Let rest 30 minutes.

Pour batter into buttered pans, filling the molds 3/4 full. Bake cookies, rotating pans halfway through, until edges are crisp and golden, 7 to 8 minutes. Let cookies cool slightly in pans on wire racks. Invert, and unmold. Dust with confectioners' sugar, if desired. Cookies can be stored between layers of parchment in airtight containers at room temperature up to one day.

Sunday, October 28, 2007

Chocolate Ghost Cake


Look! I baked! I know, it's been a while. I wasn't properly inspired lately. But now Halloween is days away and I was dying to try this cake, seen originally at
Martha Stewart's site. I didn't follow either recipe for her cake or icing and was mildly annoyed there was no further instruction on even how to make the cake decorations. So I winged it.

I had to buy the 6-inch round pans which were smaller than I anticipated. Think top tier of a wedding cake. They also took longer to bake because they were taller than normal when I split the batter into thirds for three layers. There was much testing; many toothpicks were used but it turned out around 30-35 minutes and, thanks to Ina Garten's lovely recipe, they came out still moist.

The little ghosts perched atop the cake were relatively easy but they're pretty delicate on the whole. Icing isn't strong enough to hold the marshmallows together; toothpicks work much better. I forgot I didn't have little marshmallows to make the mini-ghosts so I had to simply pipe them on, like the bigger ghost's tops. The eyes were drawn on with just a toothpick dipped in black coloring except for the little guys; those are chocolate jimmies (because the coloring just won't stick as well to buttercream icing).

The thing is kind of a nuisance to store. It's so tall! After the marshmallows, it's nearly a foot tall. Too big for a cake stand cover, too delicate decorative top to cover with foil. Maybe syran wrap. I've since frozen it but I recommend if you're going to serve it, to do so directly after assembly. It will not travel easy... But Ina's chocolate cake is delish and even if you don't end up making this cake specifically, give the regular cake a try. Mmm. Chocolate...


CHOCOLATE CAKE
Adapted from The Barefoot Contessa

2 1/2 cups all-purpose flour
1 1/2 cups good cocoa powder
2 1/4 teaspoons baking soda
1/2 teaspoon kosher salt
1/2 pound (2 sticks) unsalted butter, at room temperature
1 cup granulated sugar
1 cup light brown sugar, packed
3 extra-large eggs, at room temperature
3 teaspoons pure vanilla extract
1 1/2 cups buttermilk, at room temperature
3/4 cup sour cream, at room temperature
3 tablespoons brewed coffee


Preheat the oven to 350 degrees F. Butter and flour three 6-inch round pans.

In a medium bowl, sift together the flour, cocoa, baking soda, and salt.

In the bowl of an electric mixer fitted with a paddle attachment, cream the butter and sugars on high speed until light, approximately 5 minutes. Add the eggs and vanilla and mix well. Combine the buttermilk, sour cream, and coffee. On low speed, add the flour mixture and the buttermilk mixture alternately in thirds, beginning with the buttermilk mixture and ending with the flour mixture. Mix the batter only until blended.

Pour the batter into the prepared pans, smooth the tops with a spatula, and bake in the center of the oven for 30 to 35 minutes, or until a toothpick comes out clean. Cool to room temperature.


VANILLA BUTTERCREAM ICING

1 cup Crisco Shortening
1/2 stick butter, room temperature
2 tbsps heavy whipping cream
1 tsp vanilla
4 cups powdered sugar, sifted (measure then sift)

In your mixer bowl, beat the shortening until it's smooth, add the butter and beat together until smooth and light and fluffy. Add smaller amount of the heavy cream indicated in the recipe and the vanilla and mix well.

Add half the powdered sugar and mix for 5 minutes on low-med speed. Add remaining sugar and mix well. Add more cream or powdered sugar if necessary to adjust the consistency

Cut rounded tops off to make even layers of cake. Cover each of two layers with icing; turn third layer upside down using flat, smooth bottom as the top of the cake. Spread thin layer of icing over entire cake to act as "crumb coat". Freeze cake to allow icing to set completely (2-3 hours). Spread remaining icing over set coat, generously (but save a little for tops of ghosts).

Assemble marshmallow ghosts with toothpicks onto top of cake.


Saturday, September 1, 2007

Double Double Your Chocolate


I've had these chocolate cravings for about a week now and, specifically, chocolate cookies were on my mind. I found this recipe in Martha Stewart's Living as one of the Cookies of the Month. As a rule, I generally don't like milk chocolate too much (which the original recipe called for) so I simply replaced it with semi-sweet for a darker flavor. They came out a tad crunchier than I'd like (I'm a chewy cookie person) so I'd take a minute or two off of the cooking time if you are as well.


The batter was also a little warm for my liking (what with the melted chocolate and all), so I threw it in the refrigerator for 2-3 minutes to let it firm up so it was easier to scoop. If the batter is too warm, the cookies will spread too much (which they already do so watch how close you put them).

All in all, a pretty good, easy chocolate fix!


DOUBLE CHOCOLATE CHUNK COOKIES
Adapted from Martha Stewart's Living

These rich cookies should seem a bit soft when you take them out of the oven. They firm up as they cool, so be careful not to overbake them.


1 cup all-purpose flour
1/2 cup unsweetened cocoa powder
1/2 teaspoon baking soda
1/2 teaspoon salt
8 ounces good-quality semi-sweet chocolate (4 ounces coarsely chopped, 4 ounces cut into 1/4-inch chunks)
1 stick (8 tablespoons) unsalted butter
1 1/2 cups sugar
2 large eggs
1 teaspoon pure vanilla extract

1. Preheat oven to 325. Whisk together flour, cocoa powder, baking soda and salt in a medium bowl; set aside. Melt coarsely chopped chocolate with the butter in heatproof bowl in microwave, watching closely and stirring every 30 or so seconds until smooth (or melt in double boiler, in a bowl set over a pan of simmering water).

2. Transfer chocolate mixture to bowl of an electric mixer fitted with paddle attachment. Add sugar, eggs, and vanilla; mix on medium speed until combined. Reduce speed to low; gradually mix in flour mixture. Fold in chocolate chunks.

3. Scoop batter using a 1 1/2-inch ice cream scoop; place 2 inches apart on parchment-lined baking sheets. Bake until cookies are flat and surfaces begin to crack, about 15 minutes. Transfer on parchment to wire racks. Let cool 5 minutes. Cookies can be stored in an airtight container at room temperature for up to 3 days.

Friday, July 20, 2007

Madeleines sont jollies


I got a Madeleine pan years ago. It sat in my cupboard and got lonely. I'm sure it's pining sonnets to me were lovely but I ignored it. And then? I wanted a slight interlude between cupcake flavors but still have the baking itch and there was the recipe.

This was from the Martha Stewart website so I was hesitant (I've had hits and misses with her stuff, to be honest). The end result was quite lovely, though. Light and sweet, just cake enough to melt in your mouth. I did put a little too much in the pans (not knowing how it would spread or rise being my first go at them) so they browned a little more than I would've liked but they taste perfectly fine. The lemon rind completely makes the cookie, though, with just the right hint of flavor.


MADELEINES
Martha Stewart.com

Madeleines are best the day they are made.

MAKES 16

10 tablespoons (1 1/4 sticks) unsalted butter, melted, plus more for pan
1/2 cup all-purpose flour, plus more for pan
1/2 cup cake flour (not self-rising)
Pinch of table salt
2 large eggs
2/3 cup sugar
1 teaspoon pure vanilla extract
Grated zest of 1 lemon
Confectioners sugar, for dustin

1. Preheat oven to 375°. Butter and lightly flour Madeleine pan. In medium bowl, whisk both flours and salt together. In bowl of an electric mixer with whisk attachment, beat eggs and sugar together. Add vanilla and lemon zest, then flour mixture; beat until just combined. On low speed, pour in melted butter in a steady stream; mix until incorporated.

2. Spoon rounded tablespoon batter into each form. Bake 5 minutes; reduce oven to 350°; bake until golden, 8 to 10 minutes more. Turn over immediately onto cooling screen.

Dust with confectioners sugar, and serve.