skip to main |
skip to sidebar
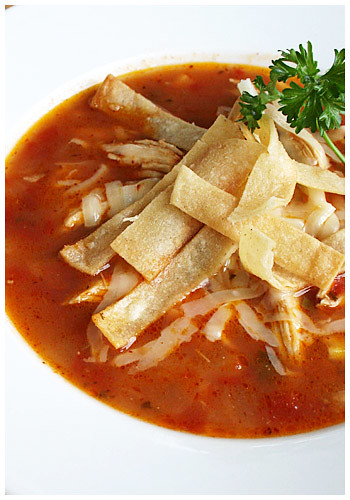 About a week ago, it got unseasonably cold up here in Alaska. It rained and rained and that's characteristic of August up here. There's even talk about it possibly being the Coldest Summer Ever (with the fewest days to get above 65 degrees). I think we'll probably just eek it out but it'll be close.
But as it was, it was cold and rainy but still "summer" so I had a dilemma. I wanted something warm but not autumn-y. The solution presented itself in the form of a spicy tortilla soup. Warm, fulfilling but not wintery. I found it on All Recipes and went with several modifications, as always. And maybe it's just me but the cheese and sour cream seemed kind of essential. I taste tested it from the pot without both and was a little uncertain. Then I bowled it up with the accompaniments and VOILA! Delish!
 CHICKEN TORTILLA SOUP
Adapted from All Recipes.com, Submitted by Betty
2 skinless, boneless chicken breasts
1/2 teaspoon olive oil
1/2 teaspoon minced garlic
1/4 teaspoon ground cumin
2 (14.5 ounce) cans chicken broth
1 cup frozen corn kernels
1 cup chopped onion
1/2 teaspoon chili powder
1 tablespoon lemon juice
1 cup chunky salsa
~4-5 corn tortillas (or tortilla chips)
1/2 cup shredded Monterey Jack cheese (optional)
In a large pot over medium heat, boil the chicken in a little water with a garlic clove and salt until done. Let the chicken cool until it can be handled and shred the chicken by hand. In the soup pot, saute the onion until tender, add the chicken and spices and then add the broth, corn, onion, chili powder, lemon juice and salsa. Reduce heat to low and simmer for about 20 to 30 minutes.
Cut the corn tortillas into narrow strips. Spray with a little cooking spray, add salt to taste and bake in the oven until crisp (or fry in a little olive oil on the stove until light golden).
Top bowls of soup with the Monterey Jack cheese, tortilla strips and a dollop of sour cream.

You know when sometimes you just get the craving to make something for no reason? That was the impetus for this. Random craving to bake. I froze a few bananas (I'm on a fruit-freezing spree, huh?) and I just felt like using them for no reason in particular. I let them thaw out, cut off the end and squeezed that junk out. Couldn't be easier!
I read a few reviews that were left on this recipe from the user submitted All Recipes.com and most substituted oil for butter which I did. The muffin itself is quite satisfying but as others noted, what makes them REALLY good is the crumb topping. Mmm. They wouldn't be half as good without it, to be perfectly honest. :)
But I've been having one for breakfast over the past week, convincing myself that bananas make it healthy. ...I'm going to make some bran muffins (with applesauce instead of oil) so I'm TRYING for healthier, okay??
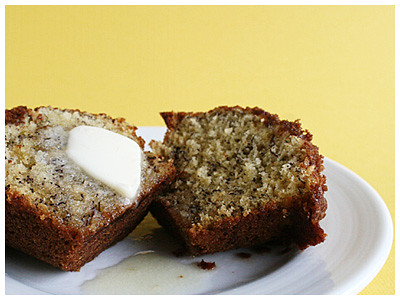 BANANA CRUMB MUFFINS
Adapted from All Recipes, Submitted by Lisa Kreft
1 1/2 cups all-purpose flour
1 teaspoon baking soda
1 teaspoon baking powder
1/2 teaspoon salt
3 bananas, mashed
3/4 cup white sugar
1 egg, lightly beaten
1/3 cup oil
1/3 cup packed brown sugar
2 tablespoons all-purpose flour
1/8 teaspoon ground cinnamon
1 tablespoon butter
1. Preheat oven to 375 degrees F (190 degrees C). Lightly grease 10 muffin cups, or line with muffin papers.
2. In a large bowl, mix together 1 1/2 cups flour, baking soda, baking powder and salt. In another bowl, beat together bananas, sugar, egg and oil. Stir the banana mixture into the flour mixture just until moistened. Spoon batter into prepared muffin cups.
3. In a small bowl, mix together brown sugar, 2 tablespoons flour and cinnamon. Cut in 1 tablespoon butter until mixture resembles coarse cornmeal. Sprinkle topping over muffins.
4. Bake in preheated oven for 18 to 20 minutes, until a toothpick inserted into center of a muffin comes out clean.
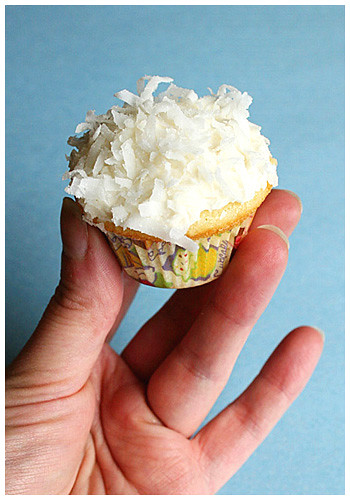
 For my birthday back in April, my best friend got me this adorable cupcake tree that I've wanted since the beginning of time. Or, uh, since I first saw it a few years ago.
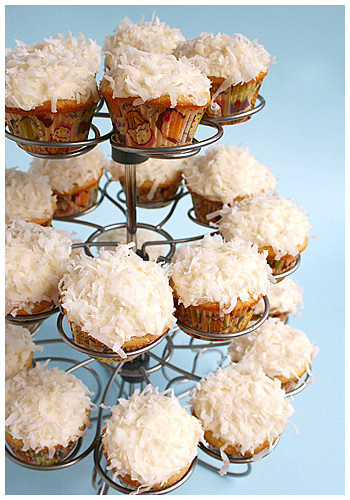 She got me the one for mini cupcakes which I've, surprisingly, never made before. I know, right? I'm a cupcake maniac; you'd think I'd be all over the map with my cupcake adventures. I've also never made (or eaten) coconut cake. So, naturally, I went to my reliable Ina. They were good, of course, but I find Ina's cakes sometimes to be a little more dense than I'd like. I'm not looking for a chiffon-type texture but something a little lighter. I'll definitely try another recipe later to compare the two. Maybe my perfect cake is a pipe dream...
But these were absolutely worth making. They were a hit with my taste testers! :)
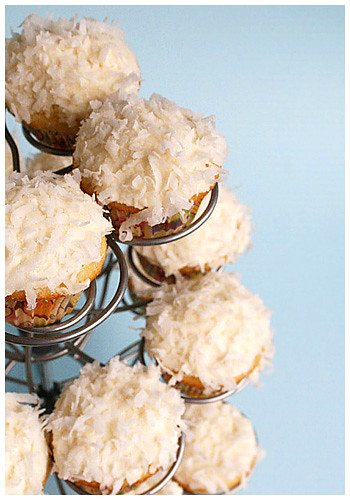
COCONUT CUPCAKES
Source: Ina Garten (cupcakes) and Williams-Sonoma (icing)
For the Cupcakes:
3/4 pound unsalted butter at room temperature (3 sticks)
2 cups sugar
5 extra-large eggs at room temperature
1 1/2 teaspoons pure vanilla extract
1 1/2 teaspoons pure almond extract
3 cups all-purpose flour
1 teaspoon baking powder
1/2 teaspoon baking soda
1/2 teaspoon salt
1 cup buttermilk
14 oz. sweetened, shredding coconut
For the vanilla frosting:
12 Tbs. (1 1/2 sticks) unsalted butter, at room temperature
3 1/4 cups confectioners' sugar
2 tablespoons heavy cream
2 teaspoons vanilla extract
1/4 teaspoon salt
2 cups sweetened, shredded coconut
Preheat oven to 325 degrees.
In the bowl of an electric mixer fitted with the paddle attachment, cream the butter and sugar for 5 minutes – until light and fluffy. With the mixer running on low, add the eggs one at a time, scraping down the sides of the bowl after each addition. Add the vanilla and almond extracts and mix well.
In a separate bowl, sift together the flour, baking powder, baking soda, and salt. In three parts, alternately add the ingredients and the buttermilk to the batter, beginning and ending with the dry. Mix until just combined. Fold in 7 ounces of coconut.
Lin a muffin pan with paper liners. Fill each cup to the top with batter. Bake for 20 to 35 minutes, until the tops are brown and a toothpick comes out clean. Allow to cool in the pan for 15 minutes. Remove to a baking rack and cool completely.
While cupcakes are cooling, make the icing. In the bowl of an electric mixer fitted with the paddle attachment, beat together the butter, confectioners' sugar, cream, vanilla and salt on low speed until smooth, about 3 minutes. Pour the 2 cups coconut into a shallow bowl.
Using an icing spatula, frost the top of each cupcake, mounding the icing in the center. Holding the bottom of each cupcake, roll the frosted top in the coconut.
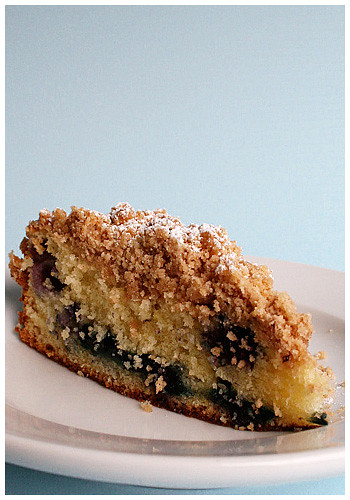
 I had these blueberries left from my massive fruit buying bonanza a few weeks ago, so I quickly froze them before they went bad and went in search of a recipe. I was thisclose to making blueberry pie but backed out; I was told they're just not that good.
One can never go wrong with blueberries and streusel topping, though. I found this out last year when I made blueberry muffins. This was very nice as well; moist and perfectly sweet with the combination of the streusel top. It's definitely a serve-the-day-of dessert, though. It goes dry pretty fast. But right after cooling completely? Perfectly soft and delicious!
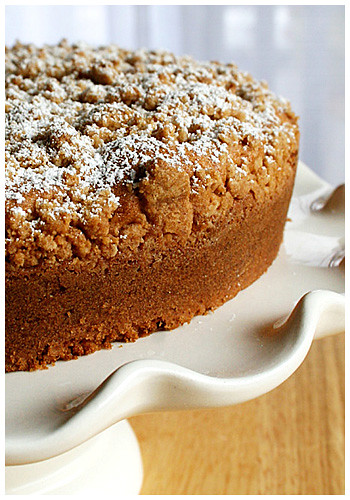 BLUEBERRY CRUMB CAKE
Source: Ina Garten
For the streusel:
1/4 cup granulated sugar
1/3 cup light brown sugar, lightly packed
1 teaspoon ground cinnamon
1/8 teaspoon ground nutmeg
1/4 pound (1 stick) unsalted butter, melted
1 1/3 cups all-purpose flour
For the cake:
6 tablespoons unsalted butter, at room temperature (3/4 stick)
3/4 cup granulated sugar
2 extra-large eggs, at room temperature
1 teaspoon pure vanilla extract
1/2 teaspoon grated lemon zest
2/3 cup sour cream
1 1/4 cups all-purpose flour
1 teaspoon baking powder
1/4 teaspoon baking soda
1/2 teaspoon kosher salt
1 cup fresh blueberries
Confectioners' sugar for sprinkling
Preheat the oven to 350 degrees F. Butter and flour a 9-inch round baking pan.
For the streusel:
Combine the granulated sugar, brown sugar, cinnamon, and nutmeg in a bowl. Stir in the melted butter and then the flour. Mix well and set aside.
For the cake:
Cream the butter and sugar in the bowl of an electric mixer fitted with the paddle attachment on high speed for 4 to 5 minutes, until light. Reduce the speed to low and add the eggs 1 at a time, then add the vanilla, lemon zest, and sour cream. In a separate bowl, sift together the flour, baking powder, baking soda, and salt. With the mixer on low speed, add the flour mixture to the batter until just combined. Fold in the blueberries and stir with a spatula to be sure the batter is completely mixed.
Spoon the batter into the prepared pan and spread it out with a knife. With your fingers,
crumble the topping evenly over the batter. Bake for 40 to 50 minutes, until a cake tester comes out clean. Cool completely and serve sprinkled with confectioners' sugar.
 Ah, on to my third favorite flavor of ice cream (after coffee then cinnamon): pistachio. You know, Williams-Sonoma's recipes are swiftly becoming a safe bet; every one I've tried has come out really well. This was no exception. Creamy but not too sweet; a terrific balance of nutty pistachios and sweet cream!
Now that I've covered my absolute favs with success, I'm going to move on to more challenging flavors (banana, peanut butter?). The good news to all this ice cream making is, I'm getting pretty decent at getting a custard together. Practice really builds the confidence, you know? So much so, I think I'm ready to tackle more experimental flavors like... bacon. (I KNOW, RIGHT? Madness! Wish me luck...)
PISTACHIO ICE CREAM
Source: Williams-Sonoma
1 cup unsalted whole pistachios, roughly chopped
2/3 cup sugar
1 1/2 cups milk
1 1/2 cups heavy cream
4 egg yolks
Pinch of salt
1/2 tsp. almond extract
Preheat an oven to 350°F.
Arrange the pistachios in a single layer on a baking sheet and bake, shaking the pan occasionally, until the nuts are lightly golden and toasted, 5 to 7 minutes. Let cool to room temperature.
In a mini-food processor or standard-size food processor, combine 1/2 cup of the pistachios with the sugar and process until finely chopped and well blended. Reserve the remaining 1/2 cup pistachios.
In a saucepan, combine the milk, cream and the pistachio-sugar mixture and stir to blend. Set the pan over medium-low heat and warm the mixture, stirring occasionally, until the sugar is dissolved and steam begins to rise from the surface, 3 to 4 minutes. Remove from the heat and let the mixture steep for 10 to 15 minutes.
In a bowl, whisk together the egg yolks and salt until blended. Form a kitchen towel into a ring and place the bowl on top to prevent it from moving. Whisk in 1/2 cup of the pistachio-cream until smooth and blended, then pour the egg mixture back into the pan. Cook over medium-low heat, stirring slowly and continuously with a wooden spoon or spatula, until the custard thickens and a finger drawn across the back of the spoon leaves a path, 8 to 10 minutes; do not allow the custard to boil.
Pour the custard through a fine-mesh sieve set over a clean bowl; discard the pistachios. Nestle the bowl in a larger one filled halfway with ice and water and cool the custard to room temperature, stirring occasionally. Refrigerate until chilled, at least 1 hour.
Stir the almond extract into the custard, transfer to an ice cream maker and freeze according to the manufacturers instructions. At the end of the freezing stage, add the remaining 1/2 cup pistachios and continue processing just until they are blended into the ice cream. Transfer the ice cream to a chilled container, cover and freeze until firm, at least 3 hours or up to 3 days, before serving.
Makes about 1 quart.

The best (and worst) thing about fruit is it's freshness and fleeting shelf life. Nothing compares to a piece of fresh fruit but if you're not in the mood, it forces you to use it anyway, damnit, because if you don't, you've just wasted good fruit.
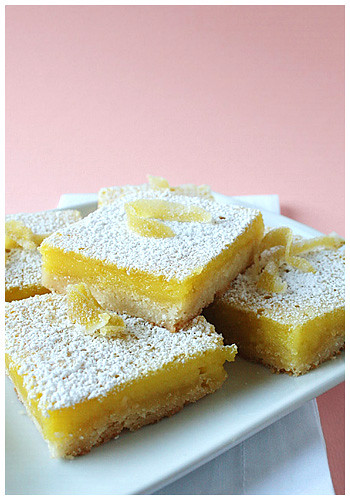
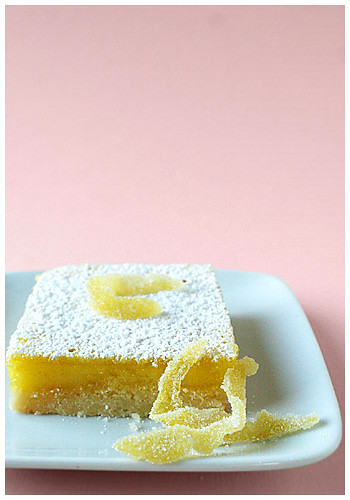
I bought a bag of lemons for my lemon tart because it saves a lot of money. Turns out, it didn't take 10-12 lemons to make one tart. Who knew. Okay, I did, but I didn't know what else I could make with the lemons until I came across an extremely high rated recipe on All Recipes.
As usual, I looked over the recipe itself and then the top most useful comments left by reviewers who have modified the original. I almost always use the altered recipe, for better or worse. This time, it came out really REALLY better. It was lemony without being too strong and perfectly proportioned with the straight-forward crust. They call this Bake Sale Lemon Bars and I can see why: they need nothing accompanying them whatsoever. No whipped cream, no big glass of milk. I was surprised how well the tart lemon and sweetness added balanced.
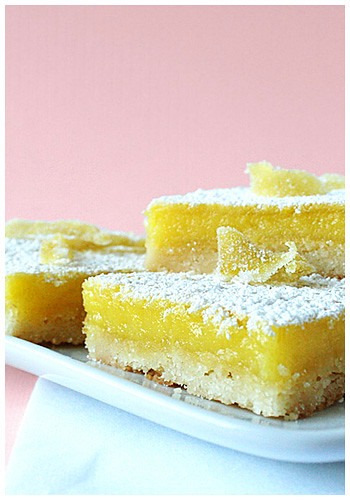
Oh and so not to be wasteful, I candied the peels. They make cute decoration but lack substance: they taste like sugar with a hint of lemon! But, still. Cute decoration. :)
As for the bars themselves, this recipe is definitely a keeper!

BAKE SALE LEMON BARS
Submitted by: Elaine, modified by GOURMETMOMMY
1 1/2 cups all-purpose flour
2/3 cup confectioners' sugar
3/4 cup unsalted butter or margarine, softened
6 eggs
1 3/4 cups white sugar
6 tablespoons all-purpose flour
1 cup lemon juice
1/3 cup confectioners' sugar for decoration
1. Preheat the oven to 350 degrees F (190 degrees C). Grease a 9x13 inch baking pan.
2. Combine the flour, 2/3 cup confectioners' sugar, and butter. Pat dough into prepared pan.
3. Bake for 15 minutes in the preheated oven, until slightly golden. While the crust is baking, whisk together eggs, white sugar, flour, and lemon juice until frothy. Add 3 drops yellow food coloring. Pour this lemon mixture over the hot crust.
4. Return to the preheated oven for an additional 20 to 25 minutes, or until light golden brown. Cool on a wire rack. Dust the top with confectioners' sugar. Cut into squares.
CANDIED LEMON PEELS
Source: Epicurious, Gabrielle Carbone
1 lemon, washed well
2 1/2 cups sugar
Use a vegetable peeler to remove the peel from the lemon in vertical strips. Try to remove only the yellow zest, avoiding as much of the white pith as possible. Save the lemon for another use.
In a small saucepan, combine the peels with 2 cups cold water. Bring to a boil, then drain off the water. Again add 2 cups cold water, bring to a boil, and drain. Repeat the process a third time, then remove the peels from the pan and set aside.
Measure 2 cups of the sugar into the pan and add 1 cup water, whisking until the sugar dissolves. Add the peels and bring to a boil over medium heat. Reduce the heat to medium-low and simmer, uncovered, until the peels are tender and translucent, 10 to 15 minutes. Drain the peels and let cool.
Measure the remaining 1/2 cup sugar into a medium bowl and add the peels. Toss to coat. Using a fork or your fingers, remove the peels one at time, gently shaking each to remove excess sugar. Store in an airtight container. The peels will keep for several weeks.

I absolutely love good Buffalo chicken wings. When I was at university in Austin, TX, there was a place (Wing Zone for all you with access) that had the best wings I could find. And they were close and fast and I swear I ordered from them so much, they probably knew my name and order by heart ('Oh, hi, Niki! 10 Medium wings with potato wedges and ranch dip, right?').
I've had a hard time since moving away from my beloved Wing Zone to find a chicken wing of equal caliber. Hot but not too hot, fresh and really, really saucy. So I've gone without for a while but every so often, the craving rolls around. Usually it's when I see the words "buffalo chicken"... This just so happened when I was browsing chicken recipes the other day and came across this one.
I'd never stuffed anything before so it was a mystery to me but I was more concerned with cooking the meat all the way through than the cheese melting out everywhere. Of course, the bleu cheese taste was practically lost in all this melting away cooking process and I only cooked the minimum amount of time. Were I to make this again, I'd probably skip the stuffed part and just add a side of homemade bleu cheese sauce/dressing. Then I could drench the chicken in the buffalo sauce and be good to go because the sauce? Awesome. I did add a little more hot sauce than it called for but that's my personal taste and you'll have to decide for yourself when it comes to that. But I definitely liked how that sauce came out. It brought (awesome) teardrops from my eyes.

SPICY BUFFALO STYLE STUFFED CHICKEN BREASTS
Adapted from George Duran via Food Network
2 boneless, skinless chicken breasts
1/4 cup blue cheese
Kosher salt
Freshly ground black pepper
2 tablespoons olive oil
1/2 stick unsalted butter
4 tablespoons hot sauce OR to taste (recommended: Frank's Hot Sauce)
2 tablespoons white vinegar
Celery, sliced thin, to serve
Heat the oven to 350 degrees F.
Using a sharp knife, cut a pocket into each chicken breast. Stuff 1/2 of the blue cheese into each breast. Secure the openings with toothpicks and season with salt and pepper. Heat the oil in a nonstick, oven-proof skillet over medium heat and sear the chicken on both sides until browned, about 3 to 4 minutes per side. Put the chicken into the oven until it is cooked through, about 8 to 10 minutes.
In a small pot, add the butter, hot sauce, and white vinegar and cook over medium heat until bubbling. Pour half the sauce over the hot chicken and cook over medium heat for 1 minute. Remove the toothpicks and serve with extra sauce garnished with sliced celery.


