Showing posts with label All Recipes. Show all posts

Sunday, June 12, 2011

Going even more Green

Soooooo, it's fun lying to kids, isn't it? I'm joking! sort of. My future children can blame MY mom for lying to me as I was growing up, and OFTEN. My mom was notorious for sneaking things into seemingly innocent desserts like brownies and would taunt us AFTER we had sampled them with, "GUESS WHAT'S IN THEM." She'd usually answer me and my brother's bafflement with "zucchini!" or "carrots!" I used to have generally unpleasant feelings from these sneaky vegetable revelations. However I know now why she did it. It is immensely satisfying to trick children into eating things that are good for them. Mwha ha ha haahahha.

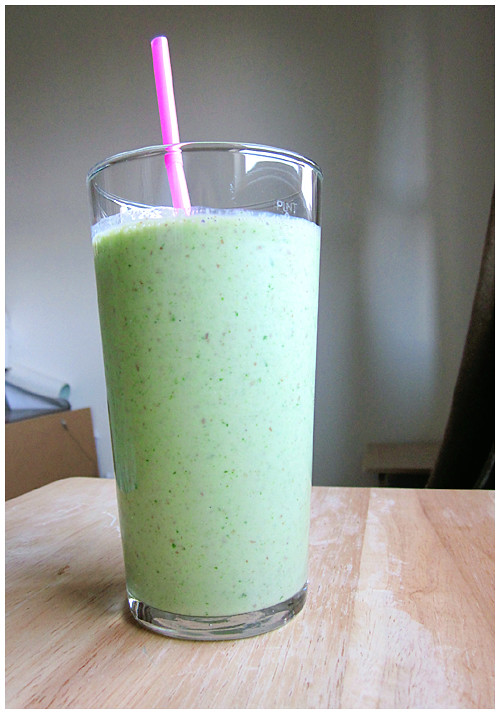
Williams-Sonoma has a new catalog and a spread with smoothies that piqued my interest. Especially that attractive looking GREEN thing front and center. I went in search of green smoothies and found several variations. The beautiful thing about smoothies is, they're so versatile. You can almost throw anything in a blender and it'll come out good. But I was on a mission so I followed the one I found on All Recipes, and the highly rated adaptation, relatively close. (Next will be kale!)

Now, the kid in question is my 13 year old nephew who is like most kids his age: he usually recoils at the sight of real vegetables. Sure, he can have some iceberg lettuce or starchy potatoes but get into leafy greens and he gets a ~look on his face. Like he'd rather eat dirt. So I gave him an enticing "We're going to try a GREEN DRINK!" preview. He's generally agreeable but eventually he asked, "What makes it green?" And I said, with a straight face, "Oh, I color it." >)

I sneaked the baby spinach leaves into the blender and kept it hidden behind me as I tossed in the yogurt, ground flax seed, frozen banana chunks and apple and voila! Beautiful green drink!

Now, the adapted comment on All Recipes used plain yogurt and agave syrup for sweetness. I used vanilla yogurt AND agave because, c'mon, I'm selling it to a kid. But only a teaspoon of syrup, so I didn't go crazy.

But you know who did go crazy? The nephew. He loved it. And I only kept it to myself long enough to enjoy the fact that he liked something that was sweet, yeah, but also protein-rich and good for him. He was even pleasantly surprised when I told him it was spinach and wanted to make more when he got home. :)

I can't wait to make this drink for a morning pick-me-up!

GROOVY GREEN SMOOTHIE
Adapted from All Recipes, mamaiscookin

1 frozen banana, cut in chunks
8 ounces vanilla yogurt
1 apple, cored and chopped
1 1/2 cups fresh spinach leaves
1 Tbsp ground flax seed
1 Tbsp agave syrup (optional)


Place the banana, yogurt, apple, spinach and flax into a blender. Cover, and blend until smooth, stopping frequently to push down anything stuck to the sides. Pour into glasses and serve.


Servings: 2

Sunday, June 27, 2010

Rainbows Pride and Love!


Happy Pride Month, peeps! I love rainbows and I love equality. Pride Month is right up my alley! In the interest of full disclosure, I saw this recipe on All Recipes as a "clown cake" and went, 'OOOoo, pretty rainbows!' And then I saw Yahoo's sweet Pride color bar and a light bulb went off. HEY, I can kill two birds with one stone: challenge of a new recipe and support my gay friends and family!

First thing's first, I used a box cake and went by it's specifications. The All Recipes one has it's own that I didn't think was necessary based on the fact that it was just food coloring basically. Second thing, and I can't stress this enough, USE TWO BOX MIXES. I used one and somehow made 12 cupcakes out of a box that insisted it would make 24... Like the other 12 got lost in a black hole somewhere. Gone for eternity... And doubling the recipe will just plain make handling the six separate colors easier.


Okay, so they look like a psychedelic trip from the outside which, when I first saw, got me a little heartbroken because I wanted beautiful layers. Then I bit into one:


HURRAH! I evened out some of the first layers with toothpick to the edges but after the first three, I knew it would come out fine when it started to cook down.


RAINBOW CUPCAKES
Adapted from All Recipes, submitted by lovestohost

2 boxes white cake mix
egg whites
water
oil
purple food coloring gel
blue food coloring gel
green food coloring gel
yellow food coloring gel
orange food coloring gel
red food coloring gel

1. Preheat an oven to 350 degrees F (175 degrees C). Prepare cupcake pans with liners or by greasing.

2. Use egg white option of cake box directions. Beat the egg whites with an electric mixer until frothy, about 1 minute. Add the cake mix, water, and canola oil; continue beating for 2 minutes on medium speed.

3. Divide the cake batter into six separate ziplock plastic bags. Use a toothpick to scoop a dab of food coloring into each bag. Seal and mix inside bag; add more food coloring, if necessary, to reach the desired shade. Repeat with the remaining colors and bags of batter.

4. Cut corner of bags and pipe 1/6 of the first color in the bottom of all liners. Repeat with the next colors (rainbow going purple, blue, green, yellow, orange and red) until cups are 2/3 full.

5. Bake in the preheated oven until a toothpick inserted into the cake comes clean, about 18-20 minutes. Cool in the pans for 5 minutes before removing to cool completely on a wire rack.


Top with your favorite icing (mine is vanilla buttercream)!


Thursday, June 17, 2010

Happy Birthday, No One!


I've been in search of an awesome ice cream flavor because it's summer. Summer = ice cream, always. But over the last few years, I've made all my favorites: cinnamon, pistachio, coffee, coconut, German chocolate, bacon. I kid! The bacon wasn't just a favorite; it was THE favorite. kidding. So while I could make variations of these favorites, I kinda wanted something new. Well. This sounded awesome and while I never order cake batter ice cream at Cold Stone, it always seemed really good.

This is one of those ice creams that tastes like CREAM. Maybe that's the thing with homemade that I'm not used to. Some people like it. I'm on the fence... But it has actual cake mix in it so it's fine frozen but, man, don't let it melt because it becomes this mutant blob of non-solid, non-liquid goop. Not that you would let it melt but still. It's a weird concoction.

It's REALLY strong, though, and hard to eat much of. That's okay; this recipe doesn't make much. It's nice to have something novel to make/try but I don't think I'll be making it again.


CAKE BATTER ICE CREAM
Source: All Recipes, by Ekho

1 cup milk
1/2 cup white sugar
2 egg yolks, beaten
1 teaspoon vanilla extract
2 cups heavy whipping cream
3/4 cup white cake mix, sifted


Whisk together milk, sugar, egg yolks, vanilla, cream, and cake mix in a saucepan until well blended. Cook over medium-low heat until mixture reaches 160 degrees F (70 degrees C), stirring frequently. Remove from heat and place in the refrigerator or freezer until liquid is cold.

Pour the chilled mixture into an ice cream maker and freeze according to manufacturer's directions until it reaches "soft-serve" consistency. Transfer ice cream to a one- or two-quart lidded plastic container; cover surface with plastic wrap and seal. For best results, ice cream should ripen in the freezer for at least 2 hours or overnight.

Tuesday, March 2, 2010

Soft Sugar Cooks


OKAY, well, there's my green; my March obligation is fulfilled! I KID. I'm planning more, trust.

I like to bake junk to thank people for being awesome to me. Or just to give because I like them. Or if it's a day ending in Y. I like giving bakery to people, okay? So a friend loaned me a TV series on DVD some time LAST YEAR. It got shuffled around in my house and shelved and I never got around to it. I pine for my loaned out DVDs sometimes so I had to make her a thank you for putting up with my forgetfulness. You can't really go wrong with straight-forward sugar cookies.


I planned to make a recipe another friend gave me. Naturally, I misplaced it (hey, like the DVD!), so I started rifling around in my saved recipes. This one caught my eye, even though it's from All Recipes, because it proclaims it's a "State Fair Blue Ribbon winner". WELL. I'm intrigued.


I love soft cookies in general so I was on board for this. They never browned up so I worried a little as I watched them in the oven but the called for 12+ minutes past with nary an edge browning. Turns out, they were perfect: lightly crispy on the outside and soft/chewy near the middle. I passed them out and everyone loved them! I later warmed them up a little in the microwave at half power for 30 seconds and woo wee. WARM COOKIES ARE TEH BEST. With a glass of milk, these are kind of perfect!


SOFT SUGAR COOKIES IV
Submitted by Laura Stearns, All Recipes.com


2/3 cup shortening
2/3 cup butter
1 1/2 cups white sugar
2 eggs
2 teaspoons vanilla extract
3 1/2 cups all-purpose flour
2 teaspoons baking powder
1 teaspoon salt
1/3 cup granulated sugar for decoration


Preheat oven to 350 degrees F (175 degrees C).

In a medium bowl, cream together the butter, shortening and sugar. Stir in the eggs and vanilla. Combine the flour, baking powder and salt, stir into the creamed mixture until dough comes together. Roll dough into walnut sized balls and roll the balls in sugar. Place them on an unprepared cookie sheet about 2 inches apart. Flatten lightly with bottom of glass.

Bake cookies 10 to 12 minutes in the preheated oven, until bottom is light brown. Remove from baking sheets to cool on wire racks.

Monday, March 30, 2009

Simple

I am embarrassed, of course, at my lack of updating. But trust in the fact that it's not that I've been baking up a storm and just neglecting my blog; I haven't been baking ANYTHING. It's all the XBox's fault; I got one for Christmas and never got off of it.

I finally found the motivation to bake something and had to scrounge up what I had in the house. That ended up being the most basic of basics: vanilla pound cake. It needed something extra, though, and I immediately thought of berry compote (because I had frozen mixed berries).

I grabbed a high rated recipe from All Recipes and you know what? I'm kind of starting to get irritated with All Recipes. Or, at least, the people reviewing on it. I made this highly rated recipe and it is utterly mediocre. I mean, to have that many stars, you'd think it'd be mouth wateringly AWESOME. But it's just not. It's bland and absolutely NEEDS the compote or other accompaniment. I always thought of a good pound cake as one so buttery and delish, it melts in your mouth a little. Because of all the butter. Delicious butter... But this one doesn't.

The berry compote, however, I got from Williams-Sonoma and it IS good. I think I'm going to stick to legit sources from now on... I won't be making this pound cake again but the compote is a keeper. I used a bag of frozen mixed berries that included raspberries, blueberries and marrionberries.

Together, they're good, but maybe that's because you're mostly just tasting the compote...


Cream Cheese Pound Cake III
Source: All Recipes, Submitted by: Nanci

1 (8 ounce) package cream cheese
1 1/2 cups butter
3 cups white sugar
6 eggs
3 cups all-purpose flour
1 teaspoon vanilla extract


1. Preheat oven to 325 degrees F (160 degrees C) grease and flour a 10 inch tube pan.

2. In a large bowl, cream butter and cream cheese until smooth. Add sugar gradually and beat until fluffy.

3. Add eggs two at a time, beating well with each addition. Add the flour all at once and mix in. Add vanilla.

4. Pour into a 10 inch tube pan. Bake at 325 degrees F (160 degrees C) for 1 hour and 20 minutes. Check for doneness at 1 hour. A toothpick inserted into center of cake will come out clean.


Berry Compote
Source: Williams-Sonoma

6 cups mixed berries
5 Tbs sugar
2 tsp lemon juice

In a saucepan over medium heat, stir together the berries, 2 Tbs. of the sugar and the lemon juice. Bring to a simmer and cook, stirring occasionally, until most of the berries have broken down and the mixture is thickened, about 30 minutes; reduce the heat if the compote sticks to the pan. Remove from the heat and let the compote cool to room temperature.

Monday, September 1, 2008

Chunky Indeed

I bought the Ben & Jerry's ice cream recipe book with high hopes. Finally! The secrets of some of my favorite ice creams revealed! well. It didn't exactly work out that way.

I tried the coffee recipe of theirs and it was good but I've never had their coffee ice cream anyway so I couldn't compare. So I moved on to banana because I HAVE had Chunky Monkey. Boy howdy; that was NOT Chunky Monkey. The consistency of the cream was icy (probably because the banana itself is quite watery) and I couldn't understand why it came out so wrong. I'm not especially surprised Ben & Jerry's didn't reveal their REAL recipe but, geez; something close would've been nice.

I should have given up but you know me; failure is not acceptable. It has to be right. So I went in search of another recipe and found one even titled "chunky" and made reference to being damn close to the famous flavor. I went to it and finally, something resembling the original! And so incredibly easy! Win!

In an effort to make it even closer to the brand flavor, I melted down some Dove dark chocolates and spread them in a thin (1/8 inch) layer on parchment paper. I chilled the chocolate in the fridge until hard and roughly cut it into rectangle pieces (maybe 2 x 1 1/2"). I don't love the texture of chocolate chips in ice cream and merely chopping a bar would make chocolate shavings throughout the mix. This worked really well. Homemade chocolate chunks. :)

I was pleased with how nice this one came out. It'd be even better with some chocolate syrup drizzled over top (but what wouldn't be better with that?)

CHUNKY BANANA NUT ICE CREAM
Adapted from All Recipes, Submitted by: Stephany Brown

4 bananas, broken into chunks
1 tablespoon lemon juice
1 teaspoon vanilla extract
1 cup white sugar
1 1/3 cups heavy cream, chilled
2/3 cup cold milk
1/2 cup chopped toasted walnuts
1/2 cup dark chocolate chunks


In a blender or food processor, combine bananas, lemon juice, vanilla, sugar, cream and milk. Puree until smooth. Transfer mixture to the freezer canister of an ice cream maker and freeze according to manufacturer's instructions.

When ice cream begins to stiffen, add walnuts and chocolate chunks.


Sunday, August 10, 2008

Healthy = Healthy!

It's not that I feel guilty, per se, for the overly sweet and fatty foods I've been making of late but sometimes you just feel like something that might actually be good for you. I went in search of a tasty, healthy muffin and came across these wildly popular bran muffins on All Recipes.

Their popularity is undoubtedly rooted in the versatility of these simple muffins. Don't want oil? Yank it out and replace it with healthy applesauce, pumpkin, cooked and pureed carrots, squash or banana! Want some extra oomph? Add shredded carrots, dates, pecans, walnuts, carob chips or coconut. It all works!

I, personally, am a big walnut fan so I played it safe and kept it simple. I used applesauce and a little cinnamon to compliment that then threw in some walnuts. These make the perfect on-the-go breakfast because they're packed with all that healthy junk I've been neglecting lately. AND the applesauce makes them incredibly moist and so tasty!


CLASSIC BRAN MUFFINS
Adapted from All Recipes.com, Submitted by Janet Kalman Villada

1 1/2 cups wheat bran
1 cup buttermilk
1/3 cup applesauce
1 egg
2/3 cup brown sugar
1/2 teaspoon vanilla extract
1 cup all-purpose flour
1 teaspoon baking soda
1 teaspoon baking powder
1/2 teaspoon salt
1/2 cup walnuts

1. Preheat oven to 375 degrees F (190 degrees C). Grease muffin cups or line with paper muffin liners.

2. Mix together wheat bran and buttermilk; let stand for 10 minutes.

3. Beat together applesauce, egg, sugar and vanilla and add to buttermilk/bran mixture. Sift together flour, baking soda, baking powder and salt. Stir flour mixture into buttermilk mixture, until just blended. Fold in walnuts and spoon batter into prepared muffin tins.

4. Bake for 15 to 20 minutes, or until a toothpick inserted into the center of a muffin comes out clean. Cool and enjoy!


Thursday, July 31, 2008

Warm AND Summery

About a week ago, it got unseasonably cold up here in Alaska. It rained and rained and that's characteristic of August up here. There's even talk about it possibly being the Coldest Summer Ever (with the fewest days to get above 65 degrees). I think we'll probably just eek it out but it'll be close.

But as it was, it was cold and rainy but still "summer" so I had a dilemma. I wanted something warm but not autumn-y. The solution presented itself in the form of a spicy tortilla soup. Warm, fulfilling but not wintery. I found it on All Recipes and went with several modifications, as always. And maybe it's just me but the cheese and sour cream seemed kind of essential. I taste tested it from the pot without both and was a little uncertain. Then I bowled it up with the accompaniments and VOILA! Delish!

CHICKEN TORTILLA SOUP
Adapted from All Recipes.com, Submitted by Betty

2 skinless, boneless chicken breasts
1/2 teaspoon olive oil
1/2 teaspoon minced garlic
1/4 teaspoon ground cumin
2 (14.5 ounce) cans chicken broth
1 cup frozen corn kernels
1 cup chopped onion
1/2 teaspoon chili powder
1 tablespoon lemon juice
1 cup chunky salsa
~4-5 corn tortillas (or tortilla chips)
1/2 cup shredded Monterey Jack cheese (optional)


In a large pot over medium heat, boil the chicken in a little water with a garlic clove and salt until done. Let the chicken cool until it can be handled and shred the chicken by hand. In the soup pot, saute the onion until tender, add the chicken and spices and then add the broth, corn, onion, chili powder, lemon juice and salsa. Reduce heat to low and simmer for about 20 to 30 minutes.

Cut the corn tortillas into narrow strips. Spray with a little cooking spray, add salt to taste and bake in the oven until crisp (or fry in a little olive oil on the stove until light golden).

Top bowls of soup with the Monterey Jack cheese, tortilla strips and a dollop of sour cream.

Sunday, July 27, 2008

Banana = Healthy, right?


You know when sometimes you just get the craving to make something for no reason? That was the impetus for this. Random craving to bake. I froze a few bananas (I'm on a fruit-freezing spree, huh?) and I just felt like using them for no reason in particular. I let them thaw out, cut off the end and squeezed that junk out. Couldn't be easier!

I read a few reviews that were left on this recipe from the user submitted All Recipes.com and most substituted oil for butter which I did. The muffin itself is quite satisfying but as others noted, what makes them REALLY good is the crumb topping. Mmm. They wouldn't be half as good without it, to be perfectly honest. :)

But I've been having one for breakfast over the past week, convincing myself that bananas make it healthy. ...I'm going to make some bran muffins (with applesauce instead of oil) so I'm TRYING for healthier, okay??

BANANA CRUMB MUFFINS
Adapted from All Recipes, Submitted by Lisa Kreft

1 1/2 cups all-purpose flour
1 teaspoon baking soda
1 teaspoon baking powder
1/2 teaspoon salt
3 bananas, mashed
3/4 cup white sugar
1 egg, lightly beaten
1/3 cup oil
1/3 cup packed brown sugar
2 tablespoons all-purpose flour
1/8 teaspoon ground cinnamon
1 tablespoon butter


1. Preheat oven to 375 degrees F (190 degrees C). Lightly grease 10 muffin cups, or line with muffin papers.

2. In a large bowl, mix together 1 1/2 cups flour, baking soda, baking powder and salt. In another bowl, beat together bananas, sugar, egg and oil. Stir the banana mixture into the flour mixture just until moistened. Spoon batter into prepared muffin cups.

3. In a small bowl, mix together brown sugar, 2 tablespoons flour and cinnamon. Cut in 1 tablespoon butter until mixture resembles coarse cornmeal. Sprinkle topping over muffins.

4. Bake in preheated oven for 18 to 20 minutes, until a toothpick inserted into center of a muffin comes out clean.

Wednesday, July 2, 2008

Lemon Bars: $1


The best (and worst) thing about fruit is it's freshness and fleeting shelf life. Nothing compares to a piece of fresh fruit but if you're not in the mood, it forces you to use it anyway, damnit, because if you don't, you've just wasted good fruit.

I bought a bag of lemons for my lemon tart because it saves a lot of money. Turns out, it didn't take 10-12 lemons to make one tart. Who knew. Okay, I did, but I didn't know what else I could make with the lemons until I came across an extremely high rated recipe on All Recipes.

As usual, I looked over the recipe itself and then the top most useful comments left by reviewers who have modified the original. I almost always use the altered recipe, for better or worse. This time, it came out really REALLY better. It was lemony without being too strong and perfectly proportioned with the straight-forward crust. They call this Bake Sale Lemon Bars and I can see why: they need nothing accompanying them whatsoever. No whipped cream, no big glass of milk. I was surprised how well the tart lemon and sweetness added balanced.


Oh and so not to be wasteful, I candied the peels. They make cute decoration but lack substance: they taste like sugar with a hint of lemon! But, still. Cute decoration. :)

As for the bars themselves, this recipe is definitely a keeper!


BAKE SALE LEMON BARS
Submitted by: Elaine, modified by GOURMETMOMMY


1 1/2 cups all-purpose flour
2/3 cup confectioners' sugar
3/4 cup unsalted butter or margarine, softened
6 eggs
1 3/4 cups white sugar
6 tablespoons all-purpose flour
1 cup lemon juice

1/3 cup confectioners' sugar for decoration


1. Preheat the oven to 350 degrees F (190 degrees C). Grease a 9x13 inch baking pan.

2. Combine the flour, 2/3 cup confectioners' sugar, and butter. Pat dough into prepared pan.

3. Bake for 15 minutes in the preheated oven, until slightly golden. While the crust is baking, whisk together eggs, white sugar, flour, and lemon juice until frothy. Add 3 drops yellow food coloring. Pour this lemon mixture over the hot crust.

4. Return to the preheated oven for an additional 20 to 25 minutes, or until light golden brown. Cool on a wire rack. Dust the top with confectioners' sugar. Cut into squares.


CANDIED LEMON PEELS
Source: Epicurious, Gabrielle Carbone

1 lemon, washed well
2 1/2 cups sugar


Use a vegetable peeler to remove the peel from the lemon in vertical strips. Try to remove only the yellow zest, avoiding as much of the white pith as possible. Save the lemon for another use.

In a small saucepan, combine the peels with 2 cups cold water. Bring to a boil, then drain off the water. Again add 2 cups cold water, bring to a boil, and drain. Repeat the process a third time, then remove the peels from the pan and set aside.

Measure 2 cups of the sugar into the pan and add 1 cup water, whisking until the sugar dissolves. Add the peels and bring to a boil over medium heat. Reduce the heat to medium-low and simmer, uncovered, until the peels are tender and translucent, 10 to 15 minutes. Drain the peels and let cool.

Measure the remaining 1/2 cup sugar into a medium bowl and add the peels. Toss to coat. Using a fork or your fingers, remove the peels one at time, gently shaking each to remove excess sugar. Store in an airtight container. The peels will keep for several weeks.


Monday, June 16, 2008

German Chocolate Cake Ice Cream... Almost


You know what's hard to photograph? Ice cream. Even after you prep and do everything in your power short of shooting it IN the freezer, it just gives up on you and starts to melt in mere minutes. With this particular ice cream, it was SECONDS. I even froze the stuff in the shape of scoops so there was no lag between the freezer and my shots but still. It started breaking down about twenty seconds in. Prissy friggin' food.

Other than the prima donna act it gave me in front of the camera, this flavor really delivered. I got the chocolate base from Williams-Sonoma and had to modify it only superficially: I had no half-and-half so I substituted half milk and half cream (theoretically, half and half from scratch). They weren't kidding about it being rich. And after cooking the custard over the heat so there was no raw egg situation, I felt extremely comfortable licking the bowl of chocolate custard and dipping brownie in the creamy stuff as well. Mmmm. Chocolate 'splosion.

When I envisioned this flavor, I was aiming for German Chocolate cake. Then after I got home from the store, I remembered there are pecans in the caramel coconut part. Oh well. It came out just fine. The only complaint I'd have against the stuff is that the caramel is very sweet and the ice cream is very rich. It makes for an intense flavor. But some people like very sweet/very rich a lot so it's just up to personal tastes, really.

I was rather pleased with making the brownies and caramel sauce myself. It felt good to look at the final product and know I made every bit from scratch. This, from a novice cook, that is. I mean, watching the caramel come to a boil? Terrifying. I just knew it was going to burn the second I looked away. (So I never looked away.)

I've encountered a few issues with ice cream, though.

#1. It doesn't give you immediate results. I'm used to baking something and having it ready to eat right then. This, you go through all the work and then? Put it away (to freeze completely). It's somewhat unsatisfying.


#2. It's not portable. If the stuff melts only minutes out of the freezer, imagine a ten, fifteen or twenty minute car ride to someone's house! So people have to come to IT (again, with the prissy nature). It makes it difficult to get to family and friends.

However, my love of creating personal flavors outweighs any faults the cooking process may have. I see pistachio and then banana on the horizon...


MMMMM... BROWNIES
Source: cicada77 at AllRecipes.com


1/2 cup white sugar
2 tablespoons butter
2 tablespoons water
1 1/2 cups semisweet chocolate chips
2 eggs
1/2 teaspoon vanilla extract
2/3 cup all-purpose flour
1/4 teaspoon baking soda
1/2 teaspoon salt


Preheat the oven to 325 degrees F (165 degrees C). Grease an 8x8 inch square pan.

In a medium saucepan, combine the sugar, butter and water. Cook over medium heat until boiling. Remove from heat and stir in chocolate chips until melted and smooth. Mix in the eggs and vanilla. Combine the flour, baking soda and salt; stir into the chocolate mixture. Spread evenly into the prepared pan.

Bake for 25 to 30 minutes in the preheated oven, until brownies set up. Do not overbake! Cool in pan.

After completely cool, cut out 1/4 of pan and freeze. When hard, cut into 1 inch cubes (roughly 1 cup of chunks) and refreeze until ready to use.


CARAMEL COCONUT SWIRL
Adapted from Gourmet, Nov 1998

1/2 cup sugar
1/3 cup light corn syrup
1/4 cup water
7 tablespoons heavy cream
1/2 teaspoon vanilla
3/4 - 1 cup shredded coconut


In a 3-quart heavy saucepan boil sugar, corn syrup, water, and a pinch salt over moderate heat, stirring, until sugar is dissolved. Boil mixture, without stirring, gently swirling pan, until a deep golden caramel. Remove pan from heat and carefully pour cream and vanilla down side of pan (mixture will vigorously steam and caramel will harden). Simmer mixture, stirring, until caramel is dissolved. Remove pan from heat, add coconut and cool caramel. Caramel swirl may be made 1 week ahead and chilled, covered. Bring caramel swirl to room temperature before using. (If caramel swirl is too stiff to pour, heat slightly.)


CHOCOLATE ICE CREAM
Adapted from Williams Sonoma


1 1/2 cups heavy cream
1 1/2 cups whole milk
6 oz. bittersweet chocolate, finely chopped
(about 1 1/3 cups)
5 egg yolks
1 cup sugar
Pinch of salt
1 tsp. vanilla extract


In a saucepan over medium heat, warm the heavy cream and milk until bubbles form around the edges of the pan. Remove from the heat, add the chocolate and stir until smooth and blended.

In a large bowl, whisk together the egg yolks, sugar and salt until blended. Slowly add the chocolate cream, whisking constantly until fully incorporated.

Pour the mixture into a bowl on top of a double boiler. Set the pan over but not touching simmering water in the bottom pan. Cook, stirring constantly with a wooden spoon, until a finger drawn across the back of the spoon leaves a path, 10 to 12 minutes; do not allow the custard to boil. Pour the custard through a fine-mesh sieve set over a clean bowl and stir in the vanilla. Nestle the bowl in a larger one filled halfway with ice and water. Cool the custard, stirring occasionally, about 30 minutes.

Transfer the custard to an ice cream maker and freeze according to the manufacturer's instructions. Just before ice cream is finished churning, add brownie chunks and stir in completely. Transfer one third ice cream to an airtight container and drizzle one third caramel swirl over it. Repeat layering with remaining ice cream and caramel swirl. Cover and freeze until firm, 3 to 4 hours, before serving. Makes about 1 quart.


Tuesday, May 27, 2008

You scream, I scream.

I'm still here! I haven't disappeared! I'm in the middle of moving to a new house so you'll have to excuse my bouts of absence. It's kind of hard to cook when you can't find measuring cups... But I finally got an ice cream maker for my birthday and I couldn't be more excited. So many recipes to try! I can make my own ice cream?! SCORE. This is my very first and it was a total success! A little explanation first, though:

You all know those ice cream chains that mix up toppings and stuff into the ice cream in front of you. Cold Stone is probably the most widespread but in Houston, Marble Slab came first. They have many amazing flavors but my favorite is the Vanilla Cinnamon. One day, my mom decided to mix in a never-fails ingredient: Butterfinger. And the rest is history. Or, you know; my favorite ice cream flavor of all time. Since I'm no longer in Houston and have no access to Marble Slab, I knew I would have to attempt cinnamon ice cream with Butterfinger mixed in.

Now, ice cream making is intense; this entire process took 3 DAYS. It'll take two next time but this time I had to freeze the bowl overnight, make the ice cream and chill the liquid form in the fridge overnight then brew it up in the machine the next morning then freeze it AGAIN overnight. When it first comes out of the machine, it's like soft serve and that's just not real ice cream to me. But when I took it out today? Perfect!

I found a few cinnamon recipes but tried one that was highly rated at All Recipes first. It doesn't look like Marble Slab's but it sure is cinnamony!

It came out smooth and creamy and so so good. I split the batch and kept half plain then I went ahead and mixed my Butterfinger in the rest!!
oh good God. It's SO good. I don't know what it is (cinnamon and Butterfinger??) but it goes so well together. VERY sweet but so yummy. I still can't believe I made ice cream! It looks and tastes so real!! I'm going to include my modified recipe but just cut out the crushed Butterfinger if you want straight cinnamon ice cream (which is delicious on it's own). It would go wonderfully with a dense chocolate cake...


CINNAMON ICE CREAM WITH BUTTERFINGER
Adapted from Elizabeth's Cinnamon Ice Cream

  • 1 cup white sugar
  • 1 1/2 cups half-and-half cream
  • 2 eggs, beaten
  • 1 cup heavy cream
  • 1 teaspoon vanilla extract
  • 2 teaspoons ground cinnamon
  • 1/2 cup crushed Butterfinger (or to your liking)

1. In a saucepan over medium-low heat, stir together the sugar and half-and-half. When the mixture begins to simmer, remove from heat, and whisk half of the mixture into the eggs. Whisk quickly so that the eggs do not scramble. Pour the egg mixture back into the saucepan, and stir in the heavy cream. Continue cooking over medium-low heat, stirring constantly, until the mixture is thick enough to coat the back of a metal spoon. Remove from heat, and whisk in vanilla and cinnamon. Cool in refrigerator overnight.


2. Pour cooled mixture into an ice cream maker, and freeze according to the manufacturer's instructions.


3. At end of mixing process, add crushed Butterfinger and let stir until fully combined. Remove from ice cream maker and store in air tight container in freezer overnight (to allow ice cream to fully refreeze).

Monday, December 24, 2007

Cookies Part Deux


When I saw this blog post on Ooh You Tasty Little Things, I was instantly bowled over and inspired. I wanted to make them OMGRIGHTNOW because they're so adorable!

I ended up finding a recipe on AllRecipes.com that was rated highest for sugar cookies. Now, here's the thing with All Recipes (or any recipe site that has feedback and comments): there's ALWAYS suggestions on bettering the recipe. Some people are convincing. I rarely use the original recipe as is; there is always someone yelling about there being too much flour, not enough flavor, etc. So, as usual, I went with some suggestions and they didn't come out as I expect they would have had I used the original recipe. I'm going to include the modifications I used but link you to the original. If you do make it, I'd suggest the more sugar (2 3/4 cups should do), the lemon zest (so yummy), and extra 1 tsp vanilla. Keep the flour. These didn't have enough and the added sugar made them spread out, not hold any shape (thus the circles after my stars came out all bloated) and they never cooked fully before browning.

I remember the author of the blog musing how she loved decorating cookies, bless her. As I got to my second snowflake, I thought, 'I really don't love this. I'm a cake kind of girl...' It was so much work. But the end pretty is worth it, I suppose. :)


THE BEST ROLLED SUGAR COOKIES

Source: AllRecipes.com, Submitted by: Jill Saunders


1 1/2 cups butter, softened
3 cups white sugar
4 eggs
2 teaspoon vanilla extract
1 teaspoon lemon zest

4 3/4 cups all-purpose flour
2 teaspoons baking powder
1 teaspoon salt

In a large bowl, cream together butter and sugar until smooth. Beat in eggs and vanilla. Stir in the flour, baking powder, and salt. Cover, and chill dough for at least one hour (or overnight).

Preheat oven to 400 degrees F (200 degrees C). Roll out dough on floured surface 1/4 to 1/2 inch thick. Cut into shapes with any cookie cutter. Place cookies 1 inch apart on ungreased cookie sheets.

Bake 8-10 minutes in preheated oven. Cool completely.


ROYAL ICING
Source: Joy of Baking.com

2 large egg whites
2 teaspoons fresh lemon juice
1/2 teaspoon vanilla extract
3 cups powdered sugar, sifted
In the bowl of your electric mixer (or with a hand mixer), beat the egg whites with the lemon juice. Add the sifted powdered sugar and vanilla and beat on low speed until combined and smooth. The icing needs to be used immediately or transferred to an airtight container as royal icing hardens when exposed to air. Cover with plastic wrap when not in use.
Red and blue Christmas 2007 FTW!

Wednesday, December 19, 2007

CookiesCookiesCookies

Being a stickler for tradition, I can only make the classic Peanut Butter Blossoms at Christmas although there's nothing really inherently Christmasy about them. It's chocolate and peanut butter, you know? Alas, it's a Christmas Cookie in our family so when the month of December rolls around, it's one of the first things I look forward to. The light peanut butter cookie, the melty chocolate Kiss... Heaven.

I got kind of ambitious with the many things on my list of Christmas Foods this year so I started early. The first week I made four batches of cookies alone. (This week I'm on the more intense cakes and candies but I'll get to that later.) I made two batches of the blossoms then wanted something that would travel well and wasn't chocolate. I settled on Coconut Macaroons which turned out really good but, as my mom says, what with Eagle Brand isn't good?

Last, I knew I was going to make cut-out sugar cookies later but still craved a sugary cookie without all the work. I found a Soft Sugar Cookie on All Recipes that took a few tries with the shaping but finally came out quite nice. Simple but with a good taste. My Christmas color theme this year is red and light blue (like the former Houston Oilers! Holla!) so I rolled one set of the sugar cookies in blue and sprinkled a little more in the center just for pop.


PEANUT BUTTER BLOSSOMS

Cream together:

1/2 cup shortening
1/2 cup peanut butter
1/2 cup sugar
1/2 cup packed brown sugar (light)

Mix in:

1 egg slightly beaten
1 tsp vanilla
1 level tsp baking soda
1/2 tsp salt

Stir in:

1 1/4 cups of flour (watch for consistency; should look shiny but hold together. Add less if needed)

Roll into balls, coat w/sugar, bake 375 degrees for 10 min. Remove from oven, press chocolate kisses into each center spreading ball so edges crack. Bake additional 1-2 minutes until chocolate melts.


COCONUT MACAROONS
Source: Ina Garten

14 ounces sweetened shredded coconut
14 ounces sweetened condensed milk
1 teaspoon pure vanilla extract
2 extra-large egg whites, at room temperature
1/4 teaspoon kosher salt

Preheat the oven to 325 degrees F.

Combine the coconut, condensed milk, and vanilla in a large bowl. Whip the egg whites and salt on high speed in the bowl of an electric mixer fitted with the whisk attachment until they make medium-firm peaks. Carefully fold the egg whites into the coconut mixture.

Drop the batter onto sheet pans lined with parchment paper using either a 1 3/4-inch diameter ice cream scoop, or two teaspoons. Bake for 25 to 30 minutes, until golden brown. Cool and serve.


SOFT SUGAR COOKIES IV
From AllRecipes.com, Submitted by Laura Stearns


2/3 cup shortening
2/3 cup butter
1 1/2 cups white sugar
2 eggs
2 teaspoons vanilla extract
3 1/2 cups all-purpose flour
2 teaspoons baking powder
1 teaspoon salt
1/3 cup granulated sugar for decoration

Preheat oven to 350 degrees F (175 degrees C).

In a medium bowl, cream together the butter, shortening and sugar. Stir in the eggs and vanilla. Combine the flour, baking powder and salt, stir into the creamed mixture until dough comes together. Roll dough into walnut sized balls and roll the balls in sugar. Place them on an unprepared cookie sheet about 2 inches apart. Press gently with bottom of a glass to make into evenly thick discs.

Bake cookies 10 to 12 minutes in the preheated oven, until bottom is light brown. Remove from baking sheets to cool on wire racks.

Saturday, November 10, 2007

Pumpkin Chocolate Chip Muffins


A few weeks ago, fall started to happen. And pumpkin products, drinks at Starbucks (holy beJesus, best everrr) started popping up. I jumped on that pumpkin wagon like crazy and bought cans of the stuff, ready to make magic. Then I lost steam. Staring at my cupboards this past week, I realized fall past me by and we're now well into winter (Starbucks is now serving they're frooffy eggnog lattes and peppermint mochas! [shakes fist]). The problem remains: I still have my cans of pumpkin. So I'm PUMPKIN SUITING UP. It's time to use this mushy fruit until I can'ts use it no mo.


First on the pumpkin parade is muffins. I got this recipe from All Recipes.com and it was disturbingly simple. Disturbing because I don't trust things that are TOO easy. But they came out perfectly fine. I'm more of a cupcake gal myself so muffins are always a hit or miss with me. These were not as sweet as I expected but the chocolate chips make up for the lack of sugar in the batter itself. The original recipe calls for all the traditional pumpkin spices separately but I didn't have ground cloves - I only had pumpkin pie spice which is a combination of all the biggies: cinnamon, cloves, nutmeg and ginger. I substituted that and added about double the amount of chocolate originally called for. What? I like chocolate.

They came out quite yummy but were especially good warm (melty chocolate!).


PUMPKIN CHOCOLATE CHIP MUFFINS

Adapted from AllRecipes.com, Submitted by: Donna

3/4 cup white sugar
1/4 cup vegetable oil
2 eggs
3/4 cup canned pumpkin
1/4 cup water
1 1/2 cups all-purpose flour
3/4 teaspoon baking powder
1/2 teaspoon baking soda
1 teaspoon pumpkin spice
1/4 teaspoon cinnamon
1 cup semisweet chocolate chips

Preheat the oven to 400 degrees F (200 degrees C). Grease and flour muffin pan or use paper liners.

Mix sugar, oil, eggs. Add pumpkin and water. In separate bowl mix together the baking flour, baking soda, baking powder, spices and salt. Add wet mixture and stir in chocolate chips.

Fill muffin cups 2/3 full with batter. Bake in preheated oven for 20 to 25 minutes.