skip to main |
skip to sidebar
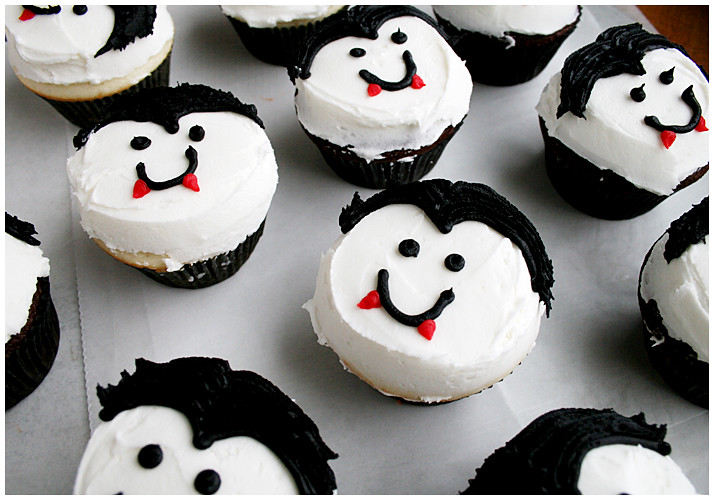
 Every year, my office puts on a Halloween party and they usually ask for desserts to be contributed. This year they're doing a dessert contest but I was just excited to make something creepy. I saw this cake on I Am Baker and thought it was AWESOME so I went about trying to replicate.
She mentions she uses Americolor for the buttercream coloring but I couldn't get my hands on it before the due date so I cheated (again) and used the Wilton bottle of black icing. Now, the legs, on hers, are red and almost gel-looking so I was stumped. I bought the little red gel bottle and that was way too bright. I added black coloring to it and it plunged into darkness; too dark! So I ended up using the leftover red Wilton bottle icing from the little vampire cupcake fangs of last week! Added a little black to darken it and voila! Kind of reddish/black legs!
Thanks to this from I Am Baker to this awesomely creepy design!!

 Soooooo, it's fun lying to kids, isn't it? I'm joking! sort of. My future children can blame MY mom for lying to me as I was growing up, and OFTEN. My mom was notorious for sneaking things into seemingly innocent desserts like brownies and would taunt us AFTER we had sampled them with, "GUESS WHAT'S IN THEM." She'd usually answer me and my brother's bafflement with "zucchini!" or "carrots!" I used to have generally unpleasant feelings from these sneaky vegetable revelations. However I know now why she did it. It is immensely satisfying to trick children into eating things that are good for them. Mwha ha ha haahahha.
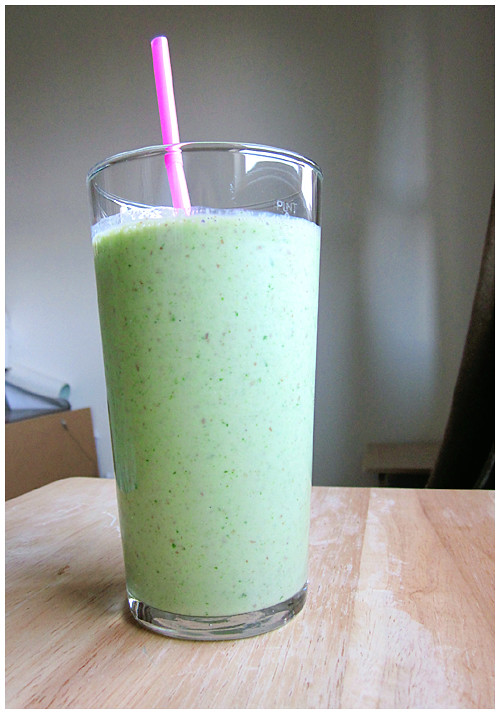
Williams-Sonoma has a new catalog and a spread with smoothies that piqued my interest. Especially that attractive looking GREEN thing front and center. I went in search of green smoothies and found several variations. The beautiful thing about smoothies is, they're so versatile. You can almost throw anything in a blender and it'll come out good. But I was on a mission so I followed the one I found on All Recipes, and the highly rated adaptation, relatively close. (Next will be kale!)
Now, the kid in question is my 13 year old nephew who is like most kids his age: he usually recoils at the sight of real vegetables. Sure, he can have some iceberg lettuce or starchy potatoes but get into leafy greens and he gets a ~look on his face. Like he'd rather eat dirt. So I gave him an enticing "We're going to try a GREEN DRINK!" preview. He's generally agreeable but eventually he asked, "What makes it green?" And I said, with a straight face, "Oh, I color it." >)
I sneaked the baby spinach leaves into the blender and kept it hidden behind me as I tossed in the yogurt, ground flax seed, frozen banana chunks and apple and voila! Beautiful green drink!
Now, the adapted comment on All Recipes used plain yogurt and agave syrup for sweetness. I used vanilla yogurt AND agave because, c'mon, I'm selling it to a kid. But only a teaspoon of syrup, so I didn't go crazy.
But you know who did go crazy? The nephew. He loved it. And I only kept it to myself long enough to enjoy the fact that he liked something that was sweet, yeah, but also protein-rich and good for him. He was even pleasantly surprised when I told him it was spinach and wanted to make more when he got home. :)
I can't wait to make this drink for a morning pick-me-up!
 GROOVY GREEN SMOOTHIE
Adapted from All Recipes, mamaiscookin
1 frozen banana, cut in chunks
8 ounces vanilla yogurt
1 apple, cored and chopped
1 1/2 cups fresh spinach leaves
1 Tbsp ground flax seed
1 Tbsp agave syrup (optional)
Place the banana, yogurt, apple, spinach and flax into a blender. Cover, and blend until smooth, stopping frequently to push down anything stuck to the sides. Pour into glasses and serve.
Servings: 2
 In an effort not to sound like a jerk, I restrain myself from talking about my relatively recent vegetarianism. But it's relevant here so, brace yourself; you're going to hear about it.
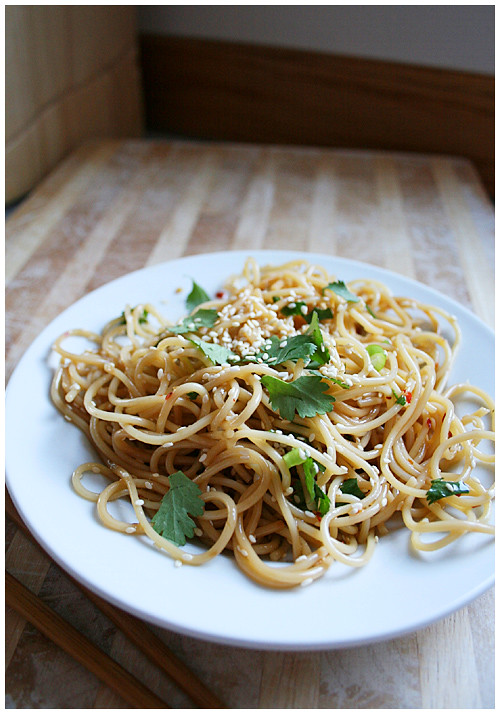
We had a holiday potluck at work, as usual, and I had a brilliant plan: pick over whatever raw veggies and breads I could scope out. Oh wait, did I say brilliant plan? I meant ~moronic plan. But the truth is, you never know what people put in their foods so it's hard to judge some dishes and it's better to be safe than sorry.
Well, as I strolled along the potluck line, I saw some noodles that, to the naked eye, looked simple and meatless. I took a bit and was surprised to find they were quite lovely; spicy, sesame-y and flavorful. I asked around then cold-called (cold-emailed?) the woman in the office that brought them in, asking for the recipe. She was happy to send it over and I giddily went to making them at home. Here's the thing with these noodles, though: they get better a day or two after they're made. The recipe even calls for letting the oils absorb into the noodles for 4 or more hours but overnight, it's even better!
Also, I didn't have roasted peanuts on hand when I made them and it was still delish (the green onions and cilantro are not as non-negotiable, though).
If you have plain sesame seeds, toasting them is just a matter of warming them up in fry pan until they become fragrant.
I love love love these noodles...

SESAME NOODLES
8 oz. capellini (or thin spaghetti)
1/4 cup vegetable oil
3 Tbsp dark sesame oil
1 tsp dry crushed red pepper
3 Tbsp honey
2 Tbsp soy sauce
1 tsp salt (may omit)
2 Tbsp. chopped cilantro
1/4 cup chopped green onion
2 Tbsp toasted sesame seeds
1/4 cup chopped roasted peanuts
1. Cook noodles, but don’t overcook, as they’ll soften with dressing. Set noodles aside.
2. Heat oil, sesame oil, and crushed red pepper over medium heat about 2 minutes. Stir in honey, soy sauce and salt and bring just to a simmer.
3. Toss warm dressing with pasta and refrigerate, covered for 4 hours or more for flavors to blend.
4. Just before serving, toss in cilantro, green onions, sesame seeds and peanuts.
Enjoy!
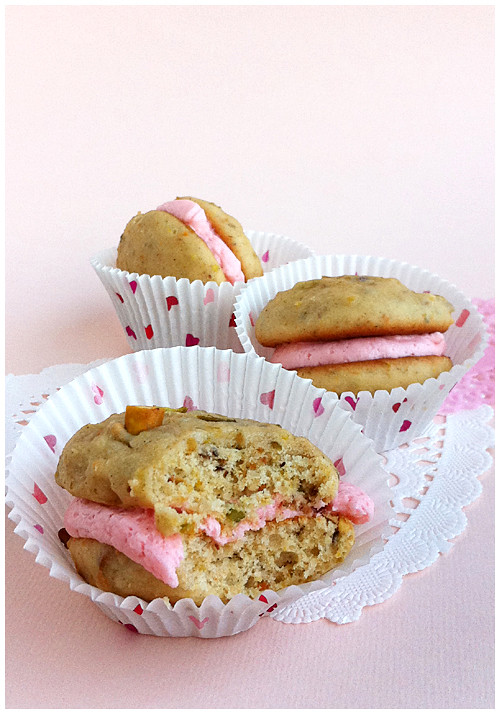
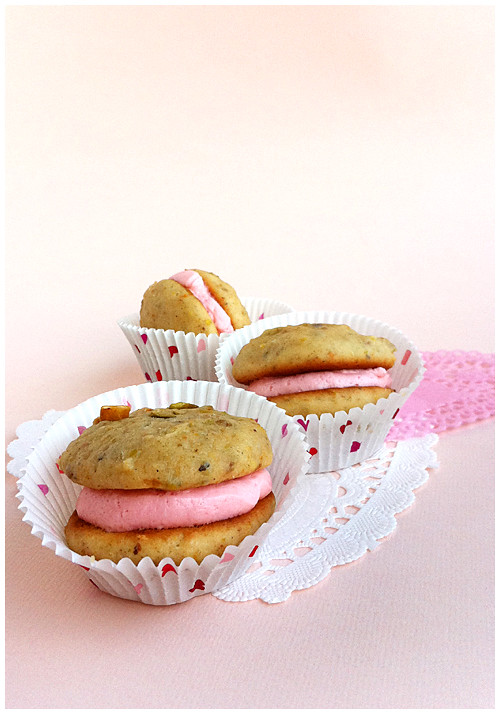 I think I'm finally coming to the realization that I don't think things through. When I read a recipe that says, Pistachio Whoopie Pies with Rosewater buttercream, I think, Ooo pretty pink! I go through all the steps to make my first whoopie pies ever then take a bite and cringe. 'ugh it tastes like FLOWER.' Never in my many years have I smelled a rose and thought, Man, I wanna chow down on THAT. But I have no one to blame but myself. It's ROSEWATER. It's going to taste like roses.
That being said, I had some leftover vanilla buttercream from a baby shower cake I made a week or so ago and tried that in one of these instead of the rose flavored. It was very nice, I must say. So my rec, and this is just personal taste, is to go with vanilla for these. And if you're wondering if you might dig rosewater buttercream, just imagine stuffing a rose into your mouth. Good? Okay, then go for it.
As previously mentioned, these are my first whoopie pies. They didn't look as poofy in the picture... Those are normal sized cupcake liners so you can see how big just a small ice cream scoop size produced. They're pretty filling when you smack two together with some flower-flavored buttercream. (Just color the vanilla pink! It'll look the same!!) I'd like to try some other flavors, though; they're a cute idea but have a short lifespan. The recipe recommends serving that day and after storing in a baggie over night, they had gone a little sticky from the moisture and such. So keep their shelf-life in mind!

PISTACHIO-CARDAMOM WHOOPIES
Source: Whoopie Pies by Sarah Billingsley and Amy Treadwell
3 cups all-purpose flour
1 1/2 teaspoons baking powder
1 teaspoon ground cardamom
1/2 teaspoon salt
1/2 cup (1 stick) butter, softened
3/4 cup granulated sugar
3/4 cup (packed) brown sugar
1 large egg
1 teaspoon vanilla extract
1 cup buttermilk
3/4 cup ground pistachios
Position a rack in the center of the over and preheat the oven to 350F. Line two baking sheets with parchment paper.
Sift together the flour, baking powder, cardamom and salt into a medium bowl.
In the work bowl of a stand mixer fitted with the paddle attachment, beat together the butter and both sugars on low speed until just combined. Increase the speed to medium and beat until fluffy and smooth, about 5 minutes. Add the egg, beating well. Add the vanilla.
Add half of the flour mixture and half of the buttermilk to the batter and beat on low until just incorporated. Scrape down the sides of the bowl. Add the remaining flour mixture and 1/2 cup buttermilk and beat until completely combined. Add the pistachios and mix just until combined.
Using a small ice cream scoop or 2-tablespoon scoop, drop about 2 tablespoons of batter onto one of the prepared baking sheets and repeat, spacing them at least 2 inches apart. Bake one sheet at a time for about 10 minutes each, or until the cakes begin to brown. Let the cakes cool on the sheet for at least 5 minutes before transferring them to a rack to cool completely.
Makes about 30 four-inch cakes.
ROSEWATER BUTTERCREAM
2 cups confectioners' sugar
4 tablespoons unsalted butter, at room temperature
3 tablespoons heavy whipping cream
1 teaspoon rosewater or rose essence
1 teaspoon vanilla extract
1/8 teaspoon salt
3 to 4 drops red food coloring
In the work bowl of a stand mixer fitted with the paddle attachment, beat together the confectioners' sugar and the butter, starting on low and increasing to medium speed, until mixture is crumbly, about 1 minute. Add the heavy cream, rosewater, vanilla, salt and red food coloring and beat on high until smooth, about 3 minutes.
OR!
VANILLA BUTTERCREAM
Source: Wilton
1/4 cup solid vegetable shortening
1/4 cup (1 stick) butter or margarine softened
1/2 teaspoon vanilla extract
2 cups sifted confectioners' sugar
1 tablespoon milk
Makes: About 1 1/2 cups of icing
In large bowl, cream shortening and butter with electric mixer. Add vanilla. Gradually add sugar, one cup at a time, beating well on medium speed. Scrape sides and bottom of bowl often. When all sugar has been mixed in, icing will appear dry. Add milk and beat at medium speed until light and fluffy. Keep bowl covered with a damp cloth until ready to use.
For best results, keep icing bowl in refrigerator when not in use. Refrigerated in an airtight container, this icing can be stored 2 weeks. Rewhip before using.
HAPPY VALENTINE'S DAY, EVERYBODY!
 My family knows I love baking. They also know that there's nothing I love more than baking BIRTHDAY CAKE. The best thing about birthday cakes is, because they come around every year, my fam usually gives me a challenge and requests something different each time. So I get to try new techniques and recipes AND do something for my loved ones at the same time!
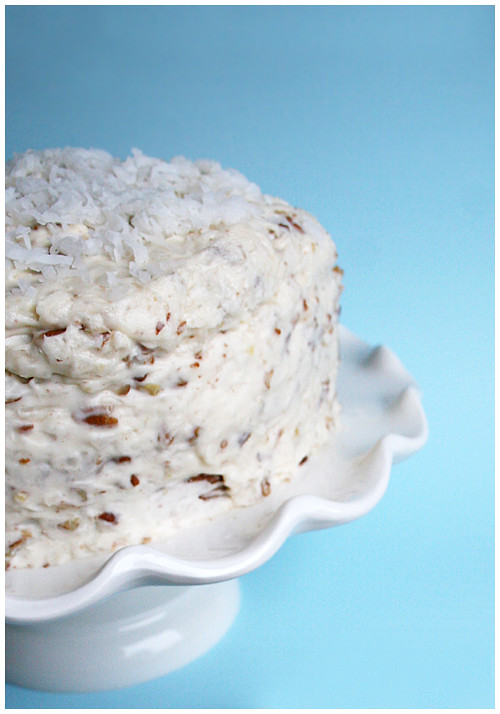
This year, my dad just said coconut cake but I had something special in mind. My friend from work and I share our cooking adventures and recipes with each other and she brought in a piece of this Italian Cream Cake a few months ago from her husband's birthday. It was DIVINE. So moist and coconutty. Auuggghhhh. She generously gave me the recipe and I sat on it, waiting for the perfect time to try it. HULLO, BIRTHDAY!
So, a few things first off: when you combine the baking soda and buttermilk, IT WILL FIZZ. I turned away for five seconds and when I looked back, it had overflowed from my cup. You've been warned! Use bigger than a 1 cup measuring cup.
Second, something in the chemical makeup of this batter cooks the eggs. You'll see pieces of scrambled egg and I don't know what I did to cause it. HOWEVER. I picked out the bigger pieces that made me nervous and baked and you couldn't tell ANYTHING in the final cake. So breathe easy; the egg will disappear!
Third, it'll seem like there's not enough icing for a three layer cake. I spread as thin a layer as possible on the insides (not even going all the way to the edge of the cake) and covered generously over the outside because that's the part that matters. You want the pretty swirliness on the outside. The inside layers were fine! The cake itself is sweet enough that it doesn't need too much icing. It was perfect the way it was!
This delish cake went SO FAST. It was just so gooooood. It's absolutely going on my all-time favorites!
 ITALIAN CREAM CAKE
Cake
1/2 cup shortening, room temperature
1/2 cup butter, room temperature
2 cups sugar
5 eggs, room temperature
1 cup buttermilk
1 teaspoon baking soda
2 cups flour
1 teaspoon vanilla
1 2/3 cup coconut
Icing
1/2 cup butter, room temperature
8 oz cream cheese, room temperature
1 box (~ 4 cups) sifted powdered sugar
1 teaspoon vanilla
1 cup coconut
1 cup chopped nuts (I used pecans)
1. Blend shortening and butter and sugar until creamy. Blend in egg yolks into mixture.
2. Add baking soda to buttermilk. Stir buttermilk and flour, alternately into egg mixture.
3. Beat egg whites until stiff; add vanilla. Fold stiff egg whites into batter, and then fold in coconut.
4. Divide batter into 3 8 or 9” cake pans that are greased and floured. Bake at 350° for 25-30 minutes or until toothpick comes out clean.
5. For Icing: Mix butter and cream cheese. Add sugar and vanilla. After mixed, add coconut and chopped nuts. Sprinkle coconut on top of cake after it is frosted. (I did mine just on top but it would look super pretty all the way around the sides too!)

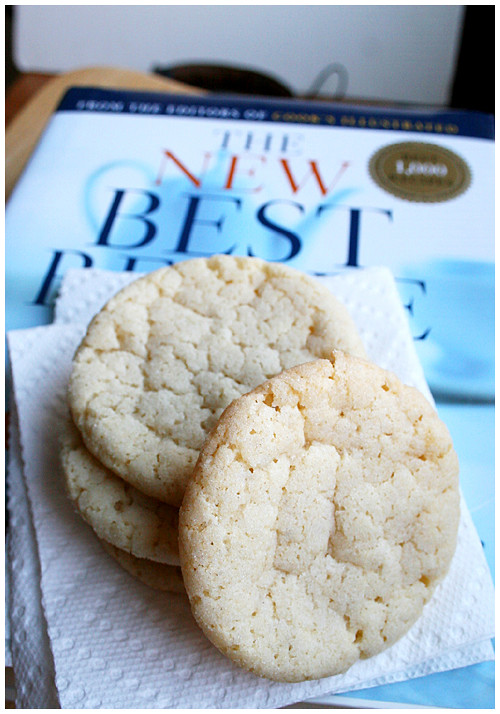 One can never have too many sugar cookie recipes. I've discovered this on my neverending journey to find the absolute best. Because I stumbled on a problem: there is no BEST. Sometimes you want chewy sugar cookies and sometimes you want sturdy but tasty ones for decorating and sometimes you want crispy, etc. Old Reliable (Cook's Illustrated) has taken care of one of these categories: the Chewy Sugar Cookie.
There's a few different techniques you can use to make each batch of these different and just a little alteration will affect them dramatically. Just a little more bake time and a perfectly crisp outer ring with chewy center turns into a full-on crunch show. So tread carefully with the first batch and see what works for you.
You can also press the ball of dough with the bottom of a glass to get the aforementioned perfect crisp/chew OR you can leave the dough in balls which results in a chewier, more raw taste (but it's cooked; trust). You can see the difference in appearance as well.
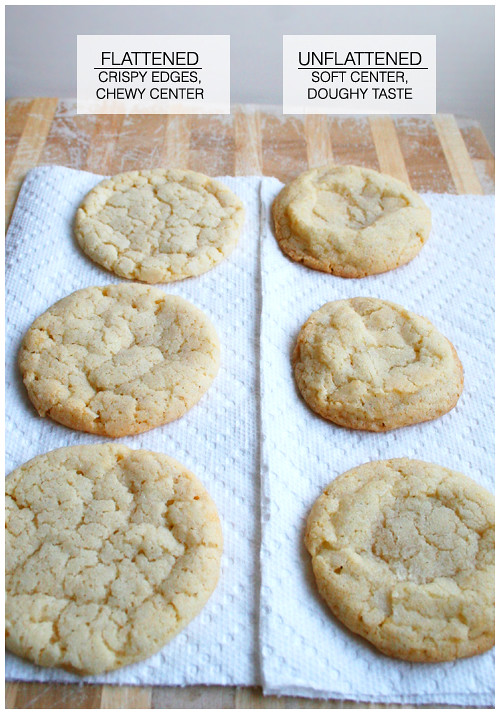 Personally, I like the flatter cookies because they came out with that chewy, soft center every time. I had family over for the holidays as I made these and they were served warm, fresh from the oven. An instant hit! (They keep really well too.)
CHEWY SUGAR COOKIES
Source: Cook's Illustrated
Note: The final dough will be slightly softer than most cookie dough. For the best results, handle the dough as briefly and gently as possible when shaping the cookies. Overworking the dough will result in flatter cookies.
2 1/4 cups (11 1/4 ounces) unbleached all-purpose flour
1/2 teaspoon baking soda
1 teaspoon baking powder
1/2 teaspoon table salt
1 1/2 cups (10 1/2 ounces) sugar, plus 1/3 cup for rolling
2 ounces cream cheese, cut into 8 pieces
6 tablespoons (3/4 stick) unsalted butter, melted and still warm
1/3 cup vegetable oil
1 large egg
1 tablespoon milk
2 teaspoons vanilla extract
1. Adjust oven rack to middle position and heat oven to 350 degrees. Line 2 large rimmed baking sheets with parchment paper. Whisk flour, baking soda, baking powder, and salt together in medium bowl. Set aside.
2. Place 1 1/2 cups sugar and cream cheese in large bowl. Place remaining 1/3 cup sugar in shallow baking dish or pie plate and set aside. Pour warm butter over sugar and cream cheese and whisk to combine (some small lumps of cream cheese will remain but will smooth out later). Whisk in oil until incorporated. Add egg, milk and vanilla; continue to whisk until smooth. Add flour mixture and mix with rubber spatula until soft homogeneous dough forms.
3. Divide dough into 24 equal pieces, about 2 tablespoons each (or use #40 portion scoop). Using hands, roll dough into balls. Working in batches, roll balls in reserved sugar to coat and evenly space on prepared baking sheet, 12 dough balls per sheet. Using bottom of drinking glass, flatten dough balls until 2 inches in diameter (or a little less than 1/2 inch tall).
4. Bake, 1 tray at a time, until edges are set and just beginning to brown, 11 to 13 minutes, rotating tray after 7 minutes. Cool cookies on baking sheets 5 minutes. Using wide metal spatula, transfer cookies to wire rack and cool to room temperature.
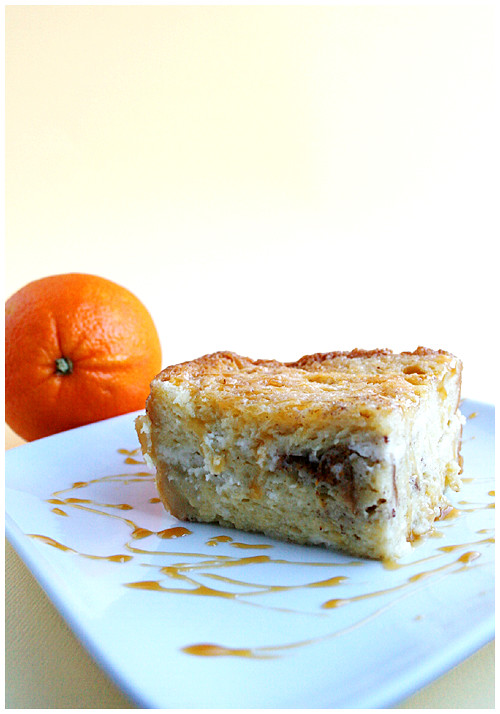 Do you want to know what's great about bread pudding? Everything. Everything is great about bread pudding. The richness, the texture, the simplicity of flavor and the versatility. In my quest for orange recipes for my orange-themed holidays, I came across many, tried a few then made this and knew all my searching hadn't been in vain. After this, I could wipe my hands clean of Orange Christmas 2010; I'd reached the pinnacle of success.
Now, full disclosure: I LOVE bread pudding. So maybe I'm a little biased. Maybe I ate this for breakfast a few times and maybe I also forked it into my mouth, directly out of the pan, because it was so addictive and lovely and I have little self-control. I kinda had my heart set on orange/chocolate recipes and I did find one for bread pudding on Food Network's site but it wasn't popular or reviewed more than 2 or 3 times and those always give me pause. This one, on the other hand, called for almond paste and the minute I see those two words, a flashing neon sign goes off in my head. WINNER. WINNER. WINNER. How does that delicious, yet shamefully unhealthy paste taste so good? Oh right, it's shamefully unhealthy. But it was Christmas so I indulged!
This had such an amazing smell when it was baking up as well and that was a big part of my Christmas baking too. I wanted the scent of orange and cinnamon and warmth permeating the house and this was spot on! And even though it's pictured, I didn't make the caramel sauce the recipe called for. That's a store bought for plate decoration. To me, it needed absolutely nothing else. It's rich and flavorful all on its own! Don't feel the need to add more sweetness to it; let the pudding speak for itself!!
If you have any inclination toward bread pudding at all, you absolutely must try this one. ugh. I miss it like an old friend. ...And it's only been 3 weeks since I've made it. want more!
 ORANGE ALMOND BREAD PUDDING
Adapted from: Sweet Pea's Kitchen
2 cups whole milk
2 cups heavy cream
Grated zest of 4 oranges
1/2 cup sugar, plus more for sprinkling
6 large egg yolks
1/2 teaspoon vanilla extract
1/4 teaspoon almond extract
1 tablespoon orange flavored liqueur such as Triple Sec, Grand Marnier or Contreau
1/2 teaspoon cinnamon
1 large egg white, at room temperature
7 ounces almond paste, crumbled
1 loaf (1 pound) of firm-textured white bread, cut into 1/2″ slices
1. In a medium saucepan, warm milk, heavy cream, orange zest and 1/2 cup of sugar to 110 degrees; Stirring often to dissolve the sugar. Remove from heat, cover, and let steep for one hour.
2. After one hour, reheat the cream mixture until it’s very warm (110 degrees). In a medium bowl, whisk the yolks then gradually whisk in the warm milk-cream mixture, whisking constantly to prevent eggs from cooking. Whisk in the vanilla extract, almond extract, orange liqueur, and cinnamon. Pour mixture through a strainer into another bowl to remove orange zest. Set aside.
3. Butter an 8x8 baking dish OR a shallow 2-quart baking dish or souffle mold. (Baking time will be longer with 8x8 as it will be thicker, as pictured.)
4. In a small bowl, beat the egg whites and almond paste until smooth. Spread a spoonful of almond paste over one side of a slice of bread, then place the slice in the prepared baking dish, almond paste side down. Continue spreading paste on bread, and layering slices into the dish. Pour the milk-egg yolk mixture over the bread and gently press down, submerging the layers in the liquid.
5. Cover with plastic wrap and place in the refrigerator at least an hour or overnight, pressing down occasionally to make sure the top layers of bread are soaked through.
6. Preheat oven to 350°F. If you’ve put the bread pudding in the fridge, allow it to come to room temperature before baking by placing it on the counter for at least an hour.
7. Sprinkle the top of the bread pudding liberally with sugar. Set the baking dish in a water bath by setting it in a large roasting pan, and then filling the roaster with water until it is halfway up the sides of the pudding’s baking dish.
8. Bake until pudding is puffed up in the center and the top is brown, about 1 to 1 1/2 hours. (Place loose aluminum foil over top if center isn't puffed; will keep top from burning.)
9. Let cool until warm. Serve warm. Optional: drizzle with caramel sauce.
Yields: 8-10 servings

I'm not sure if I've mentioned this (I have) but I live in Alaska. It's cold. And dark. And every winter, I fight for every bit of sun I can when taking pictures. But when you get off work at 3pm and it looks like that up there at 3:30 in the afternoon, it's hard to stay enthusiastic about taking pics. Some years are better than others, though. This year, I had some time off over the holidays and I took FULL advantage.

My mom wanted to make something different for Christmas dessert because every year we have pecan pie, pumpkin pie, flan and magic cookie bars. She went with a pumpkin flan in lieu of separate pie and custard and I took the opportunity to try a chocolate pie. The pictures don't do it justice because this pie was awesome! Thicker than pudding but as smooth, and rich chocolate but not overwhelming. It's got just as many glowing reviews from Epicurious so you know it's not just me!
It was a little time intensive and took planning but it was totally worth it in the end. Keeper!

CHOCOLATE CREAM PIE
Source: Gourmet, via Epicurious
For crust:
1 1/3 cups chocolate wafer crumbs (from about 26 cookies such as Nabisco Famous Chocolate Wafers)
5 tablespoons unsalted butter, melted
1/4 cup sugar
For filling:
2/3 cup sugar
1/4 cup cornstarch
1/2 teaspoon salt
4 large egg yolks
3 cups whole milk
5 oz fine-quality bittersweet chocolate (not unsweetened), melted
2 oz unsweetened chocolate, melted
2 tablespoons unsalted butter, softened
1 teaspoon vanilla
For topping:
3/4 cup chilled heavy cream
1 tablespoon sugar
Make crust:
Put oven rack in middle position and preheat oven to 350°F.
Stir together crumbs, butter, and sugar and press on bottom and up side of a 9-inch pie plate (1-quart capacity). Bake until crisp, about 15 minutes, and cool on a rack.
Make filling:
Whisk together sugar, cornstarch, salt, and yolks in a 3-quart heavy saucepan until combined well, then add milk in a stream, whisking. Bring to a boil over moderate heat, whisking, then reduce heat and simmer, whisking, 1 minute (filling will be thick).
Force filling through a fine-mesh sieve into a bowl, then whisk in chocolates, butter, and vanilla. Cover surface of filling with a buttered round of wax paper and cool completely, about 2 hours.
Spoon filling into crust and chill pie, loosely covered, at least 6 hours.
Make topping:
Just before serving, beat cream with sugar in a bowl using an electric mixer until it just holds stiff peaks, then spoon on top of pie.
Cooks' note: Pie (without topping) can be chilled up to 1 day.

 I have a 14 year old nephew that's kind of a foodie. He wants to be a chef. But he also likes a lot of different foods so when I asked him what kind of cake he wanted for his birthday and he said the same chocolate/raspberry one I'd made for another friend before, I wasn't challenged. It was a smidge disappointing. So I went in search of at least prettying it up. I found a beautiful picture on flickr of a chocolate raspberry cake that I've, regrettably, lost the link to. I attempted to duplicate it and didn't quite succeed but my nephew liked it a lot so that was my main goal.
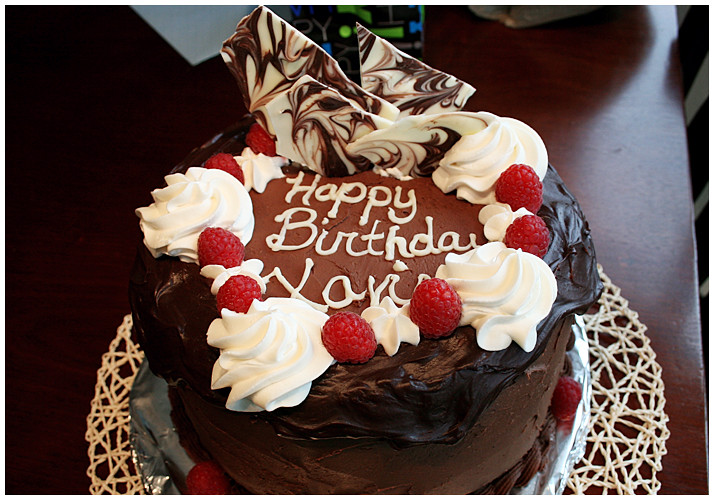 The thing I didn't prepare for was how time consuming every bit of this cake was. From the ganache to cutting the three layers to making the raspberry filling then chocolate buttercream then whipped cream THEN white chocolate marble decoration. so much work. But I'm glad it came out nice. And it was just as yummy as chocolate and raspberry always are. Win!
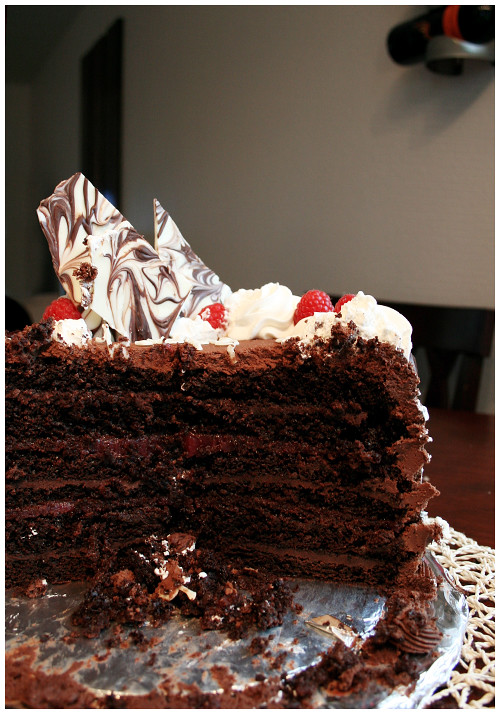 And it's six layers with three ganache fills and two raspberries. Mmmm!