Saturday, October 31, 2009

Happy Halloween!

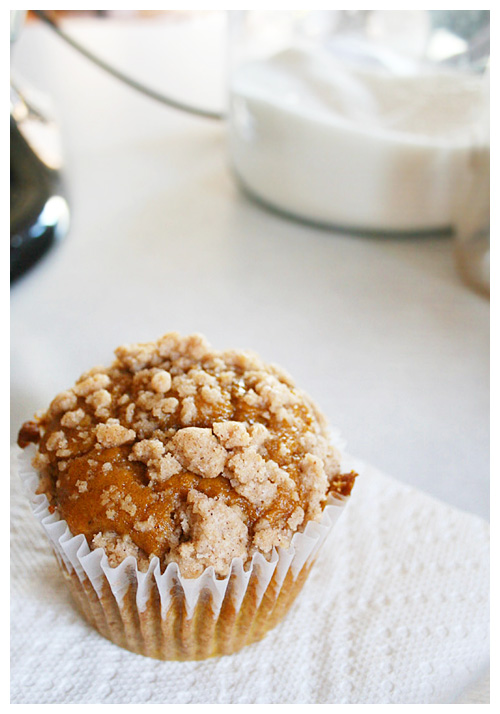
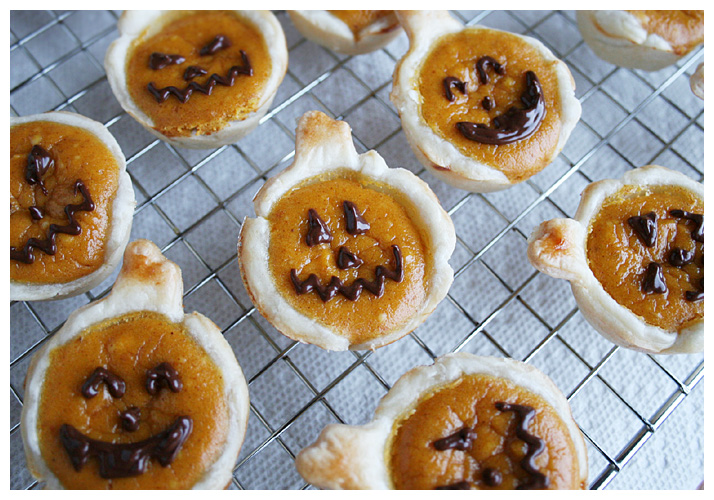
I think these are kind of perfect in every way. Cute, Halloween-y, pumpkin, bite size; the list of their attributes goes on and on! I found them posted on Facebook by a friend and was shocked to find I'd never heard of Bakerella before. Her blog is AMAZING. It's such a treat to find a baker that is both creative and imaginative in their recipes. I want to thank Bakerella for sharing such darling ideas with the world!


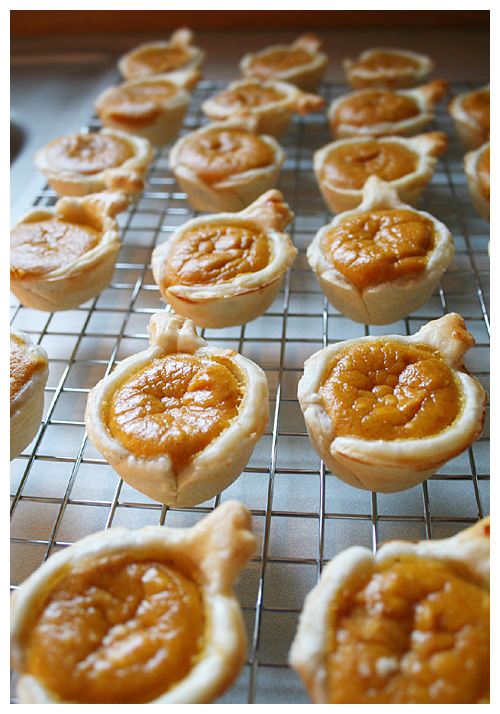
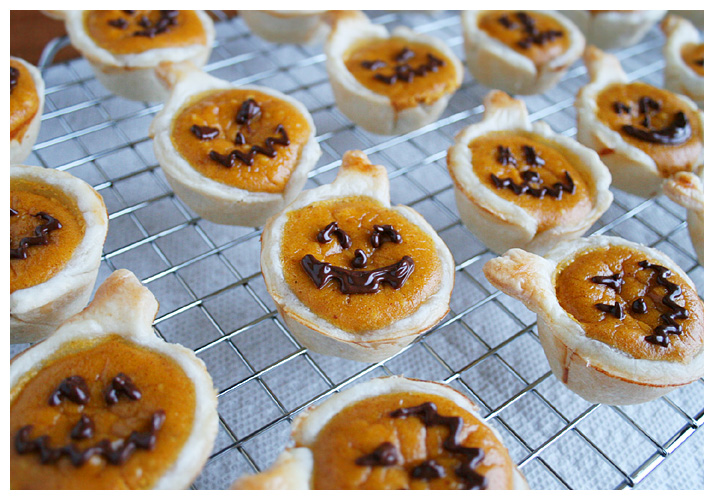
I took these little cuties to work for the Halloween bake sale and they went like hot cakes! I was a little sad to see them go so fast, to be honest; I would've made more if I had known two pie crusts (a top and bottom) made only 24 little pies and that they tasted so yummy. And 24 seemed like a lot until I took them in and they disappeared! Needless to say, they were well received!

This is a definite keeper recipe!!


MINI PUMPKIN PIES
Source: Bakerella

2 refrigerated ready-to roll pie crusts

8 oz. cream cheese, room temperature
1/2 cup sugar
1 cup canned pumpkin
2 eggs + 1 egg white
1 teaspoon vanilla
1 teaspoon pumpkin pie spice
Pumpkin-shaped cookie cutter

Optional
1/2 cup chocolate morsels
vegetable oil
re-sealable plastic bags

Preheat oven to 350 degrees.

Use cookie cutter to cut 12 pumpkin shapes from each pie crust. You will need to roll the dough thinner than it comes out of the box.

Press dough shapes into a 24 cup mini muffin tray. (Make 12 at a time, alternating cups to make sure pie crusts don’t overlap each other.)

Brush egg whites from one egg to the top edges of each pie. Mix cream cheese, sugar, canned pumpkin, remaining 2 eggs, vanilla and pumpkin pie spice together until thoroughly combined. Spoon mixture into each pumpkin-shaped pie crust. Bake for 12-15 minutes.

Remove pies to cool and repeat with second pie crust. Place the muffin tray in the freezer to cool it quickly for re-use.

Makes 24 pies. Keep refrigerated.


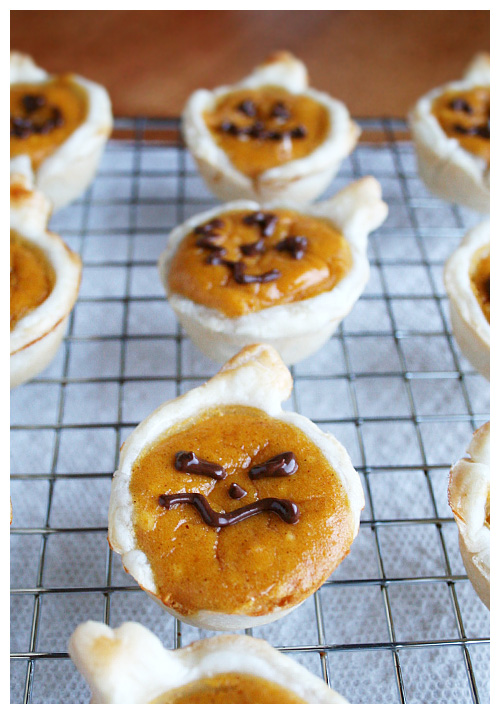
To decorate, melt chocolate in a heat-proof bowl in the microwave on medium. Heat in 30 second intervals, stirring in between until melted. Add a little vegetable oil to make the chocolate more fluid. Transfer to a re-sealable plastic bag and cut the corner off. Drizzle or draw faces on pies.


Thursday, October 29, 2009

Boo, ghosts. Boo.


Halloween is, by far, my favorite holiday. I'm not sure why because I've never been big on costumes or being scared at haunted houses or even trick-or-treating. But I guess it's fall and cute/spooky treats and decorations. Pumpkins were sent from Jesus as the greatest food stuff known to man. This is not a pumpkin entry; that's coming up next.

THIS is a Halloween cake entry because I seem to have those every other year. My best friend has a fall baby on the way (due late November) and she loves Halloween just as much and so decided the baby shower would be a perfect opportunity to have the best of both worlds. Hallo-baby party-shower! I'd seen these petits fours on Martha Stewart last year and almost died of the cute. I HAD to make them. But the holiday rolled around and went and I missed the chance. When this shower came up, I knew it would be the perfect occasion.

The thing about this blog I think I've found most fulfilling is the ability to go through a recipe, experience the process, and then post my reactions, good and bad, and try to help others not make the same mistakes. Or, in this case, say flat out: I will not make this recipe again. Don't get me wrong; another baker might look at it and decide it'll be worth the trouble. I can only say that from my standpoint, it's not.

I devised a few shortcuts from the word go that I thought would help me out. I'd bake the cake and freeze it so a hard (and not pillowy soft) cake would cut through easier when using the small biscuit round cutter. Yeah, no. Turns out, the cold cake stuck to the metal cutter and subsequently couldn't cut the third and fourth rounds neatly at all. There was much cleaning, cutting, cleaning, cutting.


I then saw that the pan made the cake too tall for the stumpy little ghosts. I had to go through and cut all the tops off the cylinders although this did provide me with a fun little sampler disk of cake. Mmm.


And that's another thing: this recipe WASTES so much cake. There's just something in me that cringes at having leftover bits with nothing to do with. I froze the trimmings and have yet to decide their fate.


So I piped the little cones of buttercream on top and froze that as well. There's always an issue of exposed cake drying out so I had to do a quick freeze for the frosting to set up then went back and lightly covered a hollow cake pan with plastic wrap so only the tops were touching. Froze them again so I could glaze the day of the shower.


Now. The glaze. Perhaps a more experienced petits-fours-making-person would've thinned it out further but there were two issues: #1. I didn't know if a thinner glaze would set up or if it would remain too liquid, and #2. Would a thinner glaze show the imperfections of the cake/frosting instead of being a smooth, ghosty outside? I don't know the answer to either still because I was too chicken to try thinning the glaze. As it is, it's kind of thick and VERY sweet. The ghosts came out okay but not great. The witch hats, however, were a small disaster. The chocolate "glaze" is nothing more than a ganache that completely smothers the tiny round of delicate cake. With the buttercream cone on top of that, you've got a giant helping of chocolate and frosting and not much else. I wanted to throw them away but, again, felt uneasy wasting food. They were an unadulterated failure, though.

One last thing: the chocolate piping. I wish I'd read Bakerella's notes on piping chocolate for faces in which she instructs to add a little vegetable oil to make the substance more fluid because MARTHA sure didn't. So, thanks to Martha Stewart, the chocolate was too thick, hard to manage and came out looking junky. Bakerella's, on the other hand, came out looking great (that's the pumpkin coming up next). Thanks for nothing, Martha!

The guests at the party were extremely nice and said they really liked the little ghosts but I was disappointed. I will absolutely never make these again but I'm glad I went through the experience and could pass it on to you guys. Attempt at your own risk!


GHOULISH PETITS FOURS
Martha Stewart

For witch hats, make petits fours through step two. Then create a brim using a dab of icing: Affix each petit four to a 2-to-2 1/2-inch chocolate wafer cookie. Proceed to step three, coating with Chocolate Glaze instead of Butter Glaze. In lieu of step four, wrap one or two pieces of licorice lace around the base of the hat immediately after glazing.


Makes about 40
White Sheet Cake
Confectioners' Sugar Icing
Butter Glaze
4 ounces semisweet chocolate, for eyes and mouth


Using a 1 1/2-inch cookie cutter, cut out circles from cake. Brush off any crumbs with a pastry brush.

Fit a pastry bag with a plastic coupler, and top cake rounds with icing in a ghost or hat shape, about 1 inch high.

Place a wire rack over a rimmed baking sheet; set aside. Set an iced cake round on a fork; hold over bowl of glaze. Using a large spoon, drizzle glaze evenly over cake and icing until completely covered. Transfer to wire rack. Repeat with remaining rounds. Let set, about 5 minutes.

Place chocolate in a heatproof bowl microwave at 50% power, stirring chocolate every 30 seconds until melted. Add small amount of vegetable oil to make more fluid. Transfer to a disposable pastry bag or resealable plastic bag; snip off tip with scissors. Pipe eyes and a mouth onto ghosts.


WHITE SHEET CAKE

Makes one 12-by-17-inch cake

1 cup (2 sticks) plus 2 tablespoons unsalted butter, room temperature, plus more for baking sheet and wire rack
4 1/2 cups sifted cake flour (not self-rising), plus more for baking sheet
2 tablespoons baking powder
3/4 teaspoon salt
1 1/2 cups milk
1 1/2 tablespoons pure vanilla extract
2 1/4 cups sugar
7 large egg whites

Preheat oven to 350 degrees. Butter a 12-by-17-by-1-inch rimmed baking sheet. Line bottom with parchment paper. Butter parchment, and dust with flour, tapping off any excess. Set sheet aside.

Into a medium bowl, sift together flour, baking powder, and salt; set aside. In a measuring cup, combine milk and vanilla; set aside. In the bowl of an electric mixer fitted with the paddle attachment, cream butter until very smooth. With mixer on medium speed, add sugar in a slow, steady stream; beat until mixture is light and fluffy, about 3 minutes.

Reduce speed to low. Add reserved flour mixture in three batches, alternating with reserved milk mixture, and starting and ending with flour. Mix until just combined; do not overmix. Set aside.

In a clean bowl, beat egg whites until stiff but do not let dry peaks form. Fold one-third of the egg whites into batter to lighten, then gently fold in remaining whites in two batches.

Scrape batter into prepared sheet; smooth top with an offset spatula. Bake in oven until cake is springy to the touch and a cake tester inserted in the center comes out clean, about 30 minutes. Transfer to a wire rack, and let cool 15 minutes. Loosen sides of cake with a small metal spatula or paring knife; invert onto a buttered wire rack. Peel off parchment. To prevent splitting, reinvert cake so top is facing up. Let cake cool completely.


CONFECTIONERS' SUGAR ICING
(I would HALVE this; it made WAY too much)

Makes about 7 cups

1 1/2 cups unsalted butter (3 sticks), room temperature
3 pounds confectioners' sugar
3/4 teaspoon salt
3 tablespoons pure vanilla extract
3/4 cup milk, plus more if needed


In the bowl of an electric mixer fitted with the paddle attachment, beat together the butter and sugar until well combined. Add salt, vanilla, and milk; beat until icing is smooth and creamy. The icing should be thick enough to pipe and hold its shape. If icing seems too thick, add 1 tablespoon milk at a time until proper consistency is reached. Use immediately, or refrigerate in an airtight container up to 2 days. If refrigerating, bring icing to room temperature before using, and lightly beat until creamy if necessary.


BUTTER GLAZE
Makes about 1 1/2 cups

2 1/2 cups sifted confectioners' sugar
1/2 cup (1 stick) unsalted butter
5 tablespoons milk


Place sugar in a medium bowl, and set aside. In a small saucepan, melt butter over medium heat. Immediately pour the melted butter into the bowl with the sugar. Add the milk, and whisk until mixture is smooth. Cover bowl, and store at room temperature until ready to use.


CHOCOLATE GLAZE (for witch hats)
Makes 1 1/2 cups

6 ounces best-quality bittersweet or semisweet chocolate
1 cup heavy cream


Chop the chocolate into small pieces, and place in a medium bowl. In a small saucepan, heat cream over medium-high heat until just simmering, and pour it over the chocolate. Let mixture stand 5 minutes, then stir until smooth. Let stand at room temperature about 10 minutes before using.


Monday, October 12, 2009

Pumpkin Goes On


My life can go on: I found pumpkin. Correction: my mom found pumpkin. The not-that-long story is, I went in search of canned pumpkin to replenish my supply for the fall after making the pumpkin brownies. The first grocery store had an empty shelf where it SHOULD have been. I thought it was weird but whatever; I’d just go to another store. A week or so later, I hit another and WHAT- another empty shelf!? I mention the strange phenom to my mom who then discovers there’s word (on the web) that there’s a pumpkin shortage this year. I freak out a little and proceed to spread the word to family and friends to fall on a can of pumpkin like it’s the end of times and it’s the last food on the planet. Hit two more stores on separate sides of town and BOTH are empty shelves. Hope fades.

Then Mom calls Sunday afternoon from Wal-Mart of all places with the news. There’s tons! Fall/Halloween has been saved! I immediately turned on my oven to preheat, ready to use the only can I had in my cupboard RIGHT AWAY.


I had a pumpkin Costco muffin a few weeks ago and it was bliss. But Costco muffins are kind of amazing, aren’t they. I’ve been wanting pumpkin muffins ever since. This recipe popped up on a few other blogs and with their ringing endorsement, I was eager to try too. The original recipe didn’t have a crumb topping like Costco’s muffin and to be honest, that’s one of my favorite parts. So I found a separate crumb topping recipe (for blueberry muffins), added a little cinnamon to it and voila! Pumpkin muffins with crumb topping.

Oh and one other thing: the blog I found the recipe on accidentally put a whole can of pumpkin in the batter when it calls for only 8 ounces (the can is 15 ounces, so, almost double). She raved that it was still good and moist so I thought, what the Hell, man; I’m craving the pumpkin and more can only make it better! They came out really delicious and moist! I did have to add some baking time (around 35-38 minutes) but still.

This made 6 large muffin cups then had a little left over that perfectly I filled a mini muffin pan. I love having little two-bite pieces of muffin around. This is definitely something I’d make again!


PUMPKIN MUFFINS WITH CRUMB TOPPING
Adapted from Gourmet/The American Club

Makes 6 large muffins / 1 dozen small muffins

1 1/2 cups all-purpose flour
1 tsp baking powder
1 can solid-pack pumpkin (15 ounces)
1/3 cup vegetable oil
2 large eggs
1 tsp pumpkin pie spice
1 1/4 cups plus 1 Tbsp sugar
1/2 tsp baking soda
1/2 tsp salt
1 tsp cinnamon

CRUMB TOPPING

1 cup all-purpose flour
3 Tbsp light brown sugar
2 Tbsp granulated sugar
1 tsp baking powder
1 tsp cinnamon
Pinch of salt
6 tablespoons unsalted butter, melted


Put oven rack in middle position and preheat oven to 350F. Put liners in muffin cups.

Whisk together flour and baking powder in a small bowl.

Whisk together pumpkin, oil, eggs, pumpkin pie spice, 1 1/4 cups sugar, baking soda, and salt in a large bowl until smooth, then whisk in flour mixture until just combined.

For crumb topping, in a medium bowl, combine the flour with the brown sugar, granulated sugar, baking powder, cinnamon and salt. Stir in the melted butter, then pinch the mixture until it forms pea-size clumps.

Divide batter among muffin cups (each should be about 3/4 full), then sprinkle tops with crumb topping mixture. Bake until puffed and golden brown and a wooden pick or skewer inserted into center of a muffin comes out clean, 30 to 35 minutes.

Cool in pan on a rack 5 minutes, then transfer muffins from pan to rack and cool to warm or room temperature.

Sunday, September 20, 2009

Fall starts today


Fall is official in my house. It always starts with the football season beginning (last week) and then the Halloween candy appears in the grocery stores. But it's not OFFICIAL in my house until I haul out the tubs of Halloween decorations, light up my favorite fall spice candle and bake something with pumpkin. Today, it has arrived.


These are the pumpkin swirl brownies from Martha Stewart and they sounded so damn easy, how could I pass them up? I was also assured the pumpkin & chocolate flavors meshed well by my last chocopumpkin attempt with muffins. There would be a big difference between the two, but I'll get to that in a second.

I had to adjust the baking time because I didn't have a 9" square pan, but an 8"; it took an added 20 minutes and it was only just coming out with the toothpick clean. I also didn't add any nuts as the original recipe suggests sprinkling on top and now I wish I had. I think walnuts would've been perfect. My instinct to omit them was completely wrong.

Now, the difference from these brownies and the muffins: the thing about the muffins was, it was all pumpkin then lovely little bits of chocolate chips. In these brownies, there is equal amounts of pumpkin and chocolate and, to be honest, the chocolate kind of takes over. It's like they stepped into the ring and the pumpkin got KO'ed. However, the batter doesn't mix completely (as you can see from the layers), so you can taste them separately. The cayenne, especially, is noticeable in the pumpkin layers (and it's the tiniest bite but it's good!)

These were good but I kind of want a big pumpkin flavor when I make something with it. My pumpkin craving wasn't satisfied at all from this so I'm definitely looking for what's next!


PUMPKIN SWIRL BROWNIES
Source: Martha Stewart

Makes 16

8 tablespoons (1 stick) unsalted butter, plus more for pan
6 ounces bittersweet chocolate, chopped
2 cups all-purpose flour
1 teaspoon baking powder
1/4 teaspoon cayenne pepper
1/2 teaspoon salt
1 3/4 cups sugar
4 large eggs
1 tablespoon pure vanilla extract
1 1/4 cups solid-pack pumpkin
1/4 cup vegetable oil
1 teaspoon ground cinnamon
1/4 teaspoon ground nutmeg

Optional: 1/2 cup chopped hazelnuts or other nuts


Preheat oven to 350 degrees. Butter a 9-inch square baking pan or dish. Line bottom of pan with parchment paper; butter lining.

Melt chocolate and butter in a heatproof bowl set over a pan of simmering water, stirring occasionally until smooth.

Whisk together flour, baking powder, cayenne, and salt in a large bowl; set aside. Put sugar, eggs, and vanilla in the bowl of an electric mixer fitted with the paddle attachment; beat until fluffy and well combined, 3 to 5 minutes. Beat in flour mixture.

Divide batter between two medium bowls (about 2 cups per bowl). Stir chocolate mixture into one bowl. In other bowl, stir in pumpkin, oil, cinnamon, and nutmeg. Transfer half of chocolate batter to prepared pan smoothing top with a rubber spatula. Top with half of pumpkin batter. Repeat to make one more chocolate layer and one more pumpkin layer. Work quickly so batters don't set.

With a small spatula or a table knife, gently swirl the two batters to create a marbled effect.

Bake until set, 40 to 55 minutes. Let cool in pan on a wire rack. Cut into 16 squares.

Thursday, September 17, 2009

Chocolate & Raspberry always works


I saw the movie Hot Fuzz the other day and while it was awesome, one moment stuck out: Nick Frost's character was munching away on a chocolate cake with some sort of red filling. I was asked to make a cake for my friend's birthday and that's the first thing I proposed.

This was another one of those collecting pieces of recipes from all over to create something. I get nervous when I do this; it feels like creating a Frankenstein monster. Who knows if it'll be okay or such a disaster, the townsfolk start gathering their pitchforks. Thankfully, it was the former.

I went with the trusty Ina Garten but, more importantly, a chocolate cake she'd featured in her show from a "Beatty", that had unheard-of positive reviews. 5 stars, almost across the board. And I could very well go to Food Network.com and add my own rave review because this cake was phenomenal. It was moist but not too dense, perfectly chocolately without being overpowering. Absolutely terrific.


Now, for the red filling, I had to start scouring the web in search of what existed in my mind but which I wasn't sure I'd seen materialized outside of a Simon Pegg movie. A few came up that never sounded exactly right but then I finally stumbled on a straightforward Raspberry Filling recipe from Wilton.com, strangely enough. I'd never used any of their recipes before but this appeared so easy and I was going for a simple taste that wouldn't complicate the cake. It came out exactly as I'd hoped, thickened by the corn starch and tart but still sweet and seriously hard to stop eating.

To even out the tartness of the raspberry filling and the richness of the chocolate, I added a layer of whipped cream. Chocolate ganache topped it off and voila! Chocolate raspberry cake! It was a hit with the birthday girl and my family. I was honestly surprised at how much I enjoyed it. It took some time to prepare all the components but it was absolutely worth it!


BEATTY'S CHOCOLATE CAKE WITH RASPBERRY FILLING
Source: Ina Garten

Butter, for greasing the pans


1 3/4 cups all-purpose flour, plus more for pans
2 cups sugar
3/4 cups good cocoa powder
2 teaspoons baking soda
1 teaspoon baking powder
1 teaspoon kosher salt
1 cup buttermilk, shaken
1/2 cup vegetable oil
2 extra-large eggs, at room temperature
1 teaspoon pure vanilla extract
1 cup freshly brewed hot coffee

Chocolate Ganache (recipe follows)
Raspberry Filling (recipe follows)
Whipped cream (recipe follows)
Preheat the oven to 350 degrees F. Butter 2 (8-inch) round cake pans. Line with parchment paper, then butter and flour the pans.

Sift the flour, sugar, cocoa, baking soda, baking powder, and salt into the bowl of an electric mixer fitted with a paddle attachment and mix on low speed until combined. In another bowl, combine the buttermilk, oil, eggs, and vanilla. With the mixer on low speed, slowly add the wet ingredients to the dry. With mixer still on low, add the coffee and stir just to combine, scraping the bottom of the bowl with a rubber spatula. Pour the batter into the prepared pans and bake for 35 to 40 minutes, until a cake tester comes out clean. Cool in the pans for 30 minutes, then turn them out onto a cooling rack and cool completely.


Assemble the bottom of the cake, flat side up, with a layer of raspberry filling then whipped cream (recipes follow). Set top cake layer on the filling layers. Refrigerate to set filling layers to cakes.

Make chocolate ganache then let come to room temperature. You may need to let it sit in the fridge as well (continue stirring every five minutes or so to allow to chill evenly). When it is a thick, spreading consistency, spread evenly over cake. It will be a thin layer (ganache is dense and strong) so it is easiest to pour all ganache in the center and slowly work out and down the sides with a flat spatula.

Serve soon or refrigerate if storing. Whipped cream will not keep long.


RASPBERRY FILLING
Adapted from: Wilton.com

1 pkg (16 ounces) frozen raspberries packed in sugar thawed
1/3 cup granulated sugar
3 tablespoons cornstarch
1 teaspoon lemon juice

Makes: Filling serves 2 cups.

Drain raspberries, reserving liquid. Add enough water to liquid to equal 1 1/4 cups.

In large saucepan, combine liquid, sugar, cornstarch and lemon juice; mix well. Heat and stir until mixture boils and thickens. Cool completely.


WHIPPED CREAM

1/2 cup heavy cream, well chilled
1 tbsp confectioners' sugar
1/4 tsp vanilla extract

Place a mixing bowl and beaters from electric mixer in the freezer or refrigerator until well chilled, about 15 minutes.

Combine the heavy cream, confectioners' sugar, and vanilla extract in the mixing bowl.

With an electric mixer on low speed, begin beating the cream, gradually increasing the speed to high as cream thickens. (Do this slowly, or the cream will splatter.)

Beat until the cream is thickened, past soft peaks. It should have some structure so it can stand on its own as a layer under the top of the cake.


CHOCOLATE GANACHE
Source: Ina Garten

1/2 cup heavy cream
8 ounces good semisweet chocolate chips
1/2 teaspoon instant coffee granules

Cook the heavy cream, chocolate chips, and instant coffee in the top of a double boiler over simmering water until smooth and warm, stirring occasionally.

Sunday, August 23, 2009

A return with cheesecake


I know. I KNOW. I've been MIA for months. The thing is, I've been trying to eat better and that consists of no baking cupcakes or puddings or ice creams. Too much unnecessary temptation! However something started happening recently that will absolutely change my mind: FALL.

I love fall stupid. I sing its praises every year, it seems like. I get excited about pumpkin stuff and warm puddings and cozy autumn harvest-themed teas. So there's no way I'm going to skip baking this fall. To go along with the season, I had a craving for something a little heavier and a little stronger. Cheesecake was something I hadn't made for years (the last was unremarkable) so I decided on that. But regular cheesecake is kind of boring so I went with my favorite: turtle.

I found a highly reviewed recipe by Tyler Florence named The Ultimate Cheesecake. It was your standard with a blueberry sauce on top so I made a few adjustments (taking out the lemon zest and swapping graham cracker crust for chocolate). Then I settled on mini chocolate chips instead of a chocolate sauce, hoping to replicate Lawler's turtle cheesecake as closely as possible. Of course, there's always little things with every recipe...


I watched the video Food Network supplied with the recipe as it baked because I got conflicting reports from the comments left by others. After 45 minutes, Tyler showed what it should look like and boy was it dodgy looking. He said he liked his cheesecake to have a smooth and silky consistency but, to be honest, that's not the kind of cheesecake I like. When I think cheesecake, I think THICK. Like, a solid brick that your fork leaves indentions in and you have to take small bites because it's so strong. This was not that.

And while it wasn't my perfect cheesecake, it still came out pretty good. The chocolate, pecans and caramel couldn't've hurt. I'd like to try another cheesecake because, like the pound cake, I have a tiny compulsion to keep trying things until they turn out perfect...


ULTIMATE TURTLE CHEESECAKE
Adapted from Tyler Florence

Crust:
2 1/2 cups finely ground chocolate cookies
1 stick unsalted butter, melted

Filling:
1 pound cream cheese, 2 (8-ounce) blocks, softened
3 eggs
1 cup sugar
1 pint sour cream
1 tsp vanilla extract

Caramel Topping
1 cup semisweet mini chips
1 cup chopped toasted pecans


Preheat the oven to 350 degrees F.

In a mixing bowl, combine the cookie crumbs and butter with a fork until evenly moistened. Lightly coat the bottom and sides of an 9-inch springform pan with nonstick cooking spray. Pour the crumbs into the pan and, using the bottom of a measuring cup or the smooth bottom of a glass, press the crumbs down into the base and up the sides. Refrigerate for 5 minutes.


For the Filling:

In the bowl of an electric mixer, beat the cream cheese on low speed for 1 minute until smooth and free of any lumps. Add the eggs, 1 at a time, and continue to beat slowly until combined. Gradually add sugar and beat until creamy, for 1 to 2 minutes. Add sour cream and vanilla. Periodically scrape down the sides of the bowl and the beaters. The batter should be well mixed but not over-beaten. Pour the filling into the crust-lined pan and smooth the top with a spatula.

Set the cheesecake pan on a large piece of aluminum foil and fold up the sides around it. Place the cake pan in a large roasting pan. Pour boiling water into the roasting pan until the water is about halfway up the sides of the cheesecake pan; the foil will keep the water from seeping into the cheesecake. Bake for 45 minutes to 1 hour. The cheesecake should still jiggle (it will firm up after chilling), so be careful not to overcook. I turned off the oven and let it sit inside for 30 minutes (Tyler suggests to just ‘Let cool in pan for 30 minutes’). Chill in the refrigerator, loosely covered, for at least 4 hours. Loosen the cheesecake from the sides of the pan by running a thin metal spatula around the inside rim. Unmold and transfer to a cake plate. Drizzle caramel topping then mini chips and pecans over the surface.

Slice the cheesecake with a thin, non-serrated knife that has been dipped in hot water. Wipe dry after each cut.


Friday, June 5, 2009

Tres!

I visited Puerto Rico with family and friends last year for the first time and had many foods I'd never even heard of. Some were familiar (because I'm Mexican and we have common recipes) and some were not (the pervasiveness of plantains was impressive).

We were treated to some desserts one night and I had tres leches for the first time. Now. I've done some research and the origins are widely disputed though most argue it is from Mexico. I was a little ashamed I'd never had it before but on further investigation, it's also considered a holiday (Christmas) dish so it's not an everyday sweet like pan dulce or anything. My shame was slightly alleviated.

I found a well-reviewed recipe from Emeril Lagasse and got to it. His recipe says to bake this deep, super wet cake for "25 minutes". At 25 minutes, it was 80% still solid liquid. I think my total bake time came out closer to 45-50 minutes so be prepared to let it go and start checking with a cake tester as you go along.

I did a little shortcut and used Cool Whip for the top because I'd heard it was just as good and it totally was! And the whole thing was terribly addictive and yummy. The leches made the cake nice and moist but not so much that it was falling apart. It was a lovely consistency that was sweet (thanks to the condensed milk) but not TOO sweet.

However. The version I had in Puerto Rico was less rich; more milky. It even left behind a little milkiness on the plate when you took a bite. I'm not sure if it was the relative density of this cake that soaked it all up or the thickness of the leches (evaporated milk, condensed milk and CREAM), but this one didn't bleed milkiness at all. It was delicious but not exactly the same as the one I had. And this was VERY rich. One piece (with a glass of milk because, clearly, there isn't enough in a cake called Tres Leches) and you're all good!

This is one easy recipe I know I'll be making again!


TRES LECHES
Adapted from Emeril Lagasse

Cake:
6 large eggs, separated
2 cups granulated sugar
2 cups all-purpose flour
2 teaspoons baking powder
1/2 cup whole milk
1 teaspoon vanilla extract

Cream topping:
1 14-ounce can evaporated milk
1 14-ounce can sweetened condensed milk
1 cup heavy cream

Icing:
1 tub Cool Whip
maraschino cherries for decoration


To make the cake: Preheat the oven to 350 degrees F. Lightly grease and flour a 9 by 13-inch baking dish and set aside.

In the bowl of a mixer, beat the egg whites on low speed until soft peaks form. Add the sugar gradually with the mixer running and peak to stiff peaks. Add the egg yolks 1 at a time, beating well after the addition of each.

Sift together the flour and baking powder and add to the egg mixture, alternating with the milk. (Do this quickly so the batter does not lose volume.) Add the vanilla. Bake until golden, 40-50 minutes.

To make the cream topping: In a blender, combine the evaporated milk, condensed milk, and heavy cream and blend on high speed.

Remove the cake from the oven and while still warm, pour the cream mixture over it. Let sit and cool to room temperature. Cover and refrigerate until well chilled, at least 4 hours or overnight.

To assemble: Remove the cake from the refrigerator and spread the icing evenly across the top. Add cherry to individual slices.

Sunday, May 31, 2009

Yes. More lemon.

I think about half of my baking comes from having ingredients I need to use or lose. Okay, maybe a quarter. This is one such recipe.

I STILL had lemons sitting around that I just couldn't ignore for another weekend but knew absolutely what I DIDN'T want to make from them (cake/cupcakes or sorbet/ice cream). That left me with a tart (which I've done before) or curd. Making the tart shells seemed like too much effort so I settled on curd.

It's relatively easy to make in the same way custard is; you cook it VERY slowly over low heat so the eggs don't curdle. I was actually considering cooking longer (even though I went the recommended time) because I imagined curd as thicker. However, I saw a bit of cooked egg and immediately took it off the fire (then put it through a sieve, of course).

It was quite good because c'mon; it's full of butter. What's not to like?

I then had to make some scones for it to go on and they're like mildly sweet biscuits. I think I could do better but they are better than my first batch many moons ago which were like hockey pucks. I'm improving!


SCONES
Adapted from: Tyler Florence


2 cups all-purpose flour
1 tablespoon baking powder
1/2 teaspoon salt
2 tablespoons sugar
5 tablespoons unsalted butter, cold, cut in chunks
1 cup heavy cream, plus more for brushing the scones


Preheat the oven to 400 degrees F.

In a food processor, mix together the dry ingredients; the flour, baking powder, salt, and sugar. Cut butter into cubes and pulse into processor until mixture looks like coarse crumbs. Transfer to large bowl and make a well in the center. Pour heavy cream into well and fold everything together just to incorporate; do not overwork the dough. (Refrigerate or freeze for a few minutes to firm up butter if it has gotten warm.)

Press the dough out on a lightly floured surface into a rectangle about 12 by 3 by 1 1/4 inches. Cut the rectangle in 1/2 then cut the pieces in 1/2 again, giving you 4 (3-inch) squares. Cut the squares in 1/2 on a diagonal to give you the classic triangle shape. Place the scones on an ungreased cookie sheet and brush the tops with a little heavy cream. Bake for 15 to 20 minutes until beautiful and brown. Let the scones cool a bit before you serve.


LEMON CURD

Source: Williams-Sonoma

5 egg yolks
1/2 cup sugar
1/4 cup fresh lemon juice
Grated zest of 2 lemons
6 Tbs. (3/4 stick) unsalted butter


In a heavy saucepan, combine the egg yolks and sugar and whisk vigorously for 1 minute. Add the lemon juice and zest and whisk for 1 minute more. Set the pan over low heat and cook gently, stirring constantly, until slightly thickened, 10 to 15 minutes.

Remove the pan from the heat and stir in the butter. Let cool, stirring occasionally. Cover tightly and refrigerate before using. Makes about 1 cup.


WHIPPED CREAM

1/2 cup heavy cream, well chilled
1 tbsp confectioners' sugar
1/4 tsp vanilla extract

1. Place a mixing bowl and beaters from electric mixer in the freezer or refrigerator until well chilled, about 15 minutes.

2. Combine the heavy cream, confectioners' sugar, and vanilla extract in the mixing bowl.

3. With an electric mixer on low speed, begin beating the cream, gradually increasing the speed to high as cream thickens. (Do this slowly, or the cream will splatter.)

4. Beat until the cream forms soft peaks. Test to see if it is ready by turning off the mixer and lifting the beaters out of the cream - if the cream makes soft peaks that topple over slightly, then it's done.

Serve immediately or cover with plastic wrap and refrigerate for up to 2 hours.

Altogether, it was delish!

Friday, May 29, 2009

Lucky number 4


I think me and pound cake are done, professionally. #1, was bland and disappointing. #2, was okay but dry and nothing special. #3, I completely screwed up (under-baked in an attempt to not dry it out) AND it tasted junky. #4, was the best yet but still not Perfection In A Loaf Pan. What can I say; I seek perfection.

With four, count them, FOUR ultimate disappointments, I think I'm through with pound cake. At least for now. Maybe I'll go back to it some day. I just need to move on.

I would like to share this recipe, however, because it did come out the best of what I tried. It was from the ever-trustworthy Williams-Sonoma. It wasn't dry but not overly moist. It came out nice and soft (due to the very light and fluffy beat-the-butter phase) but not entirely a cake-like consistency. It was definitely worth making though I, personally, will probably continue on, in search of the Perfect pound cake before I make this again.
POUND CAKE
Source: Williams-Sonoma


1 1/2 cups all-purpose flour
1/4 tsp. baking soda
1/4 tsp. salt
12 Tbs. (1 1/2 sticks) unsalted butter, at room temperature
1 cup sugar
1 1/2 tsp. vanilla extract
1/4 tsp. almond extract (optional - but seriously do it)
2 eggs, at room temperature
1/2 cup sour cream, at room temperature


Preheat an oven to 325°F. Lightly grease an 8 1/2-by-4 1/2-inch loaf pan, preferably glass, and dust with flour.

In a bowl, whisk together the flour, baking soda and salt until blended. In the bowl of an electric mixer, beat together the butter, sugar, vanilla and almond extract on medium to medium-high speed until light and fluffy. Add the eggs one at a time, beating well after each addition until just blended. Sprinkle half of the flour mixture over the egg mixture and stir until both are just incorporated. Stir in the sour cream, then sprinkle with the remaining flour mixture and stir until evenly distributed.

Pour the batter into the prepared pan and tap gently on the counter to even out and settle the ingredients. Bake until a toothpick inserted into the center comes out clean, about 70 minutes, or longer if using a metal pan. Transfer the pan to a wire rack and let cool for 15 minutes.

Run a thin knife around the inside of the pan, invert the cake onto the rack and lift off the pan. Place the cake on one of its sides and continue cooling. Serve warm or at room temperature. Serves 8 to 10.

Saturday, May 16, 2009

Making candy now

So, remember that aside I made in the coconut ice cream post about every time I have coconut I start wishing there was some chocolate with it? It was more than an aside in my life. It was a CRAVING.

A normal individual might get in their car, drive to the store and purchase that which they crave: a Mounds bar. To those unacquainted, it's a chocolate covered, coconut-filled candy. And it's delish. I, however, am almost shamefully lazy and didn't want to drive to the store. So I made it.

I went with the first semi-reputable recipe I could find that got rave reviews. I had all the necessary ingredients (I love having tons of chocolate and coconut cream just sitting around my house) so I went to it.

I did run into a slight snafu when I opened the can of coconut cream and found something that appeared to be a greyish-tan sludge. I'm talking tub paste here, people. The kind your kids spoon out with that stick attached to the top of the lid. D: Needless to say, I called in for help and Mom assured me that could probably (maybe?) be okay. The label on the can said it might solidify in cooler temperatures and I am in Alaska so, okay. I set the can in a bowl of warm water and waited it out. It turned liquid in no time so all was well. Crisis averted.

The coconut mixture itself was extremely wet and sticky and impossible to shape. I wish I could've figured out another way. Another problem I encountered was coating the frozen coconut balls; my chocolate was not warm enough or maybe just not thin enough because it coated too thick. I didn't hear complaints from the people who ate them but they're just not very pretty all globbed up with chocolate...

Other than that, I got a great reaction from those who did try them! They're sweet but they definitely defeated that chocolate and coconut craving I was having!


HOMEMADE MOUNDS BARS

12 ounces flaked coconut
1 cup confectioner's sugar, sifted
1/2 can cream of coconut milk
12 ounces semi-sweet chocolate
1 tsp of vegetable shortening


Mix together coconut, confectioner's sugar and cream of coconut. Roll into 1-inch balls and chill thoroughly or freeze. Freezing is not necessary, but it helps with the chocolate coating.

Melt chocolate and vegetable shortening in double boiler (or microwave in 30 second intervals and careful not to burn) and dip frozen centers, using a wooden skewer or toothpick.

One batch makes about 60 pieces of candy.

Tuesday, May 5, 2009

Coco-crazy.


It's that time again! Summer is upon us (a whopping upper 50s in Alaska! BREAK OUT THE SANDALS AND JEAN SHORTS!). That can only mean one thing: it's finally respectable to start making ice cream again. I should disclose the following factoid: Alaska eats the most ice cream per capita in the United States. Think about that for a second because we get about 3 months of summer and the rest is 40 and below from there. I've personally worn that factoid like a badge of honor; I've TOTALLY driven through McDonald's just for an ice cream in the dead of winter.

That being said, I don't MAKE a lot of ice cream in the winter. That just seems weird. But almost overnight, the sun started coming out and even though it's 50's-ish, it's still summer to us!

As previously mentioned in the last post, I started with coconut to duplicate a recipe I saw on a beautiful Flickr picture. I browsed my ice cream cookbooks and didn't find the coconut gelato she made, but did find a Toasted Coconut Ice Cream from David Lebovitz and this is the guy who came up with the bacon ice cream so I had to trust him. He's some sort of an authority on good ice cream so I felt I was in good hands.

And, man he was right. I don't mind taking two days to make something (the cooking then overnight freeze time) if it comes out this good. The coconut flavor infused in the ice cream is delicate but distinct and stands on its own perfectly. HOWEVER, I will admit that while I'm enjoying something purely coconut, my mind always wanders to chocolate (Mounds bars!) or maybe sliced almonds (Almond Joy!).

I even added more coconut on top of the ice cream when I devoured it because double double coconut is even better!

A quick note: the recipe requested unsweetened coconut but I didn't have that so I had to use sweetened. I kept the same amount of sugar that was called for, meaning mine would have come out slightly sweeter than Lebovitz' original. So you may want to weigh your options when deciding which road to take; I thought the sweetness of mine was perfect!


TOASTED COCONUT ICE CREAM
Source: David Lebovitz

Makes about 1 quart (1 liter)


1 cup dried, shredded coconut, preferably unsweetened
1 cup whole milk
2 cups heavy cream
3/4 cup sugar
Big pinch of salt
1 vanilla bean, split in half lengthwise
5 large egg yolks
1/2 teaspoon vanilla extract, or 1 teaspoon rum


Preheat the oven to 350 F. Spread the coconut on a baking sheet and bake for 5 to 8 minutes, stirring it frequently so it toasts evenly. Remove it from the oven when it's nice and fragrant and golden brown.

In a medium saucepan, warm the milk, 1 cup of the heavy cream, sugar and salt and add the toasted coconut. Use a paring knife, and scrape all the vanilla seeds into the warm milk, then add the pod as well. Cover, remove from the heat and let steep at room temperature for 1 hour.

Rewarm the coconut-infused mixture. Set a mesh strainer over another medium saucepan and strain the coconut-infused liquid through the strainer into the saucepan. Press down on the coconut very firmly with a flexible rubber spatula to extract as much of the flavor from it as possible. Remove the vanilla bean pieces and discard the coconut.

Pour the remaining 1 cup heavy cream into a large bowl and set the mesh strainer on top. In a separate medium bowl, whisk together the egg yolks. Slowly pour the warm coconut-infused mixture into the egg yolks, whisking constantly, then scrape the warmed egg yolks back into the saucepan.

Stir the mixture constantly over medium heat with a heatproof spatula, scraping the bottom as you stir, until the mixture thickens and coats the spatula. Pour the custard through the strainer and stir in the cream. Mix in the vanilla or rum and stir until cool over an ice bath.

Chill the mixture thoroughly in the refrigerator, then freeze it in your ice cream maker according to the manufacturer's instructions.

Thursday, April 30, 2009

More Lemon!


One of my primary motivations in what I bake is seeing a picture of something and saying, 'I want to eat that with my face right now.' Such was the motivation for this recipe and/or utter replication of one woman's picture. The original, far superior, Flickr picture is here. I stumbled on it while looking through shots of pound cake because I was still determined to remedy my foul up from a few weeks ago. She identified it as Lemon Pound cake with Blueberry Sauce and Coconut Gelato. Mmmmm. Yes please.

I stuck with Rose Levy Beranbaum for the lemon pound cake. You know how you have an idea of what something SHOULD taste like, even if you've maybe never had it that way? I always thought pound cake was supposed to be moist and melt-in-your-mouth a little. I was informed that it's not like that and that it's ultimately dry. I still have a sneaking suspicion my pound cake recipe is out there somewhere...

That's not to say this was bad - not at all. The light lemon was perfect: not too tart and not overwhelming. It only calls for zest in the actual batter and then you brush a lemon syrup over the rest of it later that is also very gentle and lovely. I especially enjoy it warmed up a little but I love warm cake so. That's me.

NOW. The lemon pound cake/blueberry sauce/coconut ice cream; it gets a C+ in my book and here's why: the coconut ice cream (which I'll post about next) is so mild, it's taken over even by the light lemon of the cake. And the blueberry sauce, Ina Garten's recipe, was surprisingly disappointing. There wasn't enough blueberry flavor; it kind of just tasted like syrup with a hint of blueberry. In the end, the cake was good alone and the ice cream was good alone but together they kind of cancelled each others' flavors out.

But reconstructing that beautiful picture was fun. :)


LEMON POUND CAKE
Source: Rose Levy Beranbaum

Ingredients at room temperature


3 tablespoons milk
3 large eggs
1 1/2 teaspoons vanilla
1 1/2 cups sifted cake flour
3/4 cup sugar
3/4 teaspoon baking powder
1/4 teaspoon salt
1 tablespoon loosely packed grated lemon zest
13 tablespoons unsalted butter (must be softened)
1/4 cup + 2 tablespoons sugar
1/4 cup freshly squeezed lemon juice


Preheat the oven to 350 F. Grease and line the bottom of one 8-inch by 4-inch by 2 1/2-inch loaf pan with parchment or wax paper, and then grease again and flour.

In a medium bowl lightly combine the milk, eggs and vanilla.

In a large mixing bowl combine the dry ingredients and lemon zest and mix on low speed for 30 seconds to blend. Add the butter and half the egg mixture. Mix on low speed under the dry ingredients are moistened. Increase to medium speed (high speed if using a hand mixer) and beat for 1 minute to aerate and develop the cake's structure.

Scrape down the sides. Gradually add the remaining egg mixture in 2 batches, beating for 20 seconds after each addition to incorporate the ingredients and strengthen the structure. Scrape down the sides.

Scrape the batter into the prepared pan and smooth the surface with a spatula. The batter will be almost 1/2 inch from the top of the 4-cup loaf pan. Bake 55 to 65 minutes (35 to 45 minutes in a fluted tube pan) or under a wooden toothpick inserted in the center comes out clean.

Shortly before the cake is done, prepare the Lemon Syrup: In a small pan over medium heat, stir the sugar and lemon juice until dissolved. As soon as the cake comes out of the oven, place the pan on a rack, poke the cake all over with a wire tester (or toothpick), and brush it with 1/2 the syrup. Cool in the pan for 10 minutes. Loosen the sides with a spatula and invert onto a greased wire rack. Poke the bottom of the cake with the wire tester, brush it with some syrup, and reinvert onto a greased wire rack. Brush the sides with the remaining syrup and allow to cool before wrapping airtight. Store 24 hours before eating to give the syrup a chance to distribute evenly. The syrup will keep the cake fresh a few days longer than a cake without syrup.


BLUEBERRY SAUCE
Source: Ina Garten

1 1/2 pints fresh blueberries, rinsed
1 cup sugar
1 splash vanilla
1 tablespoon fresh lemon juice

Combine the blueberries and sugar in a large heavy saucepan. Add 1 cup water and the lemon juice and bring to a boil over high heat, stirring occasionally. Reduce the heat and simmer for 15 minutes, or until the mixture begins to thicken.

Remove from the heat and cool to room temperature, cover and refrigerate.

Sunday, April 26, 2009

The lemon madeleines of doom


You know, the idea to make lemon madeleines started innocently enough. I just wanted something easy to get me back into baking after a winter-induced hiatus. And then the debacle with the oven breaking happened but I was determined to still make them once it came back. I mean, I still had the lemons and those things go bad if you don't use them.

And the thing about madeleines which makes them great and terrible at the same time is, they don't last more than a day. I'd argue a few hours, to be honest. Because they're best when they're warm out of the oven and after a few hours, they're dry and a little stale. The second day, they're useless. I probably won't make them again unless I have someone over to enjoy them as well.

But they're quite lovely anyway. :)


LEMON MADELEINES
Source: Martha Stewart

Makes 2 dozen

3/4 cup unsalted butter (1 1/2 sticks), melted, plus more for pans
1 1/2 cups cake flour, sifted (not self-rising)
1/2 teaspoon baking powder
1/4 teaspoon coarse salt
3 large eggs
2 large egg yolks
3/4 cup granulated sugar
1 teaspoon pure vanilla extract
2 tablespoons finely grated lemon zest
2 tablespoons fresh lemon juice (2 to 3 lemons total)
Confectioners' sugar, for dusting (optional)


Preheat oven to 350 degrees. Butter (or Pam spray) two madeleine pans; set aside.

Sift flour, baking powder, and salt into a bowl; set aside.

Put eggs, egg yolks, granulated sugar, vanilla, and lemon zest and juice in the bowl of an electric mixer fitted with the paddle attachment. Mix on medium-high speed until pale and thickened, about 5 minutes. Mix in butter. Using a spatula, fold flour mixture into egg mixture. Let rest 30 minutes.

Pour batter into buttered pans, filling the molds 3/4 full. Bake cookies, rotating pans halfway through, until edges are crisp and golden, 7 to 8 minutes. Let cookies cool slightly in pans on wire racks. Invert, and unmold. Dust with confectioners' sugar, if desired. Cookies can be stored between layers of parchment in airtight containers at room temperature up to one day.

Wednesday, April 22, 2009

Fairycakes

I lived in London for a few years (I'm American) and while I was there, I have to admit - and my sincerest apologies to any Brits reading this - but I had pretty bad experiences whilst exposed to English baking. There was just something I didn't GET. From the Christmas puddings to the dense, dry cakes; I suspect I just didn't know where to find GOOD bakery because the local shop on the high street just wasn't it.

So when I started investigating these cupcakes and discovered the glaze-like icing more or less classified it as traditionally British and therefore a "fairycake", I got a little nervous. I did a little further investigation and found that "fairycakes" are kind of just what the British call cupcakes and there's no set recipe or characteristic to the cake itself. A weight was lifted. So I chose something light because, you know. Fairies. (C'mon; I was getting in the spirit!) I found a White Velvet Butter Cake recipe in Rose Levy-Beranbaum's Cake Bible and was intrigued by her endorsement as "the softest and most delicate of all butter cakes". Perfect!


Now, one characteristic that DOES seem a standard of fairycakes is baking the cake small and low enough so the runny icing can be caught by the cup sides and it makes this darling-looking cupcake. Well. I thought I filled them low enough but the damn cakes just rose and went all normal on me. Next time, I'll try half full or maybe even less than that!

I was pleasantly surprised with the cake, though. Rose wasn't lying; it's lovely and soft. AND despite it being soft, it worked; sometimes, when cupcakes are too soft, they're hard to handle or can't take the weight of even a basic buttercream or frosting. Because I was using such a light icing, the soft cake was perfect.


However, the icing didn't come out tasting as I expected. I'll chalk that up to inexperience. I used just powdered sugar and lemon juice, expecting the sugar to dull out the lemon. Yeah, that didn't happen. So instead of just being a sweet icing, it's lemon icing. But that's okay because the cake itself isn't too sweet and the two go well together (but lemony).

So, I have the powdered sugar sifted and the lemon juice waiting to put together for the icing when I realize I have no sprinkles. That was the whole point of these things - that you just sprinkle pretty sparklies on top and they sink into the thin icing while it's wet and it still looks adorable! And I have NONE. So. Plan B. I whipped out my white chocolate, melted it, added some coloring and started using toothpicks to put it in these tiny flower molds. I was surprised to see how cute they came out looking (especially since I had nothing else).

It's my birthday today so these are kind of perfect to post. Because they're pink and fun and wee!


WHITE VELVET BUTTER CAKE
Source: The Cake Bible, by Rose Levy Beranbaum

4 1/2 large egg whites
1 cup milk
2 1/4 teaspoons vanilla
3 cups sifted cake flour
1 1/2 cups sugar
1 tablespoon + 1 teaspoon baking powder
3/4 teaspoon salt
12 tablespoons unsalted butter (must be softened)


Preheat oven to 350 degrees F.

In a medium bowl lightly combine the egg whites, 1/4 cup milk and vanilla.

In a large mixing bowl combine the dry ingredients and mix on low speed for 30 seconds to blend. Add the butter and remaining 3/4 cup milk. Mix on low speed until the dry ingredients are moistened. Increase to medium speed (high speed if using a hand mixer) and beat for 1 1/2 minutes to aerate and develop the cake's structure. Scrape down the sides. Gradually add the egg mixture in 3 batches, beating for 20 seconds after each addition to incorporate the ingredients and strengthen the structure. Scrape down the sides.

Scrape the batter into the prepared pans and smooth surface with a spatula. The pans will be about 1/2 full. Bake cupcakes 15 to 18 minutes (or two 9-inch by 1 1/2-inch pans greased and bottoms lined with parchment then greased again for 25 to 35 minutes) or until a tester inserted near the center comes out clean and the cake springs back when pressed lightly in the center. (Cake will be light and will not brown even when done.) The cakes should start to shrink from the sides of the pan only after removal from the oven.

Let the cakes cool in the pans on racks for 10 minutes. For 9-inch pans, loosen the sides with a small metal spatula and invert onto greased wire racks. To prevent splitting, reinvert so that the tops are up and cool completely before wrapping airtight.


LEMON ICING
Sift powdered sugar to remove lumps. Mix with freshly squeezed lemon juice until icing is in a thick but runny enough consistency to slowly run over top of cupcakes.
Add small amount of coloring if desired.