Showing posts with label mini. Show all posts

Thursday, June 10, 2010

Pies for your hands!

If y'all don't know by now, I'm here to tell you: I LOVE STRAWBERRIES. And I have some kind of physical compulsion to buy them when they're so beautiful and fresh in the store. So I get home and have a couple containers of strawberries and say, 'Now what?'

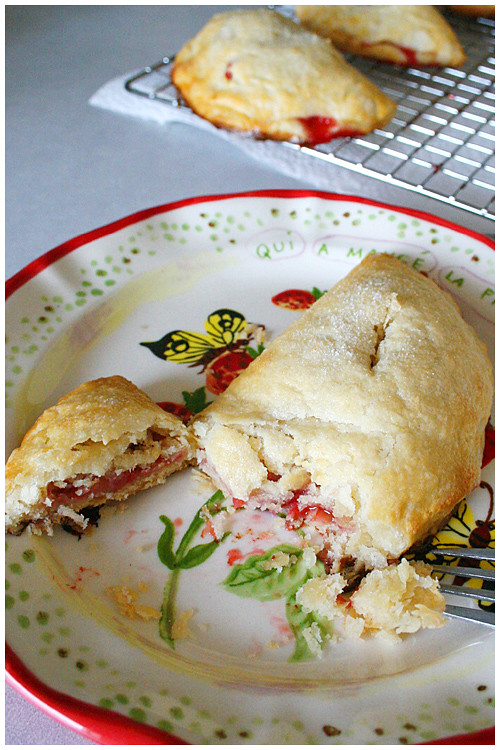
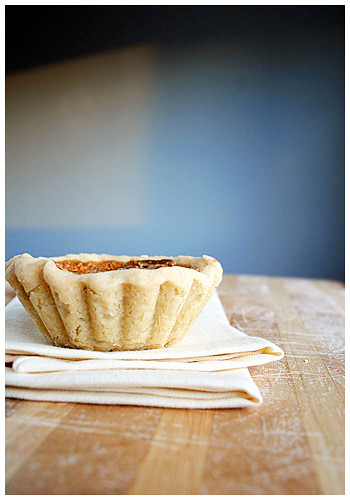
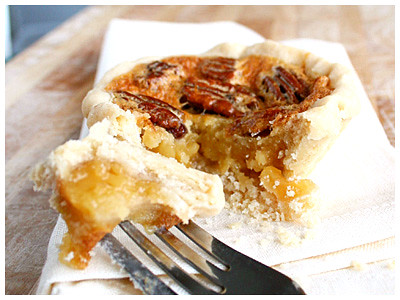
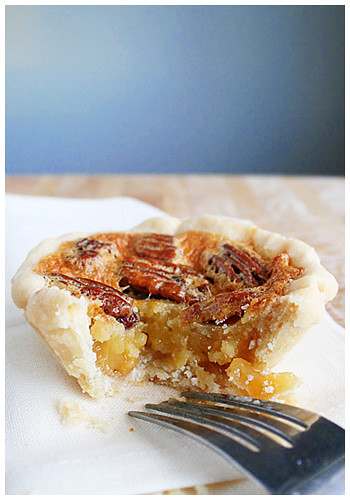
This time, the 'what' was hand pies. I'm in constant search of an awesome pie crust and I think my search may be over. I found the strawberry hand pie recipe from Good Things Catered but their dough recipe called for buttermilk which I did not have. So I found one from Epicurious and holy cow. It came out damn near perfect. Flaky and buttery! I don't even care about the filling as long as the crust is good!! To be honest, it's my favorite part of pie. Add a scoop of vanilla ice cream and it would've been perfect! I can't wait to make it in a whole sized pie and see if it comes out as good.

The recipe from Good Things Catered calls for 3 cups of strawberries and that was a little too much for the pie dough that I had. I cut that by a cup but kept the sugar content because my strawberries were actually a tad tart. I wish I would've tasted before I baked; I would have added more sugar. So TASTE YOUR BERRIES and then judge how much sweetness needs to be added. Mine needed a bit more.

But overall, this was a smashing success, mostly because I CONQUERED PIE CRUST. And they're so darn cute! Lookit the widdle hand pies!

PASTRY DOUGH
Adapted from: Epicurious (Original recipe for full pies here.)


2 1/2 cups all-purpose flour

1 1/2 sticks (3/4 cup) cold unsalted butter, cut into 1/2-inch cubes

1/4 cup cold vegetable shortening (preferably trans-fat-free)

1/2 teaspoon salt

5 to 7 tablespoons ice water


Freeze cubed butter and shortening until frozen; 15-30 minutes. Combine flour and salt in food processor to mix. Add butter and shortening and pulse until mixture resembles coarse meal with some small (roughly pea-size) butter lumps. Drizzle 5-7 tablespoons of ice water over mixture while lightly pulsing until just incorporated. Do not overwork dough, or pastry will be tough. (Personal note: I usually process until it forms a ball and this time, I decided not to. I used 6 tablespoons of water and the mixture did not pull together. Instead, it was clumpy but when I pressed with my fingers, it held. There were dots of butter visible in dough.)

Turn dough out onto a powdered sugar-dusted work surface and form together. Cut pie dough in half and form into two disks. Wrap both portions in plastic wrap and freeze. Pastry dough can be chilled up to 2 days ahead.


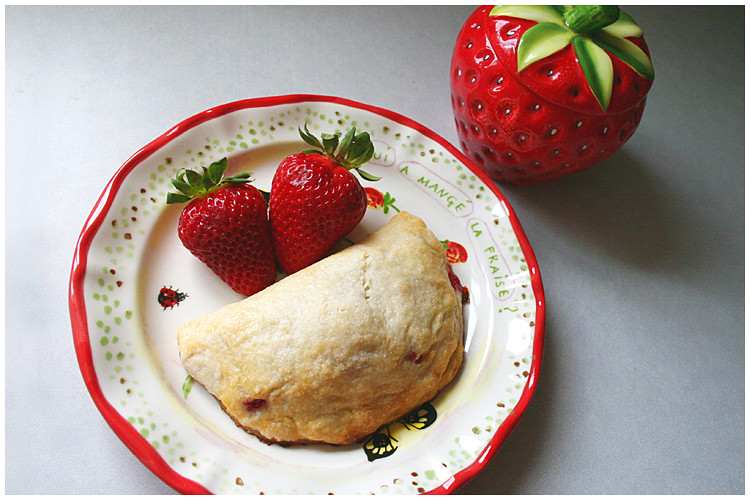
STRAWBERRY HAND PIES

2 cups fresh strawberries, hulled and quartered (or cubed; make small pieces)

2 Tbsp granulated sugar

2 tsp fresh lemon juice


2 large eggs, lightly beaten

Turbinado sugar for sprinkling


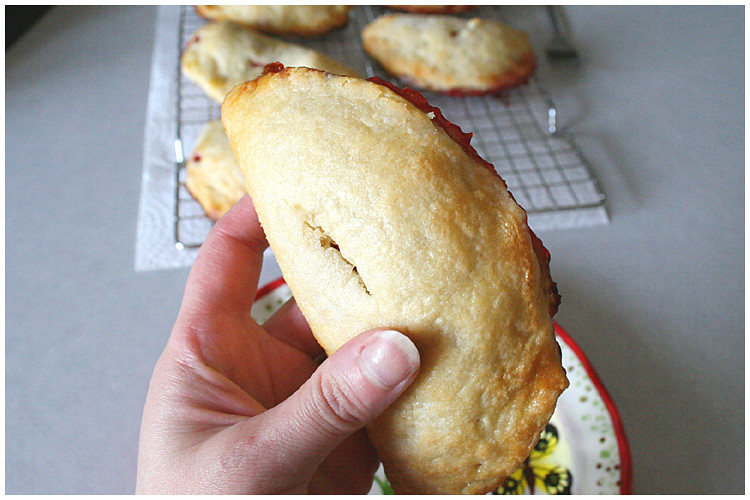
Preheat oven to 400 degrees and line baking sheets with parchment.

In medium bowl, combine strawberries, granulated sugar and lemon juice and set aside.

Let frozen pie dough disk defrost, 30 minutes to an hour. Dough should be very cold and hard to roll out. Roll onto a powered sugar-dusted work surface to about 1/8 in thickness, moving and turning over constantly to avoid sticking. Using round pastry cutter (or trace knife around small plate), cut out about 5-6 inch rounds.

Place round onto baking sheet and place about 2-3 Tbsp strawberry mixture into center.

Using pastry brush dipped in a small amount of egg, brush the edge of half of the round. Fold dry edge onto egg brushed half, forming semicircle shape, and press edges together to seal with the tines of a fork.

Brush the top of the pie with egg mixture and sprinkle with sugar. Use a small knife to make a 1 inch slit in the top of the pie for steam to escape. Repeat with remaining pastry dough.

Place in oven and bake until tops are beginning to turn golden brown, about 20 minutes. Let cool on sheets for 7-10 minutes and then transfer to wire rack to cool completely. Serve warm or at room temperature.

Sunday, February 28, 2010

February and chocolate, CHECK

AH HA. I caught you, last day of February! Take THAT, procrastination!

These are just a few mini cupcakes I made in a hurry for Valentine's. They're a box mix. I know. I bring shame on my family. HOWEVER the buttercream icing is real! It's my favorite [because it's so terrible for you]. And they were serious good. Two quick bites of delish. :)


VANILLA BUTTERCREAM ICING

1 cup Crisco Shortening
1/2 stick butter, room temperature
2 tbsps heavy whipping cream
1 tsp vanilla
4 cups powdered sugar, sifted (measure then sift)


In your mixer bowl, beat the shortening until it's smooth, add the butter and beat together until smooth and light and fluffy. Add smaller amount of the heavy cream indicated in the recipe and the vanilla and mix well.

Add half the powdered sugar and mix for 5 minutes on low-med speed. Add remaining sugar and mix well. Add more cream or powdered sugar if necessary to adjust the consistency

Add coloring as desired.


I'm making a resolution here and now: MARCH is going to be my baking month. I always tell myself I'm going to make calendar-appropriate recipes like Irish soda bread and green stuff but I never do. Well, I'm putting the pressure on myself right now. SOMETHING GREEN IS GOING TO BE HAPPENING IN MARCH. Or at least have the spirit of Irish-ness.

Saturday, October 31, 2009

Happy Halloween!

I think these are kind of perfect in every way. Cute, Halloween-y, pumpkin, bite size; the list of their attributes goes on and on! I found them posted on Facebook by a friend and was shocked to find I'd never heard of Bakerella before. Her blog is AMAZING. It's such a treat to find a baker that is both creative and imaginative in their recipes. I want to thank Bakerella for sharing such darling ideas with the world!


I took these little cuties to work for the Halloween bake sale and they went like hot cakes! I was a little sad to see them go so fast, to be honest; I would've made more if I had known two pie crusts (a top and bottom) made only 24 little pies and that they tasted so yummy. And 24 seemed like a lot until I took them in and they disappeared! Needless to say, they were well received!

This is a definite keeper recipe!!


MINI PUMPKIN PIES
Source: Bakerella

2 refrigerated ready-to roll pie crusts

8 oz. cream cheese, room temperature
1/2 cup sugar
1 cup canned pumpkin
2 eggs + 1 egg white
1 teaspoon vanilla
1 teaspoon pumpkin pie spice
Pumpkin-shaped cookie cutter

Optional
1/2 cup chocolate morsels
vegetable oil
re-sealable plastic bags

Preheat oven to 350 degrees.

Use cookie cutter to cut 12 pumpkin shapes from each pie crust. You will need to roll the dough thinner than it comes out of the box.

Press dough shapes into a 24 cup mini muffin tray. (Make 12 at a time, alternating cups to make sure pie crusts don’t overlap each other.)

Brush egg whites from one egg to the top edges of each pie. Mix cream cheese, sugar, canned pumpkin, remaining 2 eggs, vanilla and pumpkin pie spice together until thoroughly combined. Spoon mixture into each pumpkin-shaped pie crust. Bake for 12-15 minutes.

Remove pies to cool and repeat with second pie crust. Place the muffin tray in the freezer to cool it quickly for re-use.

Makes 24 pies. Keep refrigerated.


To decorate, melt chocolate in a heat-proof bowl in the microwave on medium. Heat in 30 second intervals, stirring in between until melted. Add a little vegetable oil to make the chocolate more fluid. Transfer to a re-sealable plastic bag and cut the corner off. Drizzle or draw faces on pies.


Monday, October 12, 2009

Pumpkin Goes On


My life can go on: I found pumpkin. Correction: my mom found pumpkin. The not-that-long story is, I went in search of canned pumpkin to replenish my supply for the fall after making the pumpkin brownies. The first grocery store had an empty shelf where it SHOULD have been. I thought it was weird but whatever; I’d just go to another store. A week or so later, I hit another and WHAT- another empty shelf!? I mention the strange phenom to my mom who then discovers there’s word (on the web) that there’s a pumpkin shortage this year. I freak out a little and proceed to spread the word to family and friends to fall on a can of pumpkin like it’s the end of times and it’s the last food on the planet. Hit two more stores on separate sides of town and BOTH are empty shelves. Hope fades.

Then Mom calls Sunday afternoon from Wal-Mart of all places with the news. There’s tons! Fall/Halloween has been saved! I immediately turned on my oven to preheat, ready to use the only can I had in my cupboard RIGHT AWAY.


I had a pumpkin Costco muffin a few weeks ago and it was bliss. But Costco muffins are kind of amazing, aren’t they. I’ve been wanting pumpkin muffins ever since. This recipe popped up on a few other blogs and with their ringing endorsement, I was eager to try too. The original recipe didn’t have a crumb topping like Costco’s muffin and to be honest, that’s one of my favorite parts. So I found a separate crumb topping recipe (for blueberry muffins), added a little cinnamon to it and voila! Pumpkin muffins with crumb topping.

Oh and one other thing: the blog I found the recipe on accidentally put a whole can of pumpkin in the batter when it calls for only 8 ounces (the can is 15 ounces, so, almost double). She raved that it was still good and moist so I thought, what the Hell, man; I’m craving the pumpkin and more can only make it better! They came out really delicious and moist! I did have to add some baking time (around 35-38 minutes) but still.

This made 6 large muffin cups then had a little left over that perfectly I filled a mini muffin pan. I love having little two-bite pieces of muffin around. This is definitely something I’d make again!


PUMPKIN MUFFINS WITH CRUMB TOPPING
Adapted from Gourmet/The American Club

Makes 6 large muffins / 1 dozen small muffins

1 1/2 cups all-purpose flour
1 tsp baking powder
1 can solid-pack pumpkin (15 ounces)
1/3 cup vegetable oil
2 large eggs
1 tsp pumpkin pie spice
1 1/4 cups plus 1 Tbsp sugar
1/2 tsp baking soda
1/2 tsp salt
1 tsp cinnamon

CRUMB TOPPING

1 cup all-purpose flour
3 Tbsp light brown sugar
2 Tbsp granulated sugar
1 tsp baking powder
1 tsp cinnamon
Pinch of salt
6 tablespoons unsalted butter, melted


Put oven rack in middle position and preheat oven to 350F. Put liners in muffin cups.

Whisk together flour and baking powder in a small bowl.

Whisk together pumpkin, oil, eggs, pumpkin pie spice, 1 1/4 cups sugar, baking soda, and salt in a large bowl until smooth, then whisk in flour mixture until just combined.

For crumb topping, in a medium bowl, combine the flour with the brown sugar, granulated sugar, baking powder, cinnamon and salt. Stir in the melted butter, then pinch the mixture until it forms pea-size clumps.

Divide batter among muffin cups (each should be about 3/4 full), then sprinkle tops with crumb topping mixture. Bake until puffed and golden brown and a wooden pick or skewer inserted into center of a muffin comes out clean, 30 to 35 minutes.

Cool in pan on a rack 5 minutes, then transfer muffins from pan to rack and cool to warm or room temperature.

Friday, December 5, 2008

Mini Pies!

As I mentioned in the last post, I made a chocolate pecan pie for work and didn't get to taste it. Then my mother made the same pie for Thanksgiving and I had a small piece (because there were three pies to sample!). So the week after Thanksgiving, I realized I didn't get my pecan pie fix like I shoulda. I didn't want to make a whole pie for myself. C'mon give me some credit; I do have some control. However I needed it so the solution was clearly MINI pie.

I used the same Pecan Pie recipe from the last post (without the chocolate) and simply split the filling recipe in half. I used the equivalent to one pie crust and it made five mini tart/pies. The only adjustment I had to make was to the baking time: I lowered the temperature to around 320 degrees and it ended up baking 40 minutes or so. The toothpick test will let you know when they're done!

They're perfect for one serving of your very own little pie! :)

Sunday, July 20, 2008

Cuckoo for Coco

For my birthday back in April, my best friend got me this adorable cupcake tree that I've wanted since the beginning of time. Or, uh, since I first saw it a few years ago.

She got me the one for mini cupcakes which I've, surprisingly, never made before. I know, right? I'm a cupcake maniac; you'd think I'd be all over the map with my cupcake adventures. I've also never made (or eaten) coconut cake. So, naturally, I went to my reliable Ina. They were good, of course, but I find Ina's cakes sometimes to be a little more dense than I'd like. I'm not looking for a chiffon-type texture but something a little lighter. I'll definitely try another recipe later to compare the two. Maybe my perfect cake is a pipe dream...

But these were absolutely worth making. They were a hit with my taste testers! :)


COCONUT CUPCAKES
Source: Ina Garten (cupcakes) and Williams-Sonoma (icing)

For the Cupcakes:

3/4 pound unsalted butter at room temperature (3 sticks)
2 cups sugar
5 extra-large eggs at room temperature
1 1/2 teaspoons pure vanilla extract
1 1/2 teaspoons pure almond extract
3 cups all-purpose flour
1 teaspoon baking powder
1/2 teaspoon baking soda
1/2 teaspoon salt
1 cup buttermilk
14 oz. sweetened, shredding coconut


For the vanilla frosting:

12 Tbs. (1 1/2 sticks) unsalted butter, at room temperature
3 1/4 cups confectioners' sugar
2 tablespoons heavy cream
2 teaspoons vanilla extract
1/4 teaspoon salt
2 cups sweetened, shredded coconut


Preheat oven to 325 degrees.

In the bowl of an electric mixer fitted with the paddle attachment, cream the butter and sugar for 5 minutes – until light and fluffy. With the mixer running on low, add the eggs one at a time, scraping down the sides of the bowl after each addition. Add the vanilla and almond extracts and mix well.

In a separate bowl, sift together the flour, baking powder, baking soda, and salt. In three parts, alternately add the ingredients and the buttermilk to the batter, beginning and ending with the dry. Mix until just combined. Fold in 7 ounces of coconut.

Lin a muffin pan with paper liners. Fill each cup to the top with batter. Bake for 20 to 35 minutes, until the tops are brown and a toothpick comes out clean. Allow to cool in the pan for 15 minutes. Remove to a baking rack and cool completely.

While cupcakes are cooling, make the icing. In the bowl of an electric mixer fitted with the paddle attachment, beat together the butter, confectioners' sugar, cream, vanilla and salt on low speed until smooth, about 3 minutes. Pour the 2 cups coconut into a shallow bowl.

Using an icing spatula, frost the top of each cupcake, mounding the icing in the center. Holding the bottom of each cupcake, roll the frosted top in the coconut.


Tuesday, June 24, 2008

Tarts, tarts and more tarts


There's little that's more disappointing than failure. Especially when you pour time and effort into something that results in a complete waste of both. This is what happened with my first attempt at mini tarts.

My first mistake, probably, was believing I could splice a couple recipes together without having adequate knowledge of the procedure in the first place. Without specific instructions on how thick to roll the dough, I did it TOO thick. The mini crusts weren't weighed down with beans or pie weights and they came out thick, pale and barely cooked. The custard was a disaster: cooked too long and turning into a glob of rubbery goo. If ever there was a time to describe a baking attempt as a TOTAL failure, this was it.

And yet, as a perfectionist, I can't leave something done wrong. It has to be right. So, in classic cliché form (yes, I DID say to myself, "If at first you don't succeed..."), I tossed the failure in the garbage and started again with a new recipe and some determination. I'd learned a few things so maybe screwing up is necessary every now and then. I made the crust thinner, weighed it down (as the hasn't-failed-me-yet Ina instructed), baked it until I felt it was done. I was WAY more cautious with the custard, took it off the heat the moment it came together enough for me and added the last bit of butter and vanilla while still in the pan. It was so good, I was licking the spoon. And the bowl. ...and the pan a little after it cooled.


In the end, I guess my comically bad first attempt was a good learning experience because it made this success all the more satisfying. It felt much more like an accomplishment than it otherwise would have.

Oh and they taste really good. :)


MINI BERRY TARTS
Adapted from Ina Garten

Tart Shells:
1 1/4 cups all-purpose flour
3 tablespoons sugar
1/2 teaspoon kosher salt
6 tablespoons (3/4 stick) cold unsalted butter, diced
2 tablespoons cold shortening (recommended: Crisco)
1/4 cup ice water


Pastry Cream:
5 extra-large egg yolks, room temperature
3/4 cup sugar
3 tablespoons cornstarch
1 1/2 cups scalded milk
1/2 teaspoon pure vanilla extract
1 tablespoon unsalted butter
1 tablespoon heavy cream

1–2 cups mixed berries (strawberries, blueberries, blackberries, raspberries)
1/3 cup apricot jelly


Combine the flour, sugar, and salt in a small bowl and place in the freezer for 30 minutes. Put the flour mixture in the bowl of a food processor fitted with a steel blade. Add the butter and shortening and pulse about 10 times, or until the butter is in the size of peas. Add the ice water and process until the dough comes together. Dump on a well-floured board and form into a disk. Wrap in plastic and chill for at least 30 minutes.

Meanwhile, preheat the oven to 375 degrees F.

Roll out the dough to roughly 1/4-inch thick and use round cutters (or small bowls) to cut shapes to fit into 5 (3-inch) tart pans (or your preferred size mini tins). Don't stretch the dough when placing it in the pans or it will shrink during baking. Cut off the excess by rolling the pin across the top of each pan. Line the tart shells with a piece of buttered aluminum foil, butter side down, and fill them with dried beans or rice. Bake for 10 minutes. Remove the beans and foil, prick the bottom of the shells all over with a fork, and bake for another 15 to 20 minutes until lightly browned. Set aside to cool.


In the bowl of an electric mixer fitted with the paddle attachment, beat the egg yolks and sugar on medium-high speed for 4 minutes, or until very thick. Reduce to low speed, and add the cornstarch.

With the mixer still on low, slowly pour the hot milk into the egg mixture. Pour the mixture into a medium saucepan and cook over low heat, stirring constantly with a wooden spoon, until the mixture thickens, 5 to 7 minutes. Don't be alarmed when the custard comes to a boil and appears to curdle; switch to a whisk and beat vigorously. Cook, whisking constantly, for another 2 minutes; the custard will come together and become very thick, like pudding. Stir in the vanilla, Cognac, butter, and heavy cream. Pour the custard through a sieve into a bowl. Place plastic wrap directly on the custard and refrigerate until cold.

Before serving, fill the tart shells with the pastry cream. Arrange the berries decoratively on top of the cream. Melt the apricot jelly with 1 teaspoon of water and brush the top of the tarts.