skip to main |
skip to sidebar
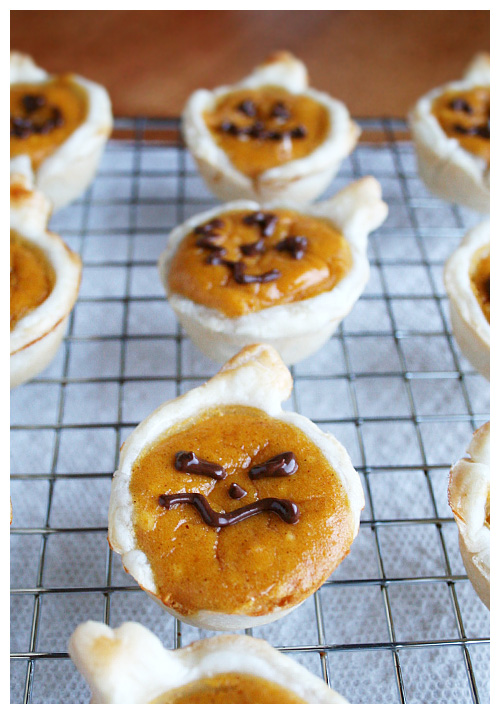
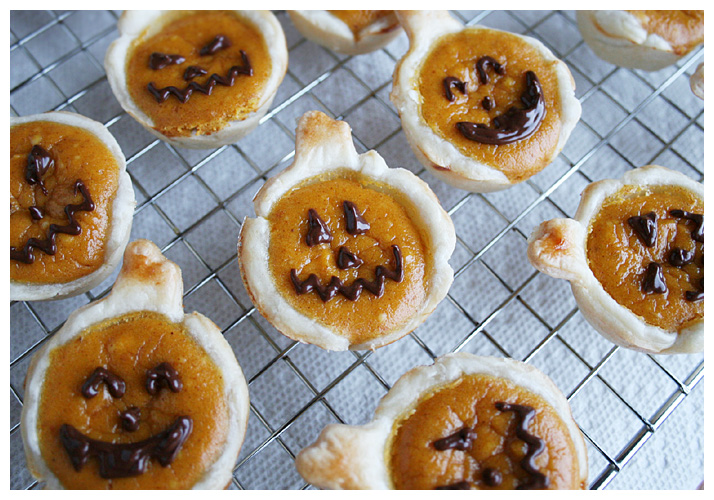
 I think these are kind of perfect in every way. Cute, Halloween-y, pumpkin, bite size; the list of their attributes goes on and on! I found them posted on Facebook by a friend and was shocked to find I'd never heard of Bakerella before. Her blog is AMAZING. It's such a treat to find a baker that is both creative and imaginative in their recipes. I want to thank Bakerella for sharing such darling ideas with the world!

I took these little cuties to work for the Halloween bake sale and they went like hot cakes! I was a little sad to see them go so fast, to be honest; I would've made more if I had known two pie crusts (a top and bottom) made only 24 little pies and that they tasted so yummy. And 24 seemed like a lot until I took them in and they disappeared! Needless to say, they were well received!
This is a definite keeper recipe!!


MINI PUMPKIN PIES
Source: Bakerella
2 refrigerated ready-to roll pie crusts
8 oz. cream cheese, room temperature
1/2 cup sugar
1 cup canned pumpkin
2 eggs + 1 egg white
1 teaspoon vanilla
1 teaspoon pumpkin pie spice
Pumpkin-shaped cookie cutter
Optional
1/2 cup chocolate morsels
vegetable oil
re-sealable plastic bags
Preheat oven to 350 degrees.
Use cookie cutter to cut 12 pumpkin shapes from each pie crust. You will need to roll the dough thinner than it comes out of the box.
Press dough shapes into a 24 cup mini muffin tray. (Make 12 at a time, alternating cups to make sure pie crusts don’t overlap each other.)
Brush egg whites from one egg to the top edges of each pie. Mix cream cheese, sugar, canned pumpkin, remaining 2 eggs, vanilla and pumpkin pie spice together until thoroughly combined. Spoon mixture into each pumpkin-shaped pie crust. Bake for 12-15 minutes.
Remove pies to cool and repeat with second pie crust. Place the muffin tray in the freezer to cool it quickly for re-use.
Makes 24 pies. Keep refrigerated.
To decorate, melt chocolate in a heat-proof bowl in the microwave on medium. Heat in 30 second intervals, stirring in between until melted. Add a little vegetable oil to make the chocolate more fluid. Transfer to a re-sealable plastic bag and cut the corner off. Drizzle or draw faces on pies.


Halloween is, by far, my favorite holiday. I'm not sure why because I've never been big on costumes or being scared at haunted houses or even trick-or-treating. But I guess it's fall and cute/spooky treats and decorations. Pumpkins were sent from Jesus as the greatest food stuff known to man. This is not a pumpkin entry; that's coming up next.
THIS is a Halloween cake entry because I seem to have those every other year. My best friend has a fall baby on the way (due late November) and she loves Halloween just as much and so decided the baby shower would be a perfect opportunity to have the best of both worlds. Hallo-baby party-shower! I'd seen these petits fours on Martha Stewart last year and almost died of the cute. I HAD to make them. But the holiday rolled around and went and I missed the chance. When this shower came up, I knew it would be the perfect occasion.
The thing about this blog I think I've found most fulfilling is the ability to go through a recipe, experience the process, and then post my reactions, good and bad, and try to help others not make the same mistakes. Or, in this case, say flat out: I will not make this recipe again. Don't get me wrong; another baker might look at it and decide it'll be worth the trouble. I can only say that from my standpoint, it's not.
I devised a few shortcuts from the word go that I thought would help me out. I'd bake the cake and freeze it so a hard (and not pillowy soft) cake would cut through easier when using the small biscuit round cutter. Yeah, no. Turns out, the cold cake stuck to the metal cutter and subsequently couldn't cut the third and fourth rounds neatly at all. There was much cleaning, cutting, cleaning, cutting.

I then saw that the pan made the cake too tall for the stumpy little ghosts. I had to go through and cut all the tops off the cylinders although this did provide me with a fun little sampler disk of cake. Mmm.

And that's another thing: this recipe WASTES so much cake. There's just something in me that cringes at having leftover bits with nothing to do with. I froze the trimmings and have yet to decide their fate.

So I piped the little cones of buttercream on top and froze that as well. There's always an issue of exposed cake drying out so I had to do a quick freeze for the frosting to set up then went back and lightly covered a hollow cake pan with plastic wrap so only the tops were touching. Froze them again so I could glaze the day of the shower.
Now. The glaze. Perhaps a more experienced petits-fours-making-person would've thinned it out further but there were two issues: #1. I didn't know if a thinner glaze would set up or if it would remain too liquid, and #2. Would a thinner glaze show the imperfections of the cake/frosting instead of being a smooth, ghosty outside? I don't know the answer to either still because I was too chicken to try thinning the glaze. As it is, it's kind of thick and VERY sweet. The ghosts came out okay but not great. The witch hats, however, were a small disaster. The chocolate "glaze" is nothing more than a ganache that completely smothers the tiny round of delicate cake. With the buttercream cone on top of that, you've got a giant helping of chocolate and frosting and not much else. I wanted to throw them away but, again, felt uneasy wasting food. They were an unadulterated failure, though.
One last thing: the chocolate piping. I wish I'd read Bakerella's notes on piping chocolate for faces in which she instructs to add a little vegetable oil to make the substance more fluid because MARTHA sure didn't. So, thanks to Martha Stewart, the chocolate was too thick, hard to manage and came out looking junky. Bakerella's, on the other hand, came out looking great (that's the pumpkin coming up next). Thanks for nothing, Martha!
The guests at the party were extremely nice and said they really liked the little ghosts but I was disappointed. I will absolutely never make these again but I'm glad I went through the experience and could pass it on to you guys. Attempt at your own risk!

GHOULISH PETITS FOURS
Martha Stewart
For witch hats, make petits fours through step two. Then create a brim using a dab of icing: Affix each petit four to a 2-to-2 1/2-inch chocolate wafer cookie. Proceed to step three, coating with Chocolate Glaze instead of Butter Glaze. In lieu of step four, wrap one or two pieces of licorice lace around the base of the hat immediately after glazing.
Makes about 40
White Sheet Cake
Confectioners' Sugar Icing
Butter Glaze
4 ounces semisweet chocolate, for eyes and mouth
Using a 1 1/2-inch cookie cutter, cut out circles from cake. Brush off any crumbs with a pastry brush.
Fit a pastry bag with a plastic coupler, and top cake rounds with icing in a ghost or hat shape, about 1 inch high.
Place a wire rack over a rimmed baking sheet; set aside. Set an iced cake round on a fork; hold over bowl of glaze. Using a large spoon, drizzle glaze evenly over cake and icing until completely covered. Transfer to wire rack. Repeat with remaining rounds. Let set, about 5 minutes.
Place chocolate in a heatproof bowl microwave at 50% power, stirring chocolate every 30 seconds until melted. Add small amount of vegetable oil to make more fluid. Transfer to a disposable pastry bag or resealable plastic bag; snip off tip with scissors. Pipe eyes and a mouth onto ghosts.
WHITE SHEET CAKE
Makes one 12-by-17-inch cake
1 cup (2 sticks) plus 2 tablespoons unsalted butter, room temperature, plus more for baking sheet and wire rack
4 1/2 cups sifted cake flour (not self-rising), plus more for baking sheet
2 tablespoons baking powder
3/4 teaspoon salt
1 1/2 cups milk
1 1/2 tablespoons pure vanilla extract
2 1/4 cups sugar
7 large egg whites
Preheat oven to 350 degrees. Butter a 12-by-17-by-1-inch rimmed baking sheet. Line bottom with parchment paper. Butter parchment, and dust with flour, tapping off any excess. Set sheet aside.
Into a medium bowl, sift together flour, baking powder, and salt; set aside. In a measuring cup, combine milk and vanilla; set aside. In the bowl of an electric mixer fitted with the paddle attachment, cream butter until very smooth. With mixer on medium speed, add sugar in a slow, steady stream; beat until mixture is light and fluffy, about 3 minutes.
Reduce speed to low. Add reserved flour mixture in three batches, alternating with reserved milk mixture, and starting and ending with flour. Mix until just combined; do not overmix. Set aside.
In a clean bowl, beat egg whites until stiff but do not let dry peaks form. Fold one-third of the egg whites into batter to lighten, then gently fold in remaining whites in two batches.
Scrape batter into prepared sheet; smooth top with an offset spatula. Bake in oven until cake is springy to the touch and a cake tester inserted in the center comes out clean, about 30 minutes. Transfer to a wire rack, and let cool 15 minutes. Loosen sides of cake with a small metal spatula or paring knife; invert onto a buttered wire rack. Peel off parchment. To prevent splitting, reinvert cake so top is facing up. Let cake cool completely.
CONFECTIONERS' SUGAR ICING
(I would HALVE this; it made WAY too much)
Makes about 7 cups
1 1/2 cups unsalted butter (3 sticks), room temperature
3 pounds confectioners' sugar
3/4 teaspoon salt
3 tablespoons pure vanilla extract
3/4 cup milk, plus more if needed
In the bowl of an electric mixer fitted with the paddle attachment, beat together the butter and sugar until well combined. Add salt, vanilla, and milk; beat until icing is smooth and creamy. The icing should be thick enough to pipe and hold its shape. If icing seems too thick, add 1 tablespoon milk at a time until proper consistency is reached. Use immediately, or refrigerate in an airtight container up to 2 days. If refrigerating, bring icing to room temperature before using, and lightly beat until creamy if necessary.
BUTTER GLAZE
Makes about 1 1/2 cups
2 1/2 cups sifted confectioners' sugar
1/2 cup (1 stick) unsalted butter
5 tablespoons milk
Place sugar in a medium bowl, and set aside. In a small saucepan, melt butter over medium heat. Immediately pour the melted butter into the bowl with the sugar. Add the milk, and whisk until mixture is smooth. Cover bowl, and store at room temperature until ready to use.
CHOCOLATE GLAZE (for witch hats)
Makes 1 1/2 cups
6 ounces best-quality bittersweet or semisweet chocolate
1 cup heavy cream
Chop the chocolate into small pieces, and place in a medium bowl. In a small saucepan, heat cream over medium-high heat until just simmering, and pour it over the chocolate. Let mixture stand 5 minutes, then stir until smooth. Let stand at room temperature about 10 minutes before using.


My life can go on: I found pumpkin. Correction: my mom found pumpkin. The not-that-long story is, I went in search of canned pumpkin to replenish my supply for the fall after making the pumpkin brownies. The first grocery store had an empty shelf where it SHOULD have been. I thought it was weird but whatever; I’d just go to another store. A week or so later, I hit another and WHAT- another empty shelf!? I mention the strange phenom to my mom who then discovers there’s word (on the web) that there’s a pumpkin shortage this year. I freak out a little and proceed to spread the word to family and friends to fall on a can of pumpkin like it’s the end of times and it’s the last food on the planet. Hit two more stores on separate sides of town and BOTH are empty shelves. Hope fades.
Then Mom calls Sunday afternoon from Wal-Mart of all places with the news. There’s tons! Fall/Halloween has been saved! I immediately turned on my oven to preheat, ready to use the only can I had in my cupboard RIGHT AWAY.

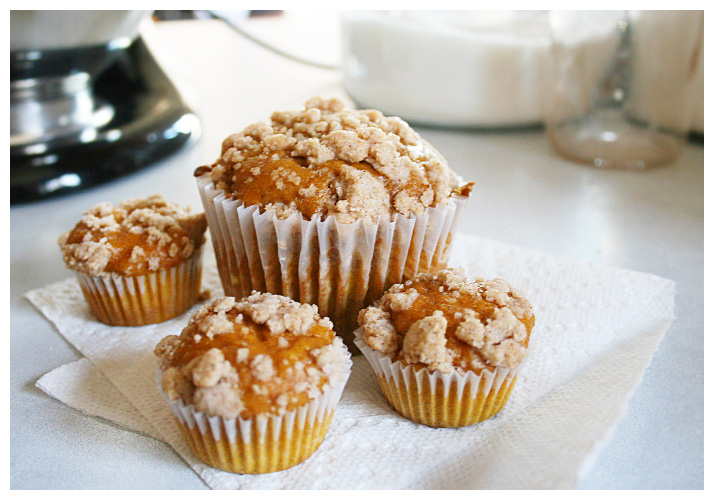
I had a pumpkin Costco muffin a few weeks ago and it was bliss. But Costco muffins are kind of amazing, aren’t they. I’ve been wanting pumpkin muffins ever since. This recipe popped up on a few other blogs and with their ringing endorsement, I was eager to try too. The original recipe didn’t have a crumb topping like Costco’s muffin and to be honest, that’s one of my favorite parts. So I found a separate crumb topping recipe (for blueberry muffins), added a little cinnamon to it and voila! Pumpkin muffins with crumb topping.
Oh and one other thing: the blog I found the recipe on accidentally put a whole can of pumpkin in the batter when it calls for only 8 ounces (the can is 15 ounces, so, almost double). She raved that it was still good and moist so I thought, what the Hell, man; I’m craving the pumpkin and more can only make it better! They came out really delicious and moist! I did have to add some baking time (around 35-38 minutes) but still.
This made 6 large muffin cups then had a little left over that perfectly I filled a mini muffin pan. I love having little two-bite pieces of muffin around. This is definitely something I’d make again!

PUMPKIN MUFFINS WITH CRUMB TOPPING
Adapted from Gourmet/The American Club
Makes 6 large muffins / 1 dozen small muffins
1 1/2 cups all-purpose flour
1 tsp baking powder
1 can solid-pack pumpkin (15 ounces)
1/3 cup vegetable oil
2 large eggs
1 tsp pumpkin pie spice
1 1/4 cups plus 1 Tbsp sugar
1/2 tsp baking soda
1/2 tsp salt
1 tsp cinnamon
CRUMB TOPPING
1 cup all-purpose flour
3 Tbsp light brown sugar
2 Tbsp granulated sugar
1 tsp baking powder
1 tsp cinnamon
Pinch of salt
6 tablespoons unsalted butter, melted
Put oven rack in middle position and preheat oven to 350F. Put liners in muffin cups.
Whisk together flour and baking powder in a small bowl.
Whisk together pumpkin, oil, eggs, pumpkin pie spice, 1 1/4 cups sugar, baking soda, and salt in a large bowl until smooth, then whisk in flour mixture until just combined.
For crumb topping, in a medium bowl, combine the flour with the brown sugar, granulated sugar, baking powder, cinnamon and salt. Stir in the melted butter, then pinch the mixture until it forms pea-size clumps.
Divide batter among muffin cups (each should be about 3/4 full), then sprinkle tops with crumb topping mixture. Bake until puffed and golden brown and a wooden pick or skewer inserted into center of a muffin comes out clean, 30 to 35 minutes.
Cool in pan on a rack 5 minutes, then transfer muffins from pan to rack and cool to warm or room temperature.

 I think these are kind of perfect in every way. Cute, Halloween-y, pumpkin, bite size; the list of their attributes goes on and on! I found them posted on Facebook by a friend and was shocked to find I'd never heard of Bakerella before. Her blog is AMAZING. It's such a treat to find a baker that is both creative and imaginative in their recipes. I want to thank Bakerella for sharing such darling ideas with the world!


