skip to main |
skip to sidebar
 I think about half of my baking comes from having ingredients I need to use or lose. Okay, maybe a quarter. This is one such recipe.
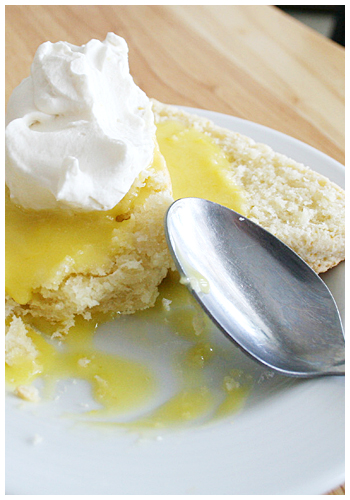
I STILL had lemons sitting around that I just couldn't ignore for another weekend but knew absolutely what I DIDN'T want to make from them (cake/cupcakes or sorbet/ice cream). That left me with a tart (which I've done before) or curd. Making the tart shells seemed like too much effort so I settled on curd.
It's relatively easy to make in the same way custard is; you cook it VERY slowly over low heat so the eggs don't curdle. I was actually considering cooking longer (even though I went the recommended time) because I imagined curd as thicker. However, I saw a bit of cooked egg and immediately took it off the fire (then put it through a sieve, of course).
It was quite good because c'mon; it's full of butter. What's not to like?
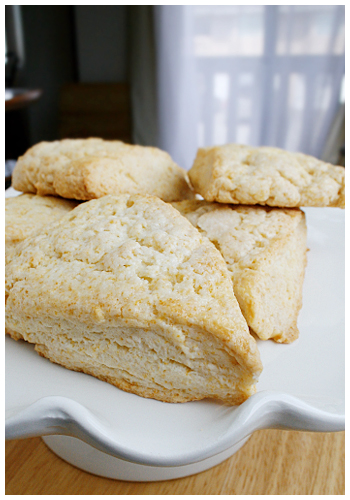
I then had to make some scones for it to go on and they're like mildly sweet biscuits. I think I could do better but they are better than my first batch many moons ago which were like hockey pucks. I'm improving!

SCONES
Adapted from: Tyler Florence
2 cups all-purpose flour
1 tablespoon baking powder
1/2 teaspoon salt
2 tablespoons sugar
5 tablespoons unsalted butter, cold, cut in chunks
1 cup heavy cream, plus more for brushing the scones
Preheat the oven to 400 degrees F.
In a food processor, mix together the dry ingredients; the flour, baking powder, salt, and sugar. Cut butter into cubes and pulse into processor until mixture looks like coarse crumbs. Transfer to large bowl and make a well in the center. Pour heavy cream into well and fold everything together just to incorporate; do not overwork the dough. (Refrigerate or freeze for a few minutes to firm up butter if it has gotten warm.)
Press the dough out on a lightly floured surface into a rectangle about 12 by 3 by 1 1/4 inches. Cut the rectangle in 1/2 then cut the pieces in 1/2 again, giving you 4 (3-inch) squares. Cut the squares in 1/2 on a diagonal to give you the classic triangle shape. Place the scones on an ungreased cookie sheet and brush the tops with a little heavy cream. Bake for 15 to 20 minutes until beautiful and brown. Let the scones cool a bit before you serve.
LEMON CURD
Source: Williams-Sonoma
5 egg yolks
1/2 cup sugar
1/4 cup fresh lemon juice
Grated zest of 2 lemons
6 Tbs. (3/4 stick) unsalted butter
In a heavy saucepan, combine the egg yolks and sugar and whisk vigorously for 1 minute. Add the lemon juice and zest and whisk for 1 minute more. Set the pan over low heat and cook gently, stirring constantly, until slightly thickened, 10 to 15 minutes.
Remove the pan from the heat and stir in the butter. Let cool, stirring occasionally. Cover tightly and refrigerate before using. Makes about 1 cup.
WHIPPED CREAM
1/2 cup heavy cream, well chilled
1 tbsp confectioners' sugar
1/4 tsp vanilla extract
1. Place a mixing bowl and beaters from electric mixer in the freezer or refrigerator until well chilled, about 15 minutes.
2. Combine the heavy cream, confectioners' sugar, and vanilla extract in the mixing bowl.
3. With an electric mixer on low speed, begin beating the cream, gradually increasing the speed to high as cream thickens. (Do this slowly, or the cream will splatter.)
4. Beat until the cream forms soft peaks. Test to see if it is ready by turning off the mixer and lifting the beaters out of the cream - if the cream makes soft peaks that topple over slightly, then it's done.
Serve immediately or cover with plastic wrap and refrigerate for up to 2 hours.
 Altogether, it was delish!
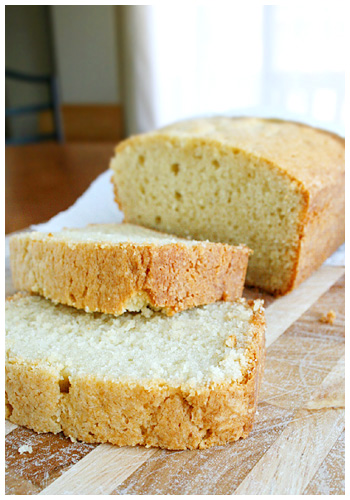
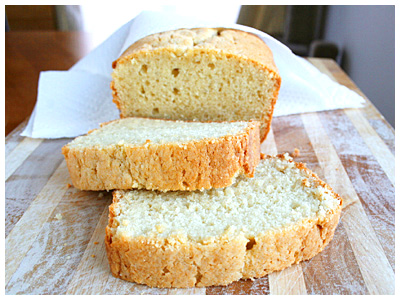
I think me and pound cake are done, professionally. #1, was bland and disappointing. #2, was okay but dry and nothing special. #3, I completely screwed up (under-baked in an attempt to not dry it out) AND it tasted junky. #4, was the best yet but still not Perfection In A Loaf Pan. What can I say; I seek perfection.
With four, count them, FOUR ultimate disappointments, I think I'm through with pound cake. At least for now. Maybe I'll go back to it some day. I just need to move on.
I would like to share this recipe, however, because it did come out the best of what I tried. It was from the ever-trustworthy Williams-Sonoma. It wasn't dry but not overly moist. It came out nice and soft (due to the very light and fluffy beat-the-butter phase) but not entirely a cake-like consistency. It was definitely worth making though I, personally, will probably continue on, in search of the Perfect pound cake before I make this again.
 POUND CAKE
Source: Williams-Sonoma
1 1/2 cups all-purpose flour
1/4 tsp. baking soda
1/4 tsp. salt
12 Tbs. (1 1/2 sticks) unsalted butter, at room temperature
1 cup sugar
1 1/2 tsp. vanilla extract
1/4 tsp. almond extract (optional - but seriously do it)
2 eggs, at room temperature
1/2 cup sour cream, at room temperature
Preheat an oven to 325°F. Lightly grease an 8 1/2-by-4 1/2-inch loaf pan, preferably glass, and dust with flour.
In a bowl, whisk together the flour, baking soda and salt until blended. In the bowl of an electric mixer, beat together the butter, sugar, vanilla and almond extract on medium to medium-high speed until light and fluffy. Add the eggs one at a time, beating well after each addition until just blended. Sprinkle half of the flour mixture over the egg mixture and stir until both are just incorporated. Stir in the sour cream, then sprinkle with the remaining flour mixture and stir until evenly distributed.
Pour the batter into the prepared pan and tap gently on the counter to even out and settle the ingredients. Bake until a toothpick inserted into the center comes out clean, about 70 minutes, or longer if using a metal pan. Transfer the pan to a wire rack and let cool for 15 minutes.
Run a thin knife around the inside of the pan, invert the cake onto the rack and lift off the pan. Place the cake on one of its sides and continue cooling. Serve warm or at room temperature. Serves 8 to 10.
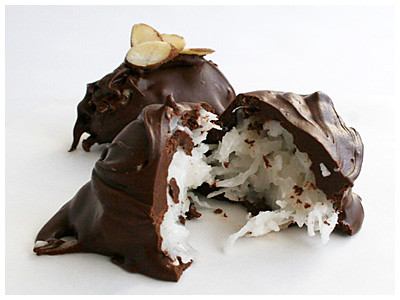
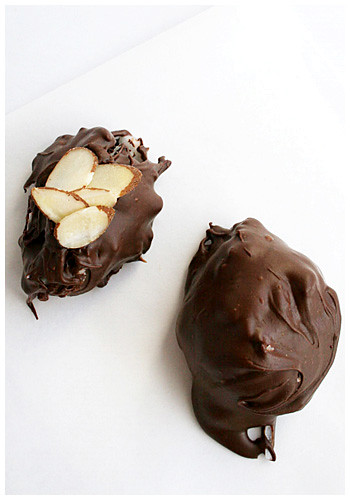
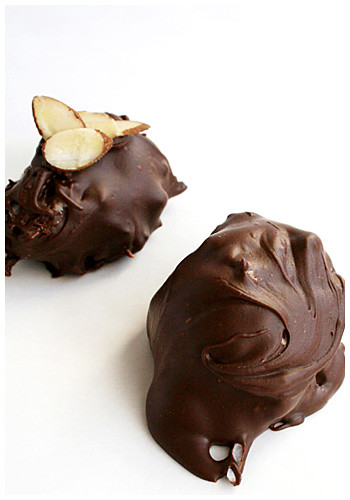 So, remember that aside I made in the coconut ice cream post about every time I have coconut I start wishing there was some chocolate with it? It was more than an aside in my life. It was a CRAVING.
A normal individual might get in their car, drive to the store and purchase that which they crave: a Mounds bar. To those unacquainted, it's a chocolate covered, coconut-filled candy. And it's delish. I, however, am almost shamefully lazy and didn't want to drive to the store. So I made it.
I went with the first semi-reputable recipe I could find that got rave reviews. I had all the necessary ingredients (I love having tons of chocolate and coconut cream just sitting around my house) so I went to it.
I did run into a slight snafu when I opened the can of coconut cream and found something that appeared to be a greyish-tan sludge. I'm talking tub paste here, people. The kind your kids spoon out with that stick attached to the top of the lid. D: Needless to say, I called in for help and Mom assured me that could probably (maybe?) be okay. The label on the can said it might solidify in cooler temperatures and I am in Alaska so, okay. I set the can in a bowl of warm water and waited it out. It turned liquid in no time so all was well. Crisis averted.
The coconut mixture itself was extremely wet and sticky and impossible to shape. I wish I could've figured out another way. Another problem I encountered was coating the frozen coconut balls; my chocolate was not warm enough or maybe just not thin enough because it coated too thick. I didn't hear complaints from the people who ate them but they're just not very pretty all globbed up with chocolate...
Other than that, I got a great reaction from those who did try them! They're sweet but they definitely defeated that chocolate and coconut craving I was having!
 HOMEMADE MOUNDS BARS
12 ounces flaked coconut
1 cup confectioner's sugar, sifted
1/2 can cream of coconut milk
12 ounces semi-sweet chocolate
1 tsp of vegetable shortening
Mix together coconut, confectioner's sugar and cream of coconut. Roll into 1-inch balls and chill thoroughly or freeze. Freezing is not necessary, but it helps with the chocolate coating.
Melt chocolate and vegetable shortening in double boiler (or microwave in 30 second intervals and careful not to burn) and dip frozen centers, using a wooden skewer or toothpick.
One batch makes about 60 pieces of candy.
 It's that time again! Summer is upon us (a whopping upper 50s in Alaska! BREAK OUT THE SANDALS AND JEAN SHORTS!). That can only mean one thing: it's finally respectable to start making ice cream again. I should disclose the following factoid: Alaska eats the most ice cream per capita in the United States. Think about that for a second because we get about 3 months of summer and the rest is 40 and below from there. I've personally worn that factoid like a badge of honor; I've TOTALLY driven through McDonald's just for an ice cream in the dead of winter.
That being said, I don't MAKE a lot of ice cream in the winter. That just seems weird. But almost overnight, the sun started coming out and even though it's 50's-ish, it's still summer to us!
As previously mentioned in the last post, I started with coconut to duplicate a recipe I saw on a beautiful Flickr picture. I browsed my ice cream cookbooks and didn't find the coconut gelato she made, but did find a Toasted Coconut Ice Cream from David Lebovitz and this is the guy who came up with the bacon ice cream so I had to trust him. He's some sort of an authority on good ice cream so I felt I was in good hands.
And, man he was right. I don't mind taking two days to make something (the cooking then overnight freeze time) if it comes out this good. The coconut flavor infused in the ice cream is delicate but distinct and stands on its own perfectly. HOWEVER, I will admit that while I'm enjoying something purely coconut, my mind always wanders to chocolate (Mounds bars!) or maybe sliced almonds (Almond Joy!).
I even added more coconut on top of the ice cream when I devoured it because double double coconut is even better!
A quick note: the recipe requested unsweetened coconut but I didn't have that so I had to use sweetened. I kept the same amount of sugar that was called for, meaning mine would have come out slightly sweeter than Lebovitz' original. So you may want to weigh your options when deciding which road to take; I thought the sweetness of mine was perfect!
 TOASTED COCONUT ICE CREAM
Source: David Lebovitz
Makes about 1 quart (1 liter)
1 cup dried, shredded coconut, preferably unsweetened
1 cup whole milk
2 cups heavy cream
3/4 cup sugar
Big pinch of salt
1 vanilla bean, split in half lengthwise
5 large egg yolks
1/2 teaspoon vanilla extract, or 1 teaspoon rum
Preheat the oven to 350 F. Spread the coconut on a baking sheet and bake for 5 to 8 minutes, stirring it frequently so it toasts evenly. Remove it from the oven when it's nice and fragrant and golden brown.
In a medium saucepan, warm the milk, 1 cup of the heavy cream, sugar and salt and add the toasted coconut. Use a paring knife, and scrape all the vanilla seeds into the warm milk, then add the pod as well. Cover, remove from the heat and let steep at room temperature for 1 hour.
Rewarm the coconut-infused mixture. Set a mesh strainer over another medium saucepan and strain the coconut-infused liquid through the strainer into the saucepan. Press down on the coconut very firmly with a flexible rubber spatula to extract as much of the flavor from it as possible. Remove the vanilla bean pieces and discard the coconut.
Pour the remaining 1 cup heavy cream into a large bowl and set the mesh strainer on top. In a separate medium bowl, whisk together the egg yolks. Slowly pour the warm coconut-infused mixture into the egg yolks, whisking constantly, then scrape the warmed egg yolks back into the saucepan.
Stir the mixture constantly over medium heat with a heatproof spatula, scraping the bottom as you stir, until the mixture thickens and coats the spatula. Pour the custard through the strainer and stir in the cream. Mix in the vanilla or rum and stir until cool over an ice bath.
Chill the mixture thoroughly in the refrigerator, then freeze it in your ice cream maker according to the manufacturer's instructions.
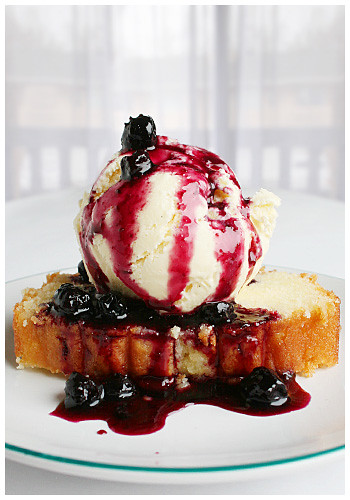 One of my primary motivations in what I bake is seeing a picture of something and saying, 'I want to eat that with my face right now.' Such was the motivation for this recipe and/or utter replication of one woman's picture. The original, far superior, Flickr picture is here. I stumbled on it while looking through shots of pound cake because I was still determined to remedy my foul up from a few weeks ago. She identified it as Lemon Pound cake with Blueberry Sauce and Coconut Gelato. Mmmmm. Yes please.
I stuck with Rose Levy Beranbaum for the lemon pound cake. You know how you have an idea of what something SHOULD taste like, even if you've maybe never had it that way? I always thought pound cake was supposed to be moist and melt-in-your-mouth a little. I was informed that it's not like that and that it's ultimately dry. I still have a sneaking suspicion my pound cake recipe is out there somewhere...
That's not to say this was bad - not at all. The light lemon was perfect: not too tart and not overwhelming. It only calls for zest in the actual batter and then you brush a lemon syrup over the rest of it later that is also very gentle and lovely. I especially enjoy it warmed up a little but I love warm cake so. That's me.
NOW. The lemon pound cake/blueberry sauce/coconut ice cream; it gets a C+ in my book and here's why: the coconut ice cream (which I'll post about next) is so mild, it's taken over even by the light lemon of the cake. And the blueberry sauce, Ina Garten's recipe, was surprisingly disappointing. There wasn't enough blueberry flavor; it kind of just tasted like syrup with a hint of blueberry. In the end, the cake was good alone and the ice cream was good alone but together they kind of cancelled each others' flavors out.
But reconstructing that beautiful picture was fun. :)
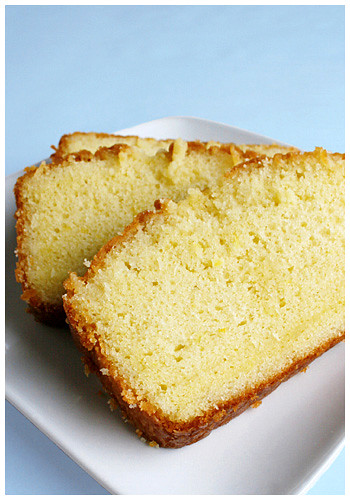 LEMON POUND CAKE
Source: Rose Levy Beranbaum
Ingredients at room temperature
3 tablespoons milk
3 large eggs
1 1/2 teaspoons vanilla
1 1/2 cups sifted cake flour
3/4 cup sugar
3/4 teaspoon baking powder
1/4 teaspoon salt
1 tablespoon loosely packed grated lemon zest
13 tablespoons unsalted butter (must be softened)
1/4 cup + 2 tablespoons sugar
1/4 cup freshly squeezed lemon juice
Preheat the oven to 350 F. Grease and line the bottom of one 8-inch by 4-inch by 2 1/2-inch loaf pan with parchment or wax paper, and then grease again and flour.
In a medium bowl lightly combine the milk, eggs and vanilla.
In a large mixing bowl combine the dry ingredients and lemon zest and mix on low speed for 30 seconds to blend. Add the butter and half the egg mixture. Mix on low speed under the dry ingredients are moistened. Increase to medium speed (high speed if using a hand mixer) and beat for 1 minute to aerate and develop the cake's structure.
Scrape down the sides. Gradually add the remaining egg mixture in 2 batches, beating for 20 seconds after each addition to incorporate the ingredients and strengthen the structure. Scrape down the sides.
Scrape the batter into the prepared pan and smooth the surface with a spatula. The batter will be almost 1/2 inch from the top of the 4-cup loaf pan. Bake 55 to 65 minutes (35 to 45 minutes in a fluted tube pan) or under a wooden toothpick inserted in the center comes out clean.
Shortly before the cake is done, prepare the Lemon Syrup: In a small pan over medium heat, stir the sugar and lemon juice until dissolved. As soon as the cake comes out of the oven, place the pan on a rack, poke the cake all over with a wire tester (or toothpick), and brush it with 1/2 the syrup. Cool in the pan for 10 minutes. Loosen the sides with a spatula and invert onto a greased wire rack. Poke the bottom of the cake with the wire tester, brush it with some syrup, and reinvert onto a greased wire rack. Brush the sides with the remaining syrup and allow to cool before wrapping airtight. Store 24 hours before eating to give the syrup a chance to distribute evenly. The syrup will keep the cake fresh a few days longer than a cake without syrup.
BLUEBERRY SAUCE
Source: Ina Garten
1 1/2 pints fresh blueberries, rinsed
1 cup sugar
1 splash vanilla
1 tablespoon fresh lemon juice
Combine the blueberries and sugar in a large heavy saucepan. Add 1 cup water and the lemon juice and bring to a boil over high heat, stirring occasionally. Reduce the heat and simmer for 15 minutes, or until the mixture begins to thicken.
Remove from the heat and cool to room temperature, cover and refrigerate.

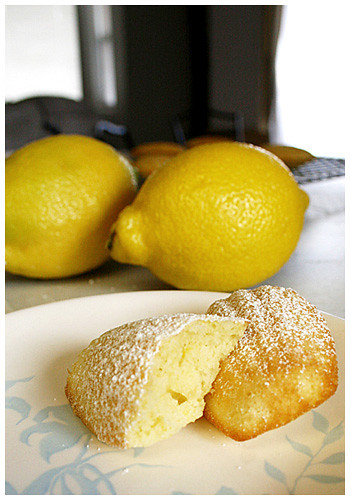
You know, the idea to make lemon madeleines started innocently enough. I just wanted something easy to get me back into baking after a winter-induced hiatus. And then the debacle with the oven breaking happened but I was determined to still make them once it came back. I mean, I still had the lemons and those things go bad if you don't use them.
 And the thing about madeleines which makes them great and terrible at the same time is, they don't last more than a day. I'd argue a few hours, to be honest. Because they're best when they're warm out of the oven and after a few hours, they're dry and a little stale. The second day, they're useless. I probably won't make them again unless I have someone over to enjoy them as well.
But they're quite lovely anyway. :)

LEMON MADELEINES
Source: Martha Stewart
Makes 2 dozen
3/4 cup unsalted butter (1 1/2 sticks), melted, plus more for pans
1 1/2 cups cake flour, sifted (not self-rising)
1/2 teaspoon baking powder
1/4 teaspoon coarse salt
3 large eggs
2 large egg yolks
3/4 cup granulated sugar
1 teaspoon pure vanilla extract
2 tablespoons finely grated lemon zest
2 tablespoons fresh lemon juice (2 to 3 lemons total)
Confectioners' sugar, for dusting (optional)
Preheat oven to 350 degrees. Butter (or Pam spray) two madeleine pans; set aside.
Sift flour, baking powder, and salt into a bowl; set aside.
Put eggs, egg yolks, granulated sugar, vanilla, and lemon zest and juice in the bowl of an electric mixer fitted with the paddle attachment. Mix on medium-high speed until pale and thickened, about 5 minutes. Mix in butter. Using a spatula, fold flour mixture into egg mixture. Let rest 30 minutes.
Pour batter into buttered pans, filling the molds 3/4 full. Bake cookies, rotating pans halfway through, until edges are crisp and golden, 7 to 8 minutes. Let cookies cool slightly in pans on wire racks. Invert, and unmold. Dust with confectioners' sugar, if desired. Cookies can be stored between layers of parchment in airtight containers at room temperature up to one day.
 I lived in London for a few years (I'm American) and while I was there, I have to admit - and my sincerest apologies to any Brits reading this - but I had pretty bad experiences whilst exposed to English baking. There was just something I didn't GET. From the Christmas puddings to the dense, dry cakes; I suspect I just didn't know where to find GOOD bakery because the local shop on the high street just wasn't it.
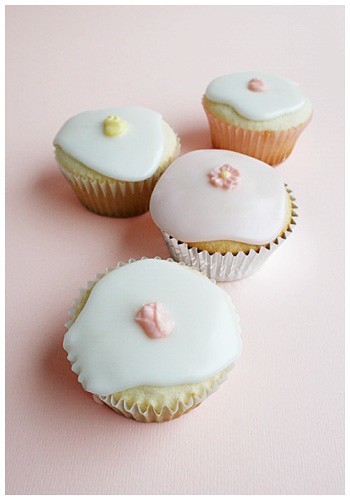
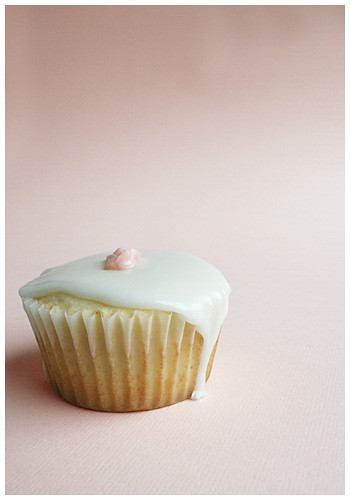
So when I started investigating these cupcakes and discovered the glaze-like icing more or less classified it as traditionally British and therefore a "fairycake", I got a little nervous. I did a little further investigation and found that "fairycakes" are kind of just what the British call cupcakes and there's no set recipe or characteristic to the cake itself. A weight was lifted. So I chose something light because, you know. Fairies. (C'mon; I was getting in the spirit!) I found a White Velvet Butter Cake recipe in Rose Levy-Beranbaum's Cake Bible and was intrigued by her endorsement as "the softest and most delicate of all butter cakes". Perfect!

Now, one characteristic that DOES seem a standard of fairycakes is baking the cake small and low enough so the runny icing can be caught by the cup sides and it makes this darling-looking cupcake. Well. I thought I filled them low enough but the damn cakes just rose and went all normal on me. Next time, I'll try half full or maybe even less than that!
I was pleasantly surprised with the cake, though. Rose wasn't lying; it's lovely and soft. AND despite it being soft, it worked; sometimes, when cupcakes are too soft, they're hard to handle or can't take the weight of even a basic buttercream or frosting. Because I was using such a light icing, the soft cake was perfect.

However, the icing didn't come out tasting as I expected. I'll chalk that up to inexperience. I used just powdered sugar and lemon juice, expecting the sugar to dull out the lemon. Yeah, that didn't happen. So instead of just being a sweet icing, it's lemon icing. But that's okay because the cake itself isn't too sweet and the two go well together (but lemony).
So, I have the powdered sugar sifted and the lemon juice waiting to put together for the icing when I realize I have no sprinkles. That was the whole point of these things - that you just sprinkle pretty sparklies on top and they sink into the thin icing while it's wet and it still looks adorable! And I have NONE. So. Plan B. I whipped out my white chocolate, melted it, added some coloring and started using toothpicks to put it in these tiny flower molds. I was surprised to see how cute they came out looking (especially since I had nothing else).
It's my birthday today so these are kind of perfect to post. Because they're pink and fun and wee!
WHITE VELVET BUTTER CAKE
Source: The Cake Bible, by Rose Levy Beranbaum
4 1/2 large egg whites
1 cup milk
2 1/4 teaspoons vanilla
3 cups sifted cake flour
1 1/2 cups sugar
1 tablespoon + 1 teaspoon baking powder
3/4 teaspoon salt
12 tablespoons unsalted butter (must be softened)
Preheat oven to 350 degrees F.
In a medium bowl lightly combine the egg whites, 1/4 cup milk and vanilla.
In a large mixing bowl combine the dry ingredients and mix on low speed for 30 seconds to blend. Add the butter and remaining 3/4 cup milk. Mix on low speed until the dry ingredients are moistened. Increase to medium speed (high speed if using a hand mixer) and beat for 1 1/2 minutes to aerate and develop the cake's structure. Scrape down the sides. Gradually add the egg mixture in 3 batches, beating for 20 seconds after each addition to incorporate the ingredients and strengthen the structure. Scrape down the sides.
Scrape the batter into the prepared pans and smooth surface with a spatula. The pans will be about 1/2 full. Bake cupcakes 15 to 18 minutes (or two 9-inch by 1 1/2-inch pans greased and bottoms lined with parchment then greased again for 25 to 35 minutes) or until a tester inserted near the center comes out clean and the cake springs back when pressed lightly in the center. (Cake will be light and will not brown even when done.) The cakes should start to shrink from the sides of the pan only after removal from the oven.
Let the cakes cool in the pans on racks for 10 minutes. For 9-inch pans, loosen the sides with a small metal spatula and invert onto greased wire racks. To prevent splitting, reinvert so that the tops are up and cool completely before wrapping airtight.
LEMON ICING
Sift powdered sugar to remove lumps. Mix with freshly squeezed lemon juice until icing is in a thick but runny enough consistency to slowly run over top of cupcakes. Add small amount of coloring if desired.

 After my last disappointing baking venture, I took a week or so off then decided to try something new. I settled on something easy but good, fresh for spring and pretty: lemon madeleines. I got everything set up, turned on the oven to preheat, mixed all the dry ingredients, had the eggs broke in a bowl and at room temperature. I'm just about to mix the wet and dry ingredients together when I notice the oven has never beeped that it's preheated. Curiously, I open the door and see that it's dead cold. :-O WUT.
Long story short, two weeks later a new (expensive) part is shipped in and the repair guy restores old [not-so] faithful! IT'S BACK. And I've been DYING to bake for the past two weeks like crazy. Well, tomorrow's the day!!
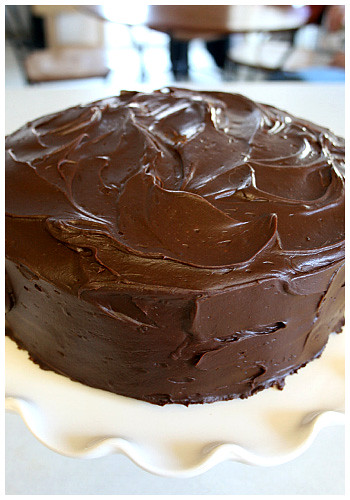
But before all this happened (the day before, to be exact), I got my mom's birthday cake baked. She wanted something chocolatey and I remembered this cake from last year as rather intense. What I DIDN'T remember was that it calls for deeper pans than I had because it expands a lot. Thankfully, I remembered before the pans went into the oven (I made a mini 6" cake with the extra batter). So. Beware, if you make this. It makes a lot of cake. But moist and yummy! Good the next few days too!
 I am embarrassed, of course, at my lack of updating. But trust in the fact that it's not that I've been baking up a storm and just neglecting my blog; I haven't been baking ANYTHING. It's all the XBox's fault; I got one for Christmas and never got off of it.
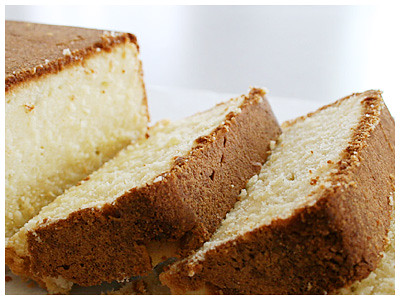 I finally found the motivation to bake something and had to scrounge up what I had in the house. That ended up being the most basic of basics: vanilla pound cake. It needed something extra, though, and I immediately thought of berry compote (because I had frozen mixed berries).I grabbed a high rated recipe from All Recipes and you know what? I'm kind of starting to get irritated with All Recipes. Or, at least, the people reviewing on it. I made this highly rated recipe and it is utterly mediocre. I mean, to have that many stars, you'd think it'd be mouth wateringly AWESOME. But it's just not. It's bland and absolutely NEEDS the compote or other accompaniment. I always thought of a good pound cake as one so buttery and delish, it melts in your mouth a little. Because of all the butter. Delicious butter... But this one doesn't.The berry compote, however, I got from Williams-Sonoma and it IS good. I think I'm going to stick to legit sources from now on... I won't be making this pound cake again but the compote is a keeper. I used a bag of frozen mixed berries that included raspberries, blueberries and marrionberries.Together, they're good, but maybe that's because you're mostly just tasting the compote...
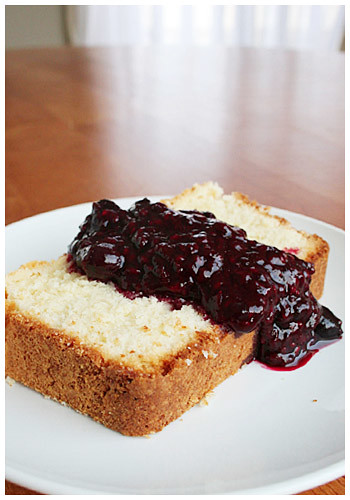 Cream Cheese Pound Cake IIISource: All Recipes, Submitted by: Nanci1 (8 ounce) package cream cheese1 1/2 cups butter3 cups white sugar6 eggs3 cups all-purpose flour1 teaspoon vanilla extract1. Preheat oven to 325 degrees F (160 degrees C) grease and flour a 10 inch tube pan.2. In a large bowl, cream butter and cream cheese until smooth. Add sugar gradually and beat until fluffy.3. Add eggs two at a time, beating well with each addition. Add the flour all at once and mix in. Add vanilla.4. Pour into a 10 inch tube pan. Bake at 325 degrees F (160 degrees C) for 1 hour and 20 minutes. Check for doneness at 1 hour. A toothpick inserted into center of cake will come out clean.
 Berry CompoteSource: Williams-Sonoma6 cups mixed berries5 Tbs sugar2 tsp lemon juiceIn a saucepan over medium heat, stir together the berries, 2 Tbs. of the sugar and the lemon juice. Bring to a simmer and cook, stirring occasionally, until most of the berries have broken down and the mixture is thickened, about 30 minutes; reduce the heat if the compote sticks to the pan. Remove from the heat and let the compote cool to room temperature.
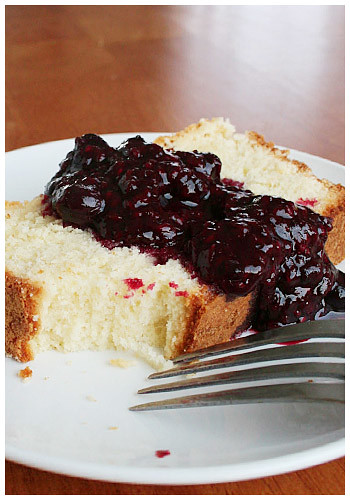
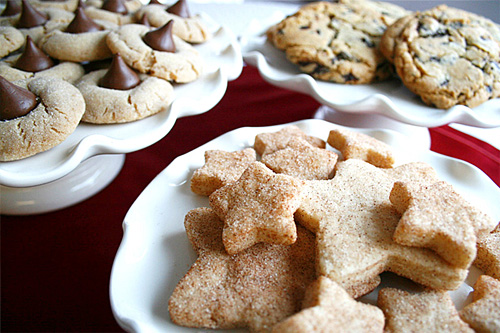 A few weeks ago, I made about 12 dozen cookies to give away to family and friends for the holidays. I made sugar (a bust), peanut butter blossoms, magic cookie bars, chocolate chip cookies and biscochitos. I sent packages of a variety of these goodies to friends and that was the most fun. My friends were pleasantly surprised to receive a box of cookies out of no where which makes me all kinds of giddy!
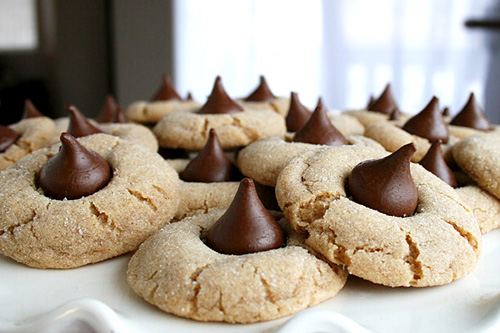 Peanut butter blossoms are a tradition every Christmas and I used this same awesome recipe for the chocolate chip cookies. This is the first year I made the biscochitos, though, which are a Mexican (or Spanish, if you want to go that far back) cookie that we always get at the Mexican bakeries in Houston. I had a few recipes but the first I tried called for lard. Now, I've never SEEN lard, I've never SMELLED lard and I've certainly never COOKED with lard before. It was definitely different. I actually kind of thought it smelled like turkey. Weird, I know. But I made the cookies which vaguely smelled (like turkey, to me) and I just couldn't give them away. I made another batch with Crisco and they were SO MUCH better. My mom said, after comparing the two, that the lard cookie tasted richer. I agree but mostly because the Crisco cookie might've been lighter because it didn't have that heavy turkey taste. (I kid! But seriously; that mess is OFF.)
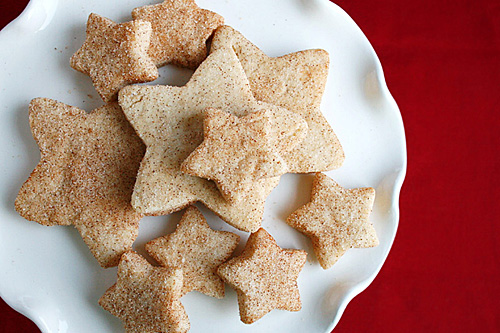
So I sent out the Crisco biscochitos to my friends in the shapes of Christmasy stars! Because my first attempt at sugar cookies was a bust, I had a second go at them. (See further down.)
It's funny but I made all those cookies and because I planned to give so many away, I really only ate one or two from each batch. I had to save the rest for others! So I made another pan of Magic Cookie Bars that stayed home for family. They're kind of my favorite bar-thing on the planet so. I gots to have some for meeeee.
 BISCOCHITOS
1 cup vegetable shortening
2/3 cup sugar
1 egg
2 to 4 Tablespoons red wine, brandy or sherry
1 to 1 1/2 teaspoons crushed/ground anise seed
3 cups flour
2 teaspoons baking powder, optional
1/2 teaspoon salt, optional
Cinnamon Sugar:
1/4 cup sugar
1 tablespoon ground cinnamon
Preheat oven to 350°.
Beat lard with an electric mixer until light and fluffy. Slowly beat in the sugar, then the egg. Beat in 2 Tablespoons of the wine and the anise seed. Toss the flour together with the baking powder and salt, if using. Gently stir in, adding more wine as needed to form a soft dough. Let stand for 10 minutes or cover with plastic wrap and refrigerate for 15 minutes.
On a lightly floured surface, roll out 1/4-inch thick and cut into shapes as desired. Dip the top side of each cookie in the cinnamon-sugar and place on ungreased cookie sheets, about 1 inch apart.
Bake for 10 to 15 minutes, depending upon size, just until the edges turn a pale blond. Let cool a few minutes then remove to a wire rack to cool. Store in a cookie jar or airtight container.
THEN I committed myself to making sugar cookies and it came down to Christmas Eve but I did them. Next year I'll prepare better and do them right but these came out cute. :)